

Virtual machines are a godsend when it comes to malware analysis. Granted there a many malware samples that may have capabilities to detect if they are operating in a virtualized environment and thus respond differently. Many, though not all of these, can be mitigated by patching the malware binary, or tricking it into a false result before needing to look at the sample on a bare-metal system.
When I’m looking at a piece of malware, I’ll run it through a number of environments, gradually permitting external access once I have an idea of what the malware’s capabilities look like. Initially when detonating samples, I’ll have the target endpoint and a REMnux virtual machine running inetsim operating on an isolated network. Rather than re-invent the wheel, here’s a solid article on setting up an isolated network on VMware ESXi.
At some point I want to enable access to the internet to observe command and control (C2) and any dropper activity. I don’t want there to be an avenue for the malware to be able to interact with any other assets whether on my lab network, or outside it. One way to solve this would be networking and introducing a router to broker the network access. It’s been a while since I had my CCNA and I had some hesitations about getting it right without impacting other services in a very internet dependent household. What I wound up going with instead is a completely separate internet connection for the malware network utilizing a LTE hot-spot.
I run my lab environment on ESXi environment using an Intel NUC. The model I have only has one onboard NIC. The easiest way to add another physical adapter was with a USB Gigabit Ethernet adapter for a measly $13 on amazon. ESXi will not detect this adapter out of the box. Follow the process on this article to configure the USB network adapter for ESXi. You will need to download the USB Network Native Driver for ESXi. Be sure to select the appropriate version to match the version of ESXi you’re running. I’m sure there’s an interesting story on why VMWare calls these ‘Flings’ but that knowledge escapes me.
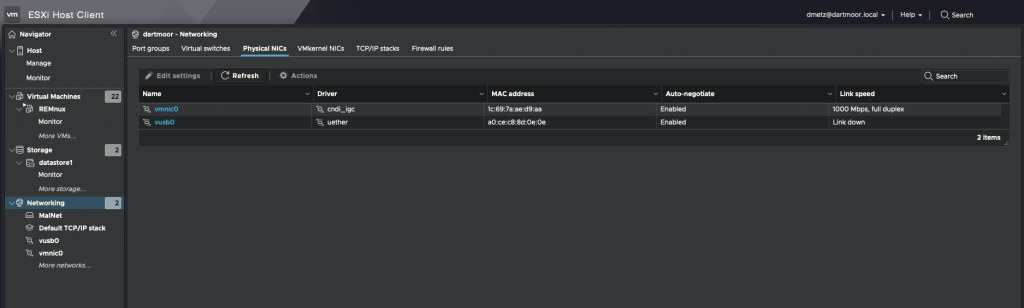
If all goes as it should, and doesn’t it always, you should see second physical adapter (vusb0) in the ESXi console.
For the secondary internet access, I wound up going with a Netgear LM1200 LTE Hotspot. I like this device because you can configure it to use an LTE connection as a backup if your primary wired internet service is down. I may utilize that in the future but for now it’s only used on the malware network without any connection to the primary LAN. Based on my current cellular plan I was able to add the minimum hotspot plan for $10/mo. A worthy investment for me for the peace of mind that I’m (less likely) to compromise the rest of my network when experimenting with live malware. It will also (one would hope) keep my home IP off any watchlists for malware beacons, or anyone else tracking where different samples are detonated from. As Mr. Heller sagely said, “Just because you’re paranoid doesn’t mean they aren’t after you.”
The same setup could be very useful for responding to compromises in isolated enterprise or manufacturing environments. If you need to have the device access the internet (maybe to upload evidence to you Forensics Service Provider (FSP)), but don’t want to maintain a connection to the corporate LAN due to suspected compromise, this solution would work for that.
Once I had the hotspot up and running, the LAN connection on the hotpot gets connected to the USB ethernet adapter. Then go back to ESXi to the isolated network you created before, the one that you were warned “NO UPLINK”, and use the ‘Add uplink’ function and add the vusb0 device. You can adjust the settings on the LTE hotspot for DHCP if needed as long as the device is in Router (not Bridged) mode.

That’s it. Now when the infected computer needs to get to the internet, all traffic will go through the LTE connection and the infected systems remain isolated from the primary network.

If I’m in a situation where I absolutely need to run the malware on a bare-metal system I can connect using the LTE modem without threat to any of the other physical systems.


