The Next Evolution: MalChela on Windows

With the v4.5 release, MalChela now runs natively on Windows. Previously, Windows users were limited to running it under WSL. The PWA interface was reachable from Windows, so driving the GUI was easy enough, but everything underneath still lived in Linux. If you’re a native Windows user, you can now skip WSL entirely and get the same toolset, CLI and web interface, that runs on macOS and Linux.
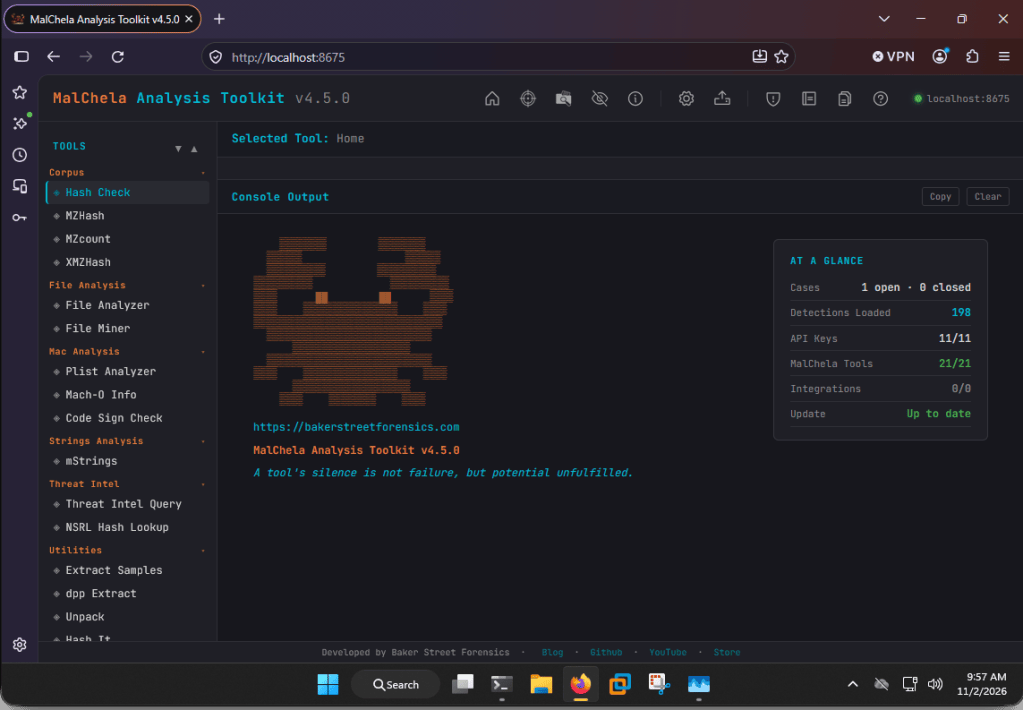
MalChela v4.5 running natively on Windows

Getting started on Windows

You’ll need Rust with the MSVC toolchain (rustup will prompt you for the Visual Studio C++ build tools), Git, and Python 3 for the web interface. From the MalChela folder in PowerShell or cmd, run .\release.ps1 (or release.cmd) to build, then server\start_server.cmd to launch the PWA. The first run sets up the Python environment for you, and no server config file is needed to get going. Full details are in the native Windows install guide. WSL2 still works if you prefer a Linux environment.

Goodbye YARA, hello yara-x

The biggest hurdle to running natively on Windows was how MalChela was originally built: it required compiling YARA from source. We’ve been moving away from YARA to yara-x, VirusTotal’s rewrite of YARA in Rust, and with this release that migration is complete. yara-x is compiled in as a Rust crate, so there’s no system YARA library to install and no environment variables to point the build at, on any platform. Much of that groundwork came from Daniel Iwugo (@elementmerc), whose PRs built out and hardened the yara-x backend and moved File Analyzer onto it.

If you’re upgrading from v4.3 or earlier, the old YARA, OpenSSL, and GTK packages are no longer used by the build. You can leave them installed, and drop the YARA_LIBRARY_PATH and BINDGEN_EXTRA_CLANG_ARGS exports from your shell profile. One heads-up if you maintain your own rulesets: yara-x is highly compatible with YARA, but not 100%. Some legacy syntax that YARA tolerated will throw errors under yara-x, so it’s worth test-compiling your custom rules after upgrading.

TIQuery updates

Thanks to a PR from Jonas Lejon (@jonaslejon), TIQuery has a new URL source: ScanMalware. It checks ScanMalware’s public scan archive without ever submitting a new scan, and only the host name leaves your machine; the full URL is matched locally, so tokens or email addresses in a phishing link’s query string stay with you.

That addition also led to a rework of how keyless sources (those that don’t require an API key) are handled. Sources that send your lookups to a third party, currently urlscan.io and ScanMalware, are now off until you opt in, so you stay in complete control of your OPSEC and what gets submitted where. Your choice is saved and shared across the CLI, the web interface, and the Claude plugin.

New in v4.5, TIQuery can also download samples from Triage (tria.ge), alongside the existing MalwareBazaar integration. If MalwareBazaar doesn’t have the sample, TIQuery falls back to Triage, verifies the SHA256 against the hash you requested, and wraps it in the usual password-protected zip before anything touches disk. Check out the online documentation for details.

Thank you

In my less-than-humble opinion, MalChela has come a long way since the early days of 2025, but it wouldn’t be where it is without feedback and contributions from the community. A very big thank you to Daniel, Jonas, and everyone who’s participated! If you run into anything on Windows, or have ideas for what’s next, issues and PRs are always welcome on GitHub.
2025 Year in Review: Open Source DFIR Tools and Malware Analysis Projects

As 2025 draws to a close, I’m taking a moment to reflect on what turned out to be one of my most productive years in code. From major releases to entirely new projects, this year saw significant evolution across my DFIR toolkit—driven by real-world incident response needs, classroom teaching experiences, and late-night tinkering sessions fueled by good bourbon and better puzzles.

What started as continuing work on CyberPipe evolved into a year of substantial innovation: creating MalChela for YARA and malware analysis, building a portable Raspberry Pi forensics platform, developing automated timeline generation workflows, and crafting specialized utilities that solve specific problems I encountered in the field. Each tool represents not just lines of code, but practical solutions to challenges that digital forensics and incident response professionals face daily.

Whether you’re a seasoned forensic analyst, an incident responder building your toolkit, or a student just getting started in DFIR, my hope is that these open-source projects make your work a little easier and a lot more efficient. All tools remain freely available on GitHub, because I believe the best way to advance our field is to share knowledge and capabilities openly.

Here’s what kept me busy in 2025:

MalChela – YARA & Malware Analysis Toolkit (Rust)

My flagship project that evolved significantly throughout 2025:

  • March: Initial release – Combined 10 programs into one Rust workspace for YARA and malware analysis
  • May: v2.1 – Added smoother workflows, better third-party tool integration, and enhanced argument handling
  • May: v2.2 “REMnux Release” – Native support for REMnux, integrations with Volatility3, Tshark, YARA-X
  • June: v3.0 – Major update introducing Case Management system, FileMiner (replacing MismatchMiner), and tool suggestion capabilities based on file characteristics
  • July: v3.0.1 – Refinements to mStrings, improved MITRE mappings, “Select All” functionality, optimizations for running on Toby
  • August: v3.0.2 – Enhanced threat hunting with MITRE ATT&CK technique lookup

MalChela at a Glance

  • Rust-based malware analysis toolkit combining YARA scanning, file analysis, hash generation, string extraction with MITRE ATT&CK mapping, and automated malware sample extraction from password-protected archives 
  • Multiple specialized utilities including mzhash/xmzhash for corpus generation, file type mismatch detection, entropy analysis, PE structure examination, and fuzzy hashing capabilities 
  • Integrated threat intelligence with VirusTotal and Malware Bazaar API support, NSRL database queries for known-good file filtering, and Sigma rule application for IOC identification 
  • Case management system (v3.0) featuring unified tracking of files, tools, and notes in case.yaml format with auto-saved outputs, tagging, search functionality, and VS Code integration 
  • Extensible architecture supporting custom tool integration via tools.yamlconfiguration, enhanced support for Volatility 3, TShark, and YARA-X, with both GUI and CLI modes (WSL2-compatible on Windows)
  • Complete documentation embedded as PDF or online

https://github.com/dwmetz/MalChela

CyberPipe – Incident Response Collection Tool (PowerShell)

Continued evolution of the enterprise digital evidence collection script:

  • May: v5.1 – Streamlined profiles with better flexibility, customizable collection profiles
  • October: v5.2 – Improved collection methods with dual disk space validation, SHA-256 hashing of artifacts, single-file reporting, network collection simplification
  • November: v5.3 – Critical PowerShell 5.1 compatibility fixes, dual validation logic, enhanced reliability across all PowerShell environments

https://github.com/dwmetz/CyberPipe

CyberPipe-Timeliner ✱New✱ (PowerShell)

  • November: CyberPipe-Timeliner – New companion project to CyberPipe that automates the workflow from Magnet Response collections to unified forensic timelines using Eric Zimmerman’s EZ Tools and ForensicTimeliner

https://github.com/dwmetz/CyberPipe-Timeliner

Toby – Portable Raspberry Pi Forensics Toolkit

  • July: Released Toby – A compact forensics toolkit built on Raspberry Pi Zero 2 W running customized Kali Linux, designed for headless operation via SSH/VNC, perfect for field analysis and malware triage

Toby-Find

  • July: Toby-Find – Terminal-based command-line helper tool for discovering CLI forensics tools in KALI and REMnux environments, created initially for university teaching

https://github.com/dwmetz/Toby

Crabwise – USB Device Benchmark Utility (Rust)

  • August: Released Crabwise – A lightweight USB benchmarking tool that measures true read/write speeds of USB devices for forensic workflows. Tests write throughput with pseudo-random data and read performance under uncached conditions. Includes logging functionality to track performance across different cables, hubs, and connection paths, helping forensic investigators optimize their hardware setups.

https://github.com/dwmetz/Crabwise

Toolbox Utilities – Specialized Python and Bash Scripts

Standalone tools maintained in the Toolbox repository:

  • October: CoreBreaker.py – Breaks large yara-rules-core files into smaller .yar files for tool ingestion
  • October: EtTu.py – Caesar cipher brute force decoder (created for Murdle puzzle solving); After all, All work and no play makes Jack a dull boy.
  • November: cloudtrail_timeline.py – Parses AWS CloudTrail JSON logs and outputs CSV format for Timeline Explorer
  • November: mac_triage_timeline.sh – Processes Mac-Triage ZIP files and generates timeline for Timeline Explorer
  • November: uac_timeline.sh – Processes UAC tar.gz files and generates timeline for Timeline Explorer (Linux/macOS)

https://github.com/dwmetz/Toolbox


All projects are available on my GitHub at github.com/dwmetz, with detailed documentation on bakerstreetforensics.com. My goal is making DFIR and malware analysis more accessible, automated, and efficient for incident responders and forensic analysts.

CyberPipe-Timeliner: From Collection to Timeline in One Script

You know how these things go. A colleague asks a simple question, and before you know it, you’re knee-deep in PowerShell creating something that didn’t exist a few weeks ago. That’s exactly how CyberPipe-Timeliner came to be.

After a recent update to CyberPipe, someone asked whether there was a way to pipe Magnet Response collections through to something like ForensicTimeliner. It was one of those “that should exist” moments. So I made it exist.

A Quick History Lesson

For those who haven’t been following along, CyberPipe (formerly CSIRT-Collect) has been around since my IR days. It went public in 2021 and has been steadily maintained and updated since then. The tool has proven itself useful for rapid incident response collection, and it’s evolved based on real-world needs and feedback from the community.

CyberPipe-Timeliner is its companion project—taking that collection data and turning it into something immediately actionable: a unified forensic timeline.

What It Actually Does

The script automates the entire workflow from collection to timeline:

Extraction – It unpacks your Magnet Response archive, whether that’s a ZIP file or an already-extracted directory.

Processing – All the heavy lifting happens here using Eric Zimmerman’s EZ Tools to generate CSVs from your artifacts.

Organization – The CSVs get structured specifically for ForensicTimeliner compatibility, because nobody wants to spend time wrestling with file formats.

Aggregation – Everything merges into a consolidated timeline, giving you that unified view we’re all after.

Built for Real-World Use

The script includes some practical features that came from actual use cases:

  • Date filtering – Need to focus on a specific incident window? Use -StartDate and -EndDate to narrow your timeline to what matters.
  • Flexible input – Point it at a ZIP file or an already-extracted collection folder. Either works.
  • Verbose and diagnostic modes – Because sometimes you need to see exactly what’s happening under the hood.
  • Auto-generated output folders – Timestamped folders keep your timelines organized without any extra effort.

Getting Started

Setting it up is straightforward. You’ll need PowerShell 7+, Eric Zimmerman’s EZ Tools, ForensicTimeliner, and Microsoft .NET SDK (v9 recommended). The GitHub repository has detailed setup instructions, including handy one-liners for downloading and configuring the required tools.

Once you’re set up, a basic run looks like this:

.\CyberPipe-Timeliner.ps1 -InputFile "collection.zip"

That’s it. The script handles the rest, creating a timestamped output folder with your complete timeline.

Why It Matters

Forensic timeline generation shouldn’t be a multi-tool, multi-step headache. CyberPipe-Timeliner takes what would normally be several manual processes and condenses them into a single automated pipeline. You collect with Magnet Response or CyberPipe, run the timeliner script, and get actionable timeline data.

It’s available now on GitHub, and as always, feedback and contributions are welcome. If you run into issues or have ideas for improvements, open an issue or reach out.

Sometimes the best tools come from simple questions and the willingness to build the answer.

CyberPipe v5.3: Enhanced PowerShell Compatibility and Reliability

I’m pleased to announce the release of CyberPipe v5.3, bringing critical compatibility improvements for Windows PowerShell 5.1 and enhanced reliability across all PowerShell environments.

The Problem

After releasing v5.2 with the new unified banner design, several users reported an interesting issue: CyberPipe would execute perfectly in PowerShell Core, but in Windows PowerShell 5.1, the script would complete the Magnet Response collection successfully—then immediately fail with an exit code error and stop before running EDD and BitLocker key recovery.

The collected artifacts were there. The output looked successful. But the script refused to continue.

The Root Cause

This turned out to be a known quirk in Windows PowerShell 5.1: the $process.ExitCode property isn’t always reliably populated after calling WaitForExit() on a process object. Even when Magnet Response completed successfully with exit code 0, PowerShell 5.1 would sometimes report a non-zero value, causing CyberPipe to think the collection had failed.

The Solution

Version 5.3 introduces dual validation logic that checks both the exit code and verifies that files were actually collected. If Magnet Response reports a non-zero exit code but artifacts were successfully collected, CyberPipe recognizes this as a PS 5.1 reporting issue and continues the workflow with a warning message.

The script now validates success based on what actually matters: did we collect the evidence?

Bonus: Adaptive Banners

While fixing the PS 5.1 compatibility, I also enhanced the banner display:

  • PowerShell Core: Displays the full Unicode box-drawing banner with visual flair
  • Windows PowerShell 5.1: Shows a clean ASCII banner optimized for automation, EDR deployment, and environments where Unicode rendering may be inconsistent

The script automatically detects which PowerShell edition is running and adjusts accordingly.

Testing & Validation

CyberPipe v5.3 has been tested and verified on:

  • ✅ Windows PowerShell 5.1
  • ✅ PowerShell Core 7.x
  • ✅ All collection profiles (Volatile, RAMOnly, RAMPage, RAMSystem, QuickTriage, Full)

The script now executes flawlessly in both environments with no workflow interruptions.

Compatibility Notes

This is a drop-in replacement for v5.2 with no breaking changes:

  • All command-line parameters work identically
  • Existing automation scripts require no modifications
  • All collection profiles function as before

Why This Matters

For incident response work, reliability is non-negotiable. When you’re collecting evidence from a potentially compromised system, you need tools that work consistently across different Windows environments—corporate workstations running PS 5.1, modern systems with PS Core, virtual machines, and physical hardware.

CyberPipe v5.3 ensures that whether you’re running an interactive collection or deploying via EDR automation, the script executes reliably from start to finish.

Get CyberPipe v5.3

Download: CyberPipe v5.3 on GitHub

Documentation: GitHub Repository

As always, feedback and issue reports are welcome on the GitHub repository.


CyberPipe is a free, open-source incident response collection tool for Windows systems, automating memory capture, triage collection, encrypted disk detection, and BitLocker key recovery.