MalChela v4.1 is out today, and the headline is something I’ve been wanting to tackle for a while: dedicated Mac malware analysis tooling. If you’ve been following the channel or the blog, you know MalChela started as a triage-first toolkit aimed at the kinds of samples that show up in Windows-centric IR engagements. That coverage was never the full picture. Mac malware — infostealers, adware loaders, APT implants — has become too common to treat as an edge case. v4.1 is the start at addressing that directly.
New Tools: Mac Analysis
Three new tools land in this release, each targeting a different layer of Mac binary analysis. All three are available in the PWA under the Mac Analysis heading, accessible via CLI shortcodes, and included in the release scripts.
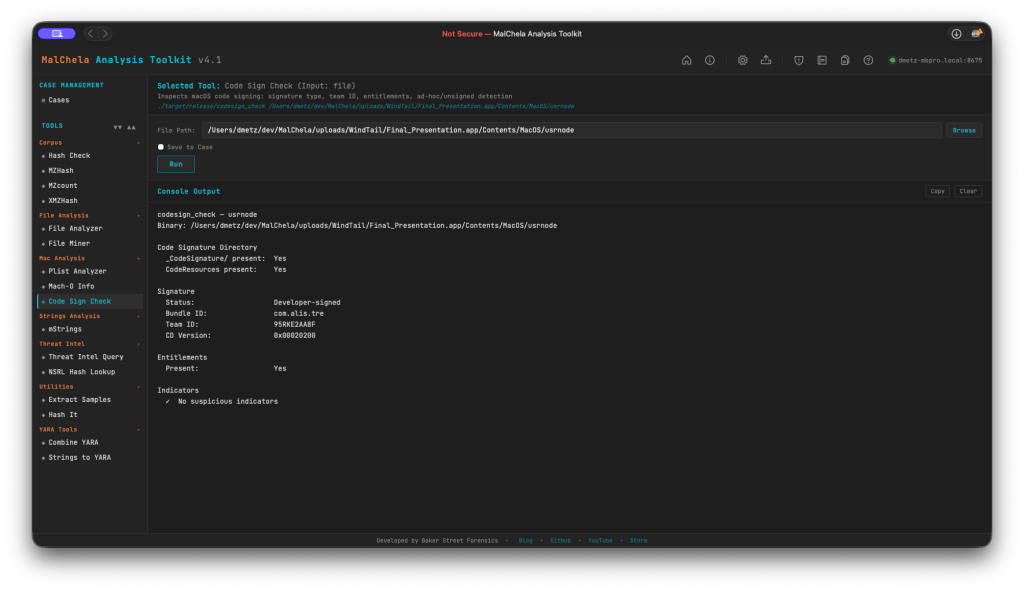
codesign_check (cs)
macOS code signatures are one of the first things worth checking on any suspicious binary. codesign_check accepts either an .app bundle or a bare Mach-O and reports signature status (Developer-signed, Ad-hoc, or Unsigned), Bundle ID, Team ID, and entitlement presence — including the get-task-allow flag that marks debug and development builds. It also verifies the _CodeSignature/ and CodeResources directory structure.
Indicators flagged: missing CMS blob, CS_ADHOC flag, absent Team ID, and get-task-allow entitlement. FileMiner now suggests Code Sign Check automatically for all Mach-O files in a scan. (Planned feature: adding a certificate revocation check).
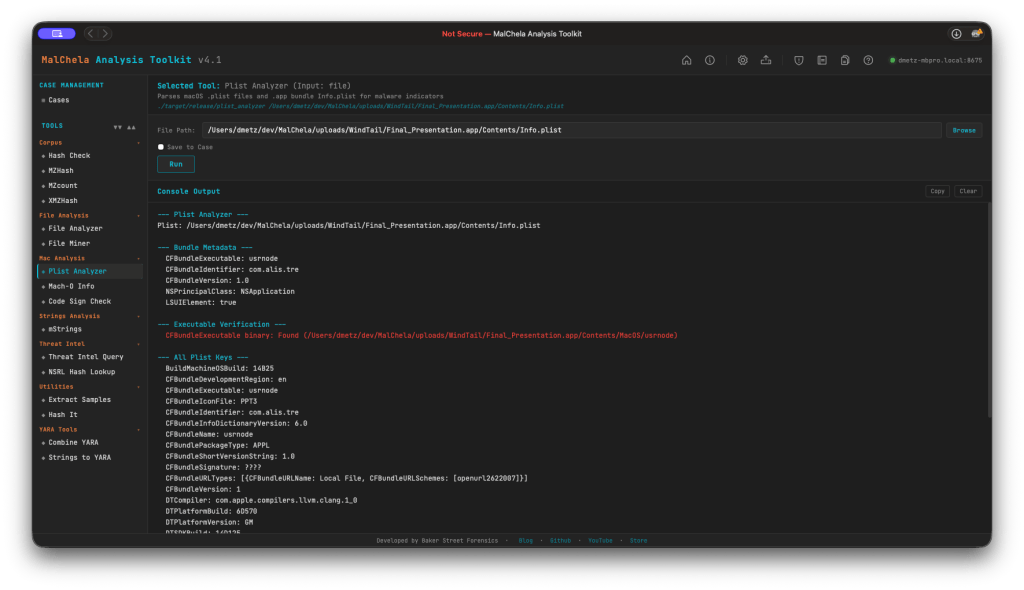
plist_analyzer (pa)
Parses macOS .plist files and .app bundle Info.plist for static malware indicators. This release includes four new detections:
- LSUIElement / NSUIElement = true — app runs as a hidden background agent with no Dock icon. Both the modern
LSUIElementand legacyNSUIElement(integer 1) forms are now detected, covering older macOS malware that used the pre-Sierra key. - NSAllowsArbitraryLoads = true — App Transport Security disabled, a classic C2 channel indicator.
- CFBundleURLTypes with custom URL schemes — flags non-standard scheme registrations used for persistence or inter-process communication.
- CFBundleSignature = ‘????’ — no creator code set, common in unsigned tools and malware.
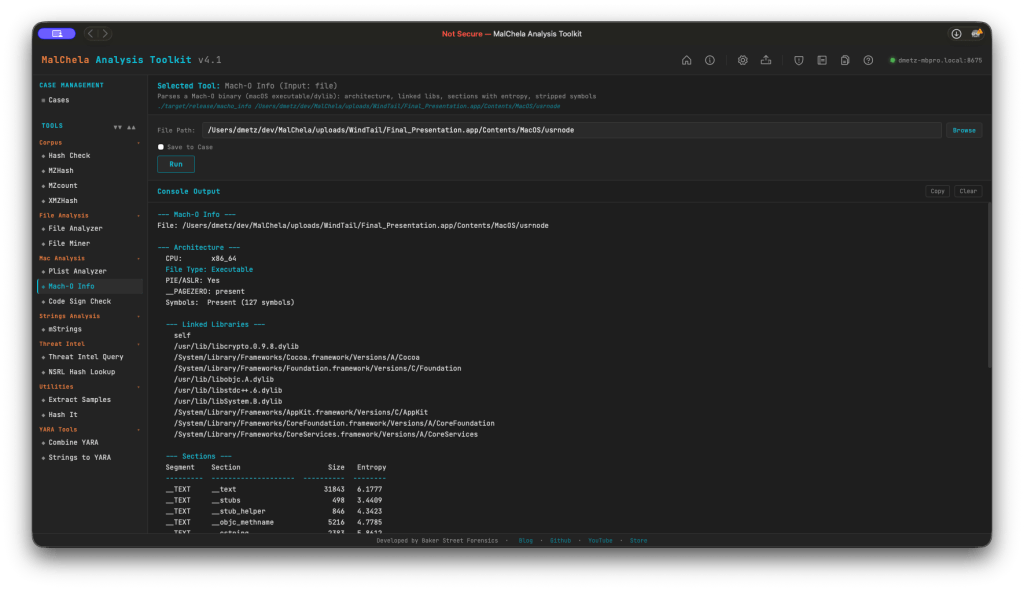
macho_info (mo)
Parses thin and fat/universal Mach-O binaries and reports: architecture, linked libraries, section entropy, symbol status, RPATH entries, __PAGEZERO integrity, and PIE/ASLR flags.
This release also adds deprecated crypto library detection: macho_info now flags linkage against end-of-life OpenSSL libraries (libcrypto.0.9.8, libssl.0.9.8, and variants). There’s no legitimate reason for a modern binary to link these — flag it and investigate further.
mStrings — Mac Tuning
Running mStrings against Mach-O binaries previously produced a lot of noise: ObjC runtime stubs, Swift mangled symbols, and Apple system library paths that add volume without adding signal. A new is_objc_swift_noise() filter suppresses these categories:
_objc_*runtime stubs@_*import stubs (including@_LSSharedFileList*, which was previously surfacing as false-positive filesystem IOCs)- Swift mangled symbols (
_$s*,_T0,swift_*) - Apple system dylib paths under
/System/Library/Frameworks/and/usr/lib/swift/ - ObjC type encoding strings
Alongside the noise filter, 12 new Mac-specific MITRE detection rules have been added to detections.yaml:
| Rule | Technique |
|---|---|
| MacLaunchAgentDaemonPersistence | T1543.001 |
| MacLoginItemPersistence | T1547.015 |
| MacShellProfileInjection | T1546.004 |
| MacCronJobPersistence | T1053.003 |
| MacDylibInjection | T1574.006 |
| MacKeychainAccess | T1555.001 |
| MacAppleScriptExecution | T1059.002 |
| MacUnixShellExecution | T1059.004 |
| MacPrivilegeEscalation | T1548.004 |
| MacSystemDiscovery | T1082 |
| MacSandboxVMEvasion | T1497.001 |
| MacSensitiveFileAccess | T1005 |
Mac path extraction also gets a dedicated regex: re_mac_path captures filesystem IOCs in Mac-style paths (.sh, .py, .dylib, .plist, .app, .pkg, .command) under /Users/, /Library/, /tmp/, and related directories.
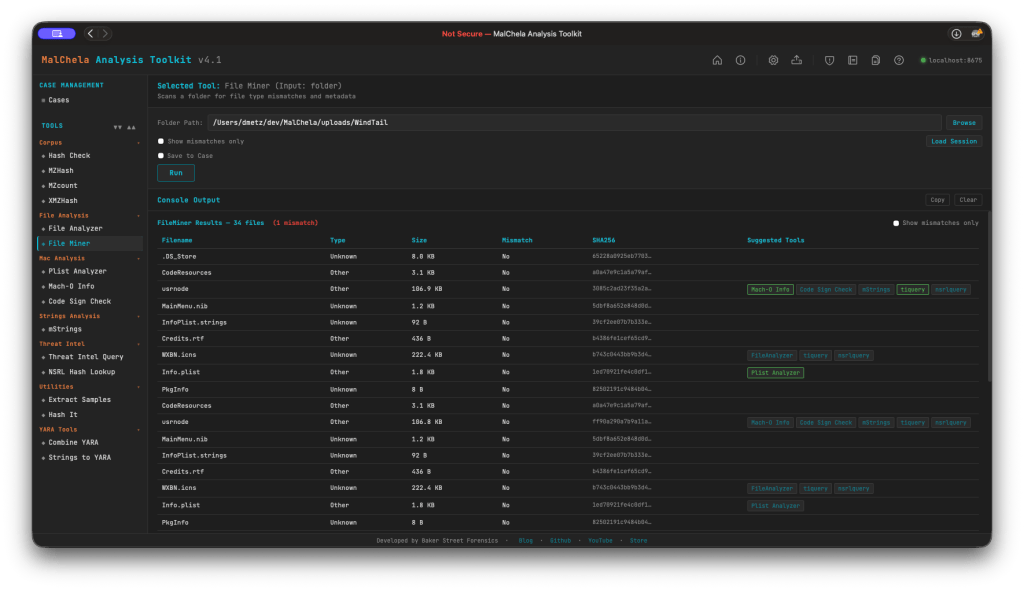
FileMiner — Session Persistence
FileMiner scan results now persist across browser close and refresh. Results, the analyzed path, and the set of executed sub-tools survive in localStorage automatically. On each scan, a session.json is also written server-side to saved_output/fileminer/ — or to the active case folder under saved_output/cases/<case>/fileminer/ when Save to Case is checked.
A Load Session button in the FileMiner options bar opens a file browser pre-navigated to the correct session directory. Selecting a session.json restores the full results table and re-populates the path input. Like the previous GUI, fileminer now tracks tool runs for suggested tools (green indicates tool report already generated).
MalChela v4.1 is available now on GitHub. As I said this is just the start of the macOS malware support. I’m looking forward to taking this much further.