Is your USB device slowing down your forensic investigation?

In digital forensics and incident response, reliable storage isn’t a luxury — it’s a requirement. Whether you’re capturing evidence from a live system, processing large data sets with specialized tools, or running a virtual machine in the middle of a case, storage throughput can make or break your workflow.

The challenge? Reported specifications from manufacturers often don’t tell the full story. A drive rated for up to 400 MB/s might only deliver a fraction of that in real-world use. And performance isn’t determined by the drive alone: the quality of your USB cable, the number of hops between your system and the media (direct vs. through a hub), and the system’s own caching behaviors all play a part.

To eliminate the guesswork, I built Crabwise, a simple USB benchmarking utility designed with forensic workflows in mind.


How Crabwise Works

Crabwise calculates read and write speeds by creating a temporary file on the target device and measuring throughput under direct (uncached) conditions.

  • Write Test: The tool writes a pseudo-random 1 GiB file (size adjustable) to the USB drive in blocks, ensuring that system caching doesn’t skew results.
  • Read Test: It then reads the file back from the device, again bypassing caches, so the reported numbers reflect device-level throughput rather than RAM speeds.
  • Progress Feedback: While testing, Crabwise shows real-time percentages and MB/s estimates, so you can spot performance bottlenecks as they happen.

The result is a clean, standardized benchmark of the USB device’s true performance.


Building a Reference Table

One of the most useful features in Crabwise comes after the test: you’re prompted to save the results to the root of the device. If you choose to do so, Crabwise appends the results to a simple log file called crabwise.log.

Each entry includes:

  • Session name (you provide this — e.g., “coil cable via hub” or “direct to Mac”),
  • Read speed,
  • Write speed,
  • Timestamp of the test.

When you cat the file, you get an instant side-by-side comparison of your runs:

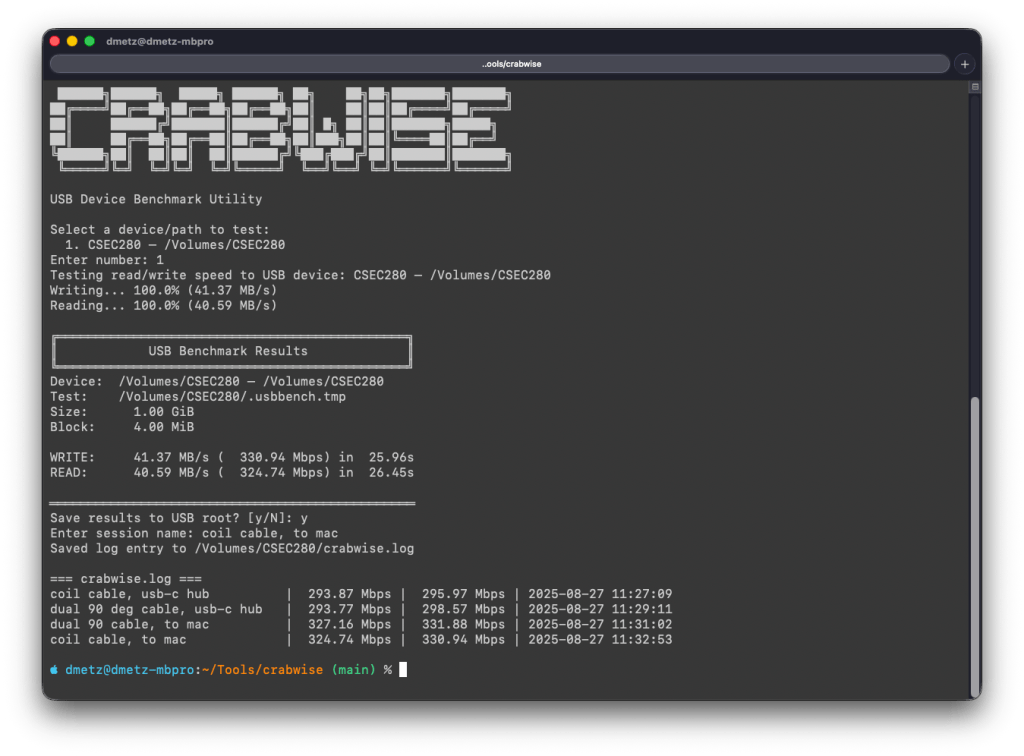
=== crabwise.log ===
coil cable, usb-c hub          |  293.87 Mbps |  295.97 Mbps | 2025-08-27 11:27:09
dual 90 deg cable, usb-c hub   |  293.77 Mbps |  298.57 Mbps | 2025-08-27 11:29:11
dual 90 cable, to mac          |  327.16 Mbps |  331.88 Mbps | 2025-08-27 11:31:02
coil cable, to mac             |  324.74 Mbps |  330.94 Mbps | 2025-08-27 11:32:53

Over time, this builds into a practical reference table that lets you quickly compare how different cables, hubs, and ports affect performance. What looks like a subtle cabling change can sometimes mean the difference between a VM booting smoothly or crawling.


Closing Thoughts

In forensic and investigative work, you don’t always get to choose the hardware you’re handed — but you can make informed decisions about how you connect and use it. Tools like Crabwise give you a way to validate your environment, document your results, and avoid unpleasant surprises when timing matters most.

Whether you’re testing cables, validating a new hub, or verifying a forensic workstation setup, Crabwise turns USB benchmarking into a repeatable, documented process.

Download crabwise from GitHub: https://github.com/dwmetz/crabwise/

Designing Internet Access for Compromised Systems

Virtual machines are a godsend when it comes to malware analysis. Granted there a many malware samples that may have capabilities to detect if they are operating in a virtualized environment and thus respond differently. Many, though not all of these, can be mitigated by patching the malware binary, or tricking it into a false result before needing to look at the sample on a bare-metal system.

When I’m looking at a piece of malware, I’ll run it through a number of environments, gradually permitting external access once I have an idea of what the malware’s capabilities look like. Initially when detonating samples, I’ll have the target endpoint and a REMnux virtual machine running inetsim operating on an isolated network. Rather than re-invent the wheel, here’s a solid article on setting up an isolated network on VMware ESXi.

At some point I want to enable access to the internet to observe command and control (C2) and any dropper activity. I don’t want there to be an avenue for the malware to be able to interact with any other assets whether on my lab network, or outside it. One way to solve this would be networking and introducing a router to broker the network access. It’s been a while since I had my CCNA and I had some hesitations about getting it right without impacting other services in a very internet dependent household. What I wound up going with instead is a completely separate internet connection for the malware network utilizing a LTE hot-spot.

I run my lab environment on ESXi environment using an Intel NUC. The model I have only has one onboard NIC. The easiest way to add another physical adapter was with a USB Gigabit Ethernet adapter for a measly $13 on amazon. ESXi will not detect this adapter out of the box. Follow the process on this article to configure the USB network adapter for ESXi. You will need to download the USB Network Native Driver for ESXi. Be sure to select the appropriate version to match the version of ESXi you’re running. I’m sure there’s an interesting story on why VMWare calls these ‘Flings’ but that knowledge escapes me.

If all goes as it should, and doesn’t it always, you should see second physical adapter (vusb0) in the ESXi console.

USB network adapter shown as vusb0

For the secondary internet access, I wound up going with a Netgear LM1200 LTE Hotspot. I like this device because you can configure it to use an LTE connection as a backup if your primary wired internet service is down. I may utilize that in the future but for now it’s only used on the malware network without any connection to the primary LAN. Based on my current cellular plan I was able to add the minimum hotspot plan for $10/mo. A worthy investment for me for the peace of mind that I’m (less likely) to compromise the rest of my network when experimenting with live malware. It will also (one would hope) keep my home IP off any watchlists for malware beacons, or anyone else tracking where different samples are detonated from. As Mr. Heller sagely said, “Just because you’re paranoid doesn’t mean they aren’t after you.”

The same setup could be very useful for responding to compromises in isolated enterprise or manufacturing environments. If you need to have the device access the internet (maybe to upload evidence to you Forensics Service Provider (FSP)), but don’t want to maintain a connection to the corporate LAN due to suspected compromise, this solution would work for that.

Once I had the hotspot up and running, the LAN connection on the hotpot gets connected to the USB ethernet adapter. Then go back to ESXi to the isolated network you created before, the one that you were warned “NO UPLINK”, and use the ‘Add uplink’ function and add the vusb0 device. You can adjust the settings on the LTE hotspot for DHCP if needed as long as the device is in Router (not Bridged) mode.

Malware network with external internet access

That’s it. Now when the infected computer needs to get to the internet, all traffic will go through the LTE connection and the infected systems remain isolated from the primary network.

Release the hounds and observe

If I’m in a situation where I absolutely need to run the malware on a bare-metal system I can connect using the LTE modem without threat to any of the other physical systems.

Raspberry Pi Forensics Hacking Gadget

Ever since the 2021 iPad models with USB-C chargers came out, I’ve been intrigued by the notion of Raspberry Pi gadgets. In short, these are Raspberry Pi devices that draw their power, and/or networking from the USB-C port on the iPad Pro.

Having awakened my tinkering spirit with the internet speed monitor project, I was looking for another project. I had one unused Raspberry Pi Zero W in a box of spare Pi parts, so that’s where I started.

I chose Kali for the distribution to use because there are images specific to various Raspberry Pi hardware models, and because the distribution itself supports many popular Linux tools for Forensics and Reverse Engineering. REMnux is my default Linux for malware poking, but to date it’s only supported on Intel architectures.

Know from the start you’re not going to be using this device for processing on the scale of Enron, but for access to a wider toolset when on the go, and especially for training I think it’s a pretty cool setup. If you’re looking to set up a mobile development environment, or still run Kali but with more oomf – there’s number of resources to do so using a Pi 4. Since the Pi Zero W is powered by a USB-micro, it cannot support networking (iPad to Pi) over the USB port. Later models like the Pi 4 (USB-C powered) are capable, but at the time of the project, all mine be were occupied. In this case we’ll be connecting to the Pi over WiFi via SSH.

Grab the image for Pi Zero W (or whatever’s applicable for the model you’re running from https://www.kali.org/get-kali/#kali-arm. There’s plenty of documentation on enabling SSH if it isn’t by default. On this particular build for the Pi, it was. You’ll also want to install tightvncserver.

Depending on which Pi hardware version you’re using, the Pi will have different capabilities. Notably lacking on the Pi Zero W, the resources to run any modern browser. But since I have the iPad that it’s running from it’s not like I’m missing it at all.

Kali supports the installation of what they call meta-packages. These are specific sets of tools or features to support different capabilities (Bluetooth hacking, wireless hacking, etc.) For my build I chose the reverse engineering and forensics packages as those are the tools I’m most interested in experimenting with.

I had a bit of trial and error when it came to the physical USB connections. Originally I had a series of USB-C connecting adapters, terminating with a USB-C to USB micro adapter. When I had this franken-jack plugged into the iPad the Pi wouldn’t power up. However if I had a USC-C cable connected to the jack, or between the jack and the iPad, I could get power (just with a cable I didn’t need.) At some point I had the idea of introducing a USB-A into the mix and voila, power to the Pi. All that said, the final hardware combo consisted of a USB-C (male) to USB-A (female) 180 degree adapter, and a USB-A (male) to USB-Micro (male) adapter.

The 180 degree adapter enables a very low profile while having a reasonable gap for ventilation, even when connected to a Magic Keyboard.

Plug the device into the USB-C port on the iPad a give it a minute or two to boot up.

For SSH on the iPad there’s no better than Blink.

I don’t have VNC running at boot to save on resources, but I have a script in my home directory to quickly turn it on when GUI access is needed.

For VNC I use Jump Desktop, and have a configuration saved for VNC tunneled over SSH.