Hashes for the Masses: Finding What Matters in a Sea of Samples

A short while back, I released a pair of tools for building MD5 hash sets — one targeting known-good gold builds, the other designed for scanning malware corpora. The goal was simple: generate hash sets that could be used in forensics tools like Axiom Cyber to flag IOC matches during case processing.

Recently, I hit a familiar problem: I had a hash and wanted to know if that file existed in my malware library. Step one was updating my tooling to support SHA256 — the modern standard for hash sharing — and regenerating the hash sets. That part worked. I could search for a hash and confirm whether it appeared in my set.

But what if I got a match?

At that point, I realized: I had no way to correlate the match back to the original file. With ~30,000 samples in the library, “just eyeballing it” wasn’t an option.

As I’ve been coding up new tools — or revisiting earlier ones — I’ve discovered that rabbit holes have rabbit holes.

So I updated the SHA256 tool to not only generate a hash set, but also produce a .tsv lookup table mapping each hash to its full file path. This made the sets usable both in forensics platforms and for custom lookups in more ad hoc workflows. As they say: necessity is the mother of intention.

Of course, that led to another realization. I now had four hashing tools — two for MD5 (MZ and non-MZ), and two for SHA256. The “Hashing Tools” section in MalChela was getting a bit crowded.

Back to the drawing board.


The Result: Three Unified Tools

I consolidated and upgraded everything into three tools — all of which support both CLI and GUI usage.

#️⃣ MZHash (replaces mzmd5)

• Uses YARA to recursively scan for files with an MZ header (i.e., Windows executables and DLLs)

• Generates one hash file per selected algorithm: MD5, SHA1, SHA256

• Also creates a .tsv lookup file for each, mapping hashes to paths

cargo run -p mzhash /directory/to/scan -- -a MD5 -a SHA1 -a SHA256

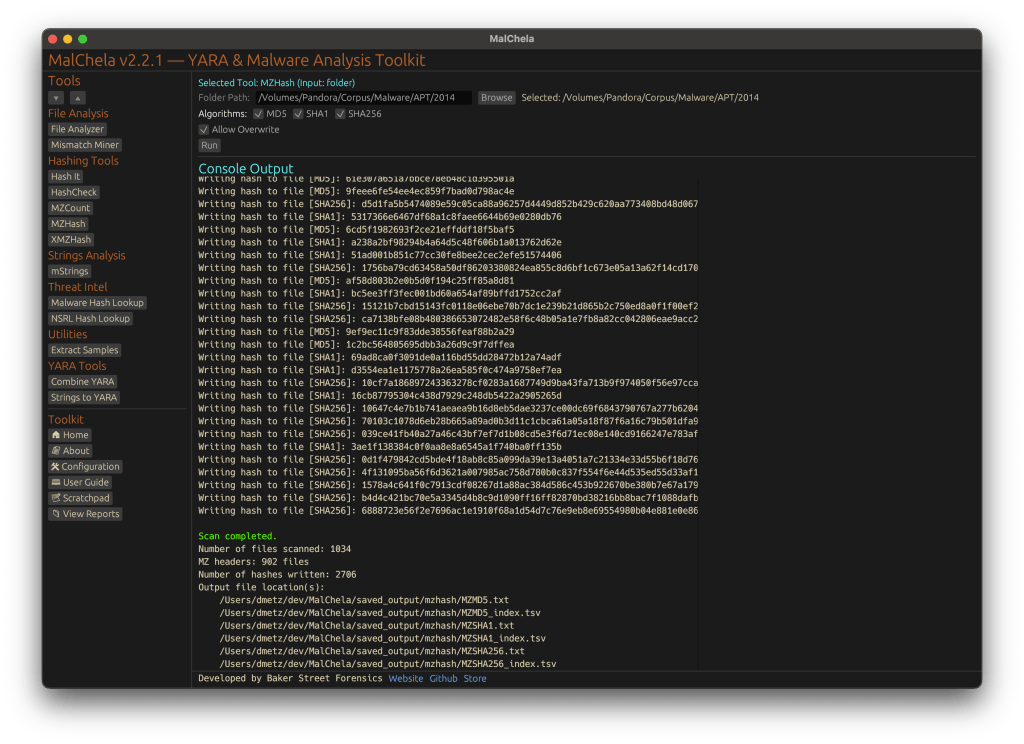
Via GUI, you can browse to the folder and check boxes for each algorithm.


🌐 XMZHash (replaces xmzmd5)

• Uses YARA to skip over files with MZ, ZIP, or PDF headers

• Hashes everything else — ideal for surfacing Linux, Mac, or unusual samples from a mixed malware corpus

• Also supports .tsv lookup file generation

cargo run -p xmzhash /directory/to/scan -- -a MD5 -a SHA1 -a SHA256

The idea: hash what’s not obviously Windows, document-related, or un-extracted samples.

XMZHash

🔍 HashCheck

Okay, so naming might not be my strong suit. But this tool’s direct.

• Provide a hash value and a .txt or .tsv hash set

• It checks for matches, and if you’re using a .tsv, it shows the file path of the match

• Great for live triage, corpus hunting, or checking known-bads

cargo run -p hashcheck ./hashes.tsv 44d88612fea8a8f36de82e1278abb02f
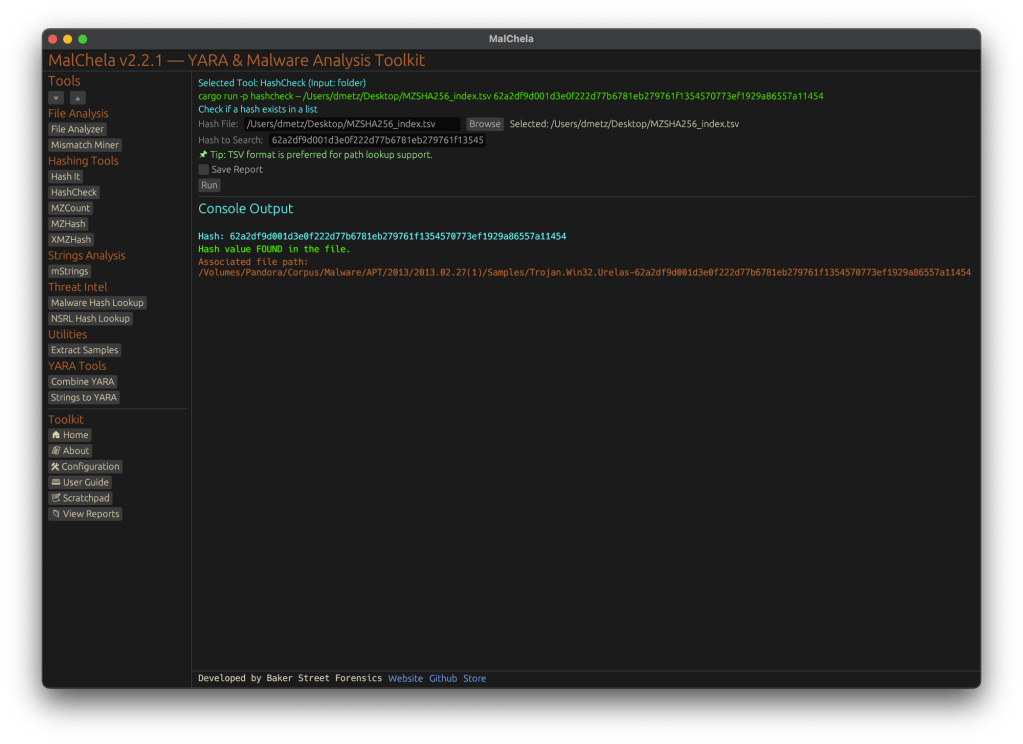
Hash Check

In Summary

MalChela 2.2.1 expands its hashing toolkit with the introduction of HashCheck, MZHash, and XMZHash — giving analysts faster ways to flag known-good, isolate unknowns, and build actionable sets. In this release, we’ve also said goodbye to legacy tools, standardized output saving, and doubled down on clarity across both CLI and GUI workflows.

Download: https://github.com/dwmetz/MalChela/releases

User Guide: https://dwmetz.github.io/MalChela/

Exploring Magnet Virtual Summit 2025 CTF Challenges, Part II (Windows)

This is part II of this series; for part I see Exploring Magnet Virtual Summit 2025 CTF Challenges (iOS).


If we jump into Axiom and head to the User Accounts, we can see that the SID for chick is S-1-5-21-493923485-410185161-2094537482-1001.


Windows Event Logs will track user login and logoff activity. The primary event IDs for Windows logoff are:
1. Event ID 4647: This is logged when a user manually initiates a logoff process. It is typically associated with interactive and remote-interactive logon types and indicates user-initiated activity.
2. Event ID 4634: This is logged when a logon session is terminated and no longer exists. It can result from system actions (e.g., idle timeout or shutdown) rather than explicit user action. It often follows Event ID 4647 if the logoff was user-initiated.

In Axiom we can find the most recent 4634 event at 11/24/2024 5:36:55 PM, formatted for the challenge as 2024-11-24 17:36:55.


The download source from the crow.jpg URL is https://www.treehugger.com/thmb/EmZOvx28sGNqCtDqQQBMGv-aezM=/4288×2848/filters:fill(auto,1)/__opt__aboutcom__coeus__resources__content_migration__mnn__images__2019__10__american-crow-portrait-01-b3f0cfbdbf164de59831c9725bfdbf67.jpg


In the Installed Programs under Application Usage we can see that com.CandyCrushSaga was installed. This is the package name for Candy Crush.


Under the Web Related artifacts, specifically Edge Chromium Web History we can see traffic to https://x.com/bfp_news which is the Twitter/X site for Burlington Free Press.


Refined Results, Social Media URLs, shows that the user visited the subreddit of https://reddit.com/r/coding.


The question itself practically gives it away, but we’ll check the Installed Programs to be safe. Sure enough the user had Python installed.


Event ID 4720 is a Windows Security Log event that is generated whenever a new user account is successfully created on a system. The creation date for Mary’s account is 2024-09-24 15:11:51.


As someone who used to geocache frequently, this question was a pleasant surprise. Already having an account on geocaching.com also helped.

There’s a fair amount of results if you search on geocaching, but there is only reference in the history to an actual geocache location (GCM70J) titled “Something’s Fishy.”


First we need to identify what counter-forensics tools may have been in use. In the user’s download activity we see that SDelete was downloaded.

If we look at the PowerShell history, ConsoleHost_history.txt, we can see that the command sdelete success.txt.txt was executed.


There are multiple evidence items indicating that the user was also using Proton Mail on the device with the account hackergotyou@proton.me.


The default browser can be identified from the Registry at Software\Microsoft\Windows\Shell\Associations\UrlAssociations\https\UserChoice. In this instance the user was using Edge, the default, as their browser.


In the browser history we see that the user accessed a video at the url, https://www.tiktok.com/@dochristmass/video/7436518844501347616?is_from_webapp=1

To get the time the video was posted, we can copy the url into UNFURL. This reveals the timestamp the video was posted as 2024-11-22 22:11:09.


Again with a filter on ‘geocaching’ we see a fair amount of activity. There is a url with “join” that appears to be part of the user sign in, including username=geomaryr

We also have an entry under Edge Chromium Autofill, as the user opted to save the login ID on that page.

Lastly we can double-check the geocaching.com site with the log for “Something’s Fishy” which matches the timestamp of the web activity. geomaryr is Mary’s username on geocaching.com


The first thought would be to go to the Passwords and Tokens Refined Result. We see a hash for the chick user account. But Wait!

The key is in “Shadow.” It’s not the Windows account we’re looking for.

Looking at Installed Programs we identify that the user installed KALI in Windows Subsystem for Linux (WSL). I knew I wanted to get the /etc/shadow file from the KALI installation – but I was hitting a wall on how.

Finally I wound up exporting the ext4.vhdx (the virtual hard drive for the KALI instance) and running strings against it, and piped the results to ag (grep on steroids) with a search for ‘chick:’.

Much like the way my father would describe my shots back when we would play golf together, ugly but effective. The hash for the user account chick is $fRLLkVPTrLiLVAGhQRWjQd.kKDyvvj040aDd5zoJRt4.


There were a few more challenges under the Windows category but that was as far as I made it in the time allotted.

I hope you’ve enjoyed these walk throughs on my approach to solving the challenges.

If you’d like to access the images used for the CFT for your own training and investigation, you can find them at https://cfreds.nist.gov/all/Hexordia/2025MVSCTF. In addition to the Windows 11 image used here, there is also full file system extractions of Android and iOS, as well as two Google Takeout exports. It’s a great reference set for practicing.

Exploring Magnet Virtual Summit 2025 CTF Challenges (iOS)

A couple weeks ago, I participated in the Magnet Virtual Summit 2025 CTF (Capture the Flag). While I don’t think I will ever see a day where I win one of these, (speed is not my forte), I enjoyed working through a good number of the challenges, starting with the lower point values and working my way up. The CTF covered images/sources including: Cipher challenges, iOS and Android full file system images, Google takeouts, and images of a Windows 11 workstation and a Chromebook. I spent my available time working on the iOS and Windows challenges. I wasn’t able to complete all of them, but I’ll share what I was able to complete.

In this post I’ll be sharing my solutions for the iOS challenges. Warning: SPOILERS AHEAD!


To determine the version of iOS, I used the iLEAPP report for the device.

Another way of finding this information in Axiom is to review the Powerlog Battery Shutdown events.

The answer is 18.0


Looking at the Owner information in Axiom is quick way to identify the telephone number associated with the device. 18024959063.


For this one you could start in Contacts or start with a Date/Time filter as that was very specific to the question. The answer is Mary.


Reviewing the iOS Call Logs in Axiom we see that the user never answers their phone. (I can relate.) The answer is “0”.


That’s a ducking odd thing to be curious about. According the the Keyboard Usage Stats, the answer is 51.


In a Discord chat, Mary and Ruth agree to meet up at 2:15 for coffee.


Started off with a global search on ‘bitmoji’ and then reviewed the media files. (Brown)


A global search on Discord narrows the results. There is an apple mail message from Discord about the user signing in from a new location. The IP address is 184.171.159.153.


Ah, Nashville. Home of the Magnet User Summit coming up in just a few weeks. iLEAPP can provide us with the Lat and Long of the cities configured in the Weather app.


Looking at the Application Permission we can see which applications had (or were denied) access to the microphone. The app identifier com.toyopagroup.picaboo corresponds to Snapchat. The name “Picaboo” refers to Snapchat’s original name before it was rebranded.


In the iOS Messages, we find a number of ‘sale’ announcement from Zenni. EARLYBF24 is the code associated with the 40% off promotion.


First off, we need to know what TikTok video this is referring to. In the iOS messages we see a TikTok video that was shared.

Copy the url and head over to Ryan Benson’s Unfurl. Unfurl decodes the different elements of the url string. One of the details embedded in the string is the time the video was posted. 2024-11-12 22:11:09.


For this one we can take a look at the Apple Maps – Biome App Intents, and see a search for directions to North Beach Park.


When I first looked at this one I thought there could be a “Welcome to your new iPhone” message or something similar. No dice. Besides, that would be too easy for a 25 pointer. A quick googling indicated was that one way to confirm the purchase date of an iPhone is too look up the warranty status on checkcoverage.apple.com.

We can grab the serial number for the device from iLEAPP.

Plugging that into the warranty coverage site we get: December 2022 (2022-12).


“October” is a good search to start with. Within the PDF documents we find a reference for an October-2023-iphone-wallpaper. In the details we see that the author of this image was nicole vranjican.


There were a few more higher point challenges in the iOS section, but that’s as far as I made it in the allotted time. I’m looking forward to reading other’s write-ups, both for the questions I was unable to solve, as well as seeing the unique and alternative ways that others solved the ones I did.

Stay tuned for my next post on the solutions for the Windows challenges.

If you’d like to access the images used for the CFT for your own training and investigation, you can find them at https://cfreds.nist.gov/all/Hexordia/2025MVSCTF.

Last but not least, my heartfelt appreciation to the team at Hexordia who put together the CTF. Another PUNderful job!

Magnet RESPONSE PowerShell

I’m excited to share with you a new script I’ve written, Magnet RESPONSE PowerShell.

Magnet RESPONSE is a free tool from Magnet Forensics that makes it easy for investigators as well as non-technical operators to collect triage collections quickly and consistently.

Released initially as a GUI tool for law-enforcement investigators, it’s a single executable that requires no installation. The available command line syntax also makes it very flexible for enterprise use.

So what do I do when there’s a command line interface available, I PowerShell the hell out of it.

If you’ve been following my CyberPipe project, you’ll definitely want to check this one out.

MagnetRESPONSEPowerShell.ps1

Functions:
  • 💻 Capture specified triage artifacts using profiles with Magnet RESPONSE,
  • 🐏 Capture a memory image with DumpIt for Windows or Magnet RAM Capture,
  • 💾 Save all artifacts, output, and audit logs to network drive.
  • 🪟 Supports x86, x64 and ARM64 versions of Windows
Prerequisites:
  • Magnet RESPONSE
  • Web server where you can host MagnetRESPONSE.zip that’s accessible to endpoints.
  • File server repository to save the file collections to.

Please note this is not a Magnet supported product. This script is open source. If you have comments, updates, or suggestions – please do so here or on GitHub via discussion or pull request.


There are two areas of the script for you to customize.

  • The Variable Setup contains the case identification, file server and web server locations.
  • The second section, Collection Profiles, define which artifact groups you want to collect. You can see all the options available in the Magnet RESPONSE CLI Guide.

VARIABLE SETUP

$caseID = "demo-161" # no spaces

$outputpath = "\\Server\Share" # Update to reflect output destination.

$server = "192.168.4.187" # "192.168.1.10" resolves to http://192.168.1.10/MagnetRESPONSE.zip

COLLECTION PROFILES

Within the script we need to have at least one set of collection arguments defined. In this case I’ve built multiple profiles, which are simply un-commented to mark the profile as active. You only want to have one profile enabled at a time. You can design your own collection profiles using any of the available CLI options, just follow the format below.

#### Extended Process Capture

$profileName = "EXTENDED PROCESS CAPTURE"

$arguments = "/capturevolatile /captureextendedprocessinfo /saveprocfiles"

Execution

Once your environment and collection variables are defined, go ahead and run the script on your endpoints. Every host that executes the script will download RESPONSE from the web server, run the specified collection profile, and then save the output to the file server. All data defined in the collection profile will be collected and organized by case name, hostname and timestamp of collection in the central location. The returned files can be examined manually, using open source tools, or products like Magnet AXIOM Cyber.

If you’d like to learn more about the script, and how I integrated it with AXIOM Cyber and Magnet AUTOMATE, you can register for my webcast, Responding at Scale with Magnet RESPONSE. I hope to see you there.

You can download the script at https://github.com/MagnetForensics/Magnet-RESPONSE-PowerShell