Sometimes the best breakthroughs are the ones you don’t plan for. After a routine Windows update this week, I launched MalChelaGUI from the Ubuntu terminal on an Ubuntu WSL2 instance — and it simply opened. No X-server, no environment tweaks, no extra packages.
🎉 😱 A Rust native GUI app on Windows, via Ubuntu WSL terminal!
The latest WSL 2.5 + WSLg 1.0.66 update from Microsoft quietly unlocked full Wayland and GPU acceleration for Linux GUI apps on Windows 11 24H2. (Note the latest WSL at the time of this post is 2.61)
The result? MalChelaGUI now runs as a true desktop app on Windows, powered entirely by Ubuntu WSL.
Why This Matters
🧰 No configuration needed — just follow the default instructions at GItHub, and build MalChela as usual. (WSL, Ubuntu 24.04 or later)
🪟 Native windowing — Clipboard, display scaling, and GPU acceleration all handled automatically.
🦀 Cross-platform parity — macOS, Linux, and now Windows (via WSL) all run the same GUI experience.
It’s a small but meaningful proof of concept: cross-platform DFIR tooling can now live comfortably in every environment analysts work in — even Windows, without compromise.
Call for Testers
If you’re running Windows 11 24H2 or newer, update WSL and give it a try:
```powershell
wsl --update
Then from Ubuntu WSL
./target/release/MalChelaGUI
If it launches successfully, drop me a note or tag me — I’d love to hear how it behaves across different hardware and GPU setups.
Whether teaching, investigating, or tinkering on the road, there’s an undeniable appeal to a device that’s self-contained, headless, and versatile enough to support forensic analysis, malware triage, and field acquisition. That idea became the seed for Toby — a Raspberry Pi Zero 2 W–based micro-rig that can be managed from an iPad or mobile device.
It started off with a “what could I do with at Raspberry Pi” and the final result: a fully functional, go-anywhere forensics toolkit that fits in the palm of your hand, carefully packed into a Grid-It travel kit and loaded with purpose.
Why Build Toby?
Toby wasn’t born from necessity. It came from a blend of curiosity, constraint, and the spirit of joyful overengineering. The goal wasn’t just to get Kali Linux running on a Pi — that’s been done. The challenge was in how much capability could be packed into a minimalist footprint without compromising on control, security, or style.
Some driving goals from the outset:
Headless-first: Must be operable via SSH, or VNC — no screen needed.
Kali-based: Full access to familiar forensic and pentest tooling.
Discreet and functional: Everything should be secure, practical, and stowable.
Modular connectivity: USB OTG, video capture, remote keyboard/mouse, and VPN support all needed to be viable.
Portable power: Run from a battery pack for field ops or demo use without dependency on AC power.
Hardware Selection
Raspberry Pi Zero 2 W
The Pi Zero 2 W hits a sweet spot. It has enough power to run full Kali and perform triage analysis, especially with swap and careful headless tuning. It supports USB OTG and can be powered over micro-USB, making it ideal for lightweight builds.
Grid-It Travel Kit: The Physical Layout
Instead of housing the components in a fixed enclosure, I opted for flexibility: a Grid-It organizer sleeve. It allows each cable and tool to remain accessible and secured via elastic straps — perfect for quick swaps or field reconfiguration.
The current loadout includes:
Raspberry Pi Zero 2 W
HDMI mini to full adapter (for display recovery if needed)
USB micro to USB-C adapter combo (for powering Pi from laptop, iPad, or battery pack)
Anker battery pack (portable, long runtime)
Wireless keyboard (compact; paired via Bluetooth or USB receiver)
USB capture device (used for teaching, demoing webcam/VNC sessions)
Short USB OTG cable
The setup is light, self-contained, and TSA-friendly — a true digital go-bag for the forensically inclined.
Portable Power
Toby can be powered from the USB port of an iPad or from a battery pack or AC adapter, making it extremely flexible for field use.
Toby powered from iPad Pro
Toby powered from portable battery
Software
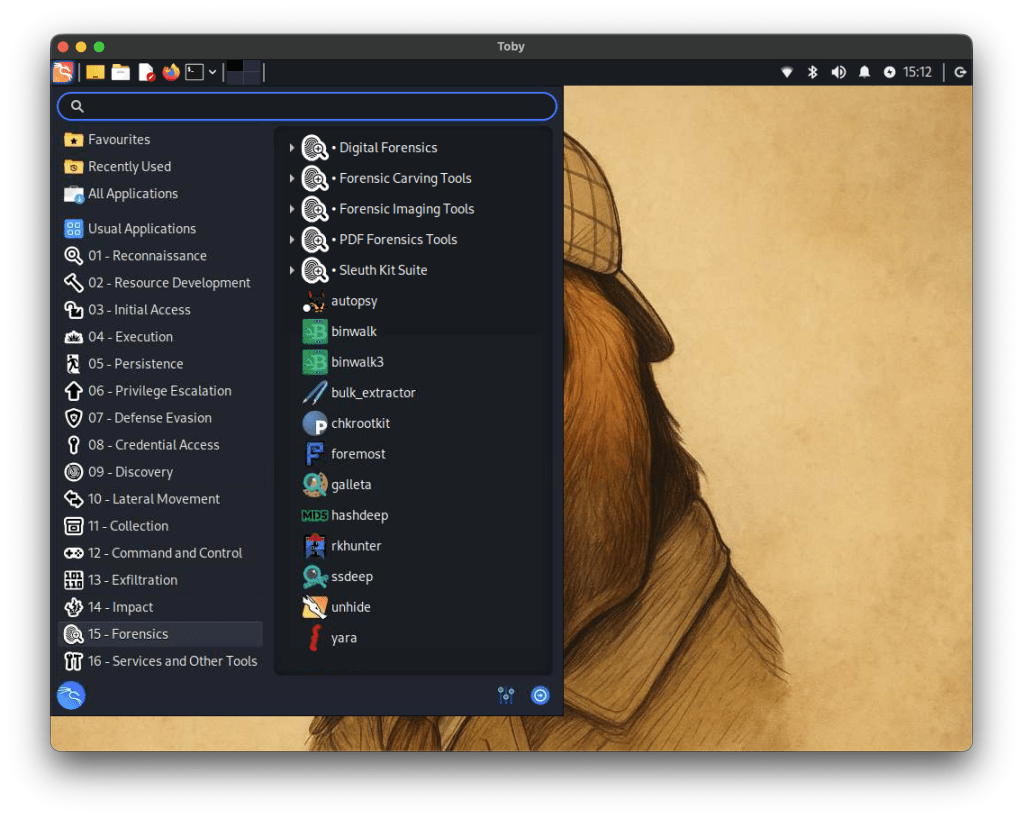
The OS is a clean, headless Kali Linux image configured specifically for ARM on the Pi Zero 2 W. Rather than trying to turn it into a desktop experience (even though it can), it boots fast, runs lean, and drops me directly into a terminal where I can get to work — whether over SSH or local keyboard.
Core Components:
• Base image: Raspbian (Debian-based) with Kali tools manually installed
Metapackages:
kali-linux-forensic
kali-linux-desktop
core/default Kali utilities and command-line tools, incrementally layered until the system was functionally equivalent to a full Kali install (minus unnecessary services)
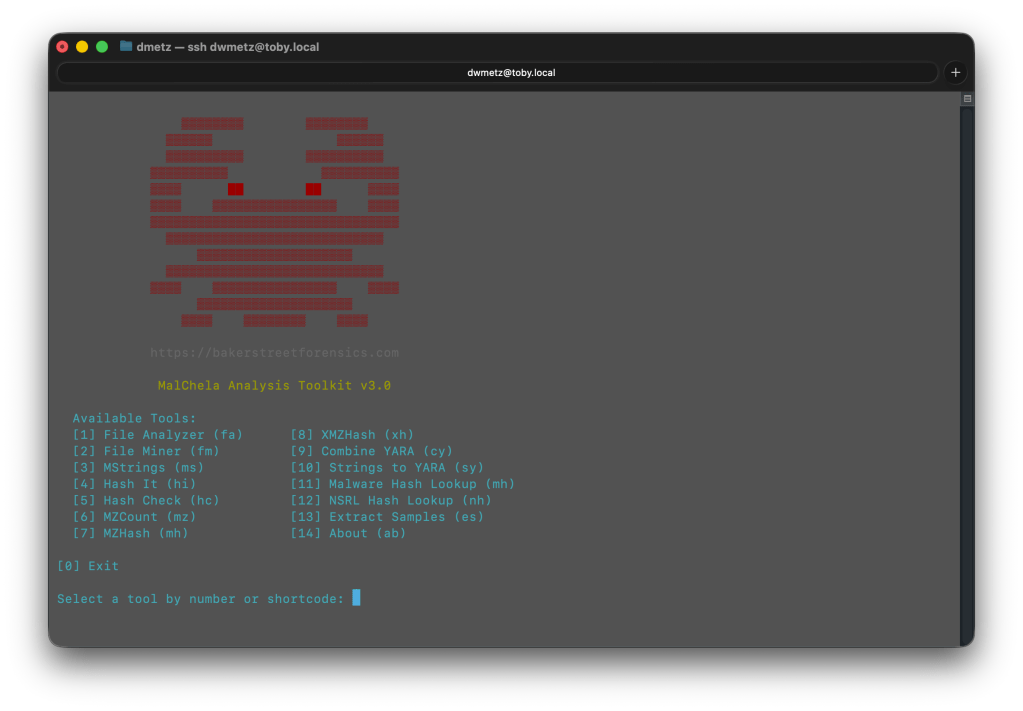
One of Toby’s handiest features isn’t a tool you run—it’s a tool to remember tools. toby-find is a simple but powerful command-line helper built into the system. It gives you fast access to a curated list of CLI forensics tools available on Toby, along with short descriptions and usage tips.
It’s like having a searchable cheat sheet, always available—perfect for field use when memory is fuzzy or connectivity is limited.
toby-find utility
What It Does
When you run:
toby-find [keyword]
it will search the help file for any tool(s) mentioning the keyword in name or description, and provide back a simple command syntax for each tool.
Example:
dwmetz@toby:~$ toby-find strings

Tool:        mstrings
Description: Extracts printable strings from files and maps them to MITRE ATT&CK techniques.
Example:     mstrings suspicious.exe
Category:    Malware
--------------------------------------------------
Tool:        strings_to_yara
Description: Generates a basic YARA rule from strings gathered manually or via mstrings.
Example:     strings_to_yara
Category:    Malware
--------------------------------------------------
Tool:        floss
Description: Extracts obfuscated strings from malware binaries.
Example:     floss suspicious.exe
Category:    Forensics
--------------------------------------------------
Tool:        rephrase
Description: Analyzes and reformats strings from documents or binaries.
Example:     rephrase input.txt
Category:    Forensics
--------------------------------------------------
Installed Tools:
Many of the tools are native to Kali, but some, including MalChela, were compiled manually or added through custom scripts. (Bold == MalChela tools or custom scripts.)
Tool Name
Description
bat
Cat replacement with syntax highlighting and Git integration.
binwalk
Scans binaries for embedded files and executable code.
bulk_extractor
Extracts artifacts like emails and credit card numbers from disk images.
combine_yara
Combines multiple YARA rule files into a single merged rule set.
dff
Digital Forensics Framework with CLI and GUI modes.
dig
Performs DNS lookups to retrieve domain IPs and records.
exiftool
Displays metadata from images, PDFs, and other file types.
extract_samples
Extracts files from password-protected ZIP and RAR archives.
fileanalyzer
Analyzes file metadata, headers, and hashes to assist triage and detection.
fileminer
Recursively scans a directory for files of interest based on extensions and type.
floss
Extracts obfuscated strings from malware binaries.
foremost
Recovers deleted files from disk images using file carving.
hashcheck
Computes multiple cryptographic hashes and prints them side-by-side.
hashdeep
Generates and verifies file hashes for entire directories.
hashit
Quickly generate MD5, SHA1, SHA256, and SHA512 hashes of a file.
htop
Interactive system monitor showing real-time process usage.
ipcalc
Performs subnet calculations for IP ranges.
ipstatus
Shows interface configuration and public IP address.
malchela
Main CLI launcher for the MalChela forensic toolkit, with a menu-driven interface.
malhash
Looks up file hashes using VirusTotal and MalwareBazaar.
mosh
SSH replacement that maintains session state during roaming.
mstrings
Extracts printable strings from files and maps them to MITRE ATT&CK techniques.
mzcount
Tallies file extensions and MIME types in a directory.
mzhash
Recursively hash all files in a directory using MD5.
ncdu
Disk usage analyzer with an interactive interface.
nmap
Performs host discovery and port scanning on a network.
nsrlquery
Checks file hashes against the National Software Reference Library.
p0f
Performs passive OS fingerprinting from live network traffic.
reglookup
Queries Windows Registry hives from the command line.
regripper
Extracts and parses registry artifacts using Perl-based plugins.
rephrase
Analyzes and reformats strings from documents or binaries.
rifiuti2
Parses Windows Recycle Bin INFO2 files for forensic analysis.
rkhunter
Scans the system for known rootkits and suspicious behavior.
rsakeyfind
Searches RAM dumps for RSA private key patterns.
safecopy
Recovers data from damaged or unstable storage media.
samdump2
Extracts password hashes from Windows SAM files.
scalpel
Performs file carving on disk images using headers/footers.
screen
Terminal window manager similar to tmux.
scrounge-ntfs
Recovers deleted files from NTFS file systems.
speed
Performs a network speed test from the command line.
ssh
Standard secure shell for remote command-line access.
Generates a basic YARA rule from strings gathered manually or via mstrings.
tcpdump
Captures and displays raw network packets in real time.
tmux
Terminal multiplexer for managing multiple sessions.
toby-find
Lists available tools and examples installed on the Toby system.
truecrack
Attempts to brute-force passwords for TrueCrypt volumes.
tshark
Terminal version of Wireshark for packet capture and filtering.
undbx
Extracts messages from Outlook Express DBX mailboxes.
unar
Extracts files from .rar and other archives.
unhide
Detects hidden processes and tasks in Linux systems.
upx
Compresses or decompresses executable files.
uptime
Displays system uptime and load averages.
vinetto
Parses thumbnail caches from Internet Explorer and Firefox.
vnc-off
Stops the running VNC session.
vnc-on
Starts a VNC server session for remote desktop access.
volatility3
Memory forensics framework for analyzing RAM dumps.
vpn-off
Stops the active OpenVPN session.
vpn-on
Starts the OpenVPN client using the configured lab connection.
winregfs
Mounts Windows Registry hives as a read-only virtual filesystem.
xmount
Converts between forensic image formats (e.g. EWF to RAW).
xmzhash
Recursively hash all files in a directory using MD5, SHA1, and SHA256.
This setup enables lightweight static analysis, file triage, memory inspection, and network capture — all from a Pi that fits in a Altoids case.
Build Process (Step by Step)
1. Flashing and First Boot
Using the Raspberry Pi Imager, I selected the ARM64 Raspbian image, added SSH and Wi-Fi credentials, and flashed the SD card.
Tip: The “advanced” options in Raspberry Pi Imager let you configure headless behavior up front, saving time on first boot.
2. Swap, Networking, and System Setup
The Pi Zero 2 W is modest on RAM — just 512MB — so swap is essential. I configured a persistent 2GB file-based swap at /swapfile, which gave the system enough breathing room to compile, run heavier tools, and avoid out-of-memory crashes during extended sessions.
Networking is Wi-Fi-only, so multiple SSIDs were configured using wpa_supplicant.conf for home and hotspot SSIDs. VPN has also been configured for remote access to my home malware lab.
3. Building and Installing MalChela
I cloned the full MalChela repository directly and compiled tool-by-tool:
cd MalChela
for tool in fileanalyzer mstrings hashcheck extract_samples ...; do
  cargo build --release -p $tool
done
4. Screen Choices
In addition to headless-mode, you can use a typical keyboard/monitor/mouse setup, for either cli mode or full gui.
The Pi Zero 2 W supports HDMI output via its mini-HDMI port, so you can plug it directly into any monitor or TV using a mini-HDMI to HDMI cable or adapter. For true portability, I needed something more flexible that didn’t require me packing a separate screen.
Toby running in desktop mode
To solve this, I added a compact USB-based HDMI capture device to the kit. It effectively turns any mobile device into a live monitor. By connecting Toby’s HDMI out to the capture card and plugging it into my iPad or iPhone, I can preview the Pi’s screen on the go. This setup also works with OBS, QuickTime, or dedicated capture apps for recording demos or screen sessions — handy for teaching or documenting tool usage.
Input is handled with a small wireless Bluetooth keyboard, which pairs cleanly with Toby for direct control. This combo — Pi output through HDMI capture and keyboard input via Bluetooth — lets me interact with Toby completely untethered.
In practice, I rarely need the GUI. But when I do, this setup lets me bring it up quickly without dragging along a dedicated screen.
Final Result: What Toby Can Do
Toby isn’t just a cute Pi rig with a name. It’s a real tool, and its current feature set reflects that.
💼 Mobile Forensics Platform
Mount, triage, and scan USB drives with fileanalyzer
Run YARA scans and generate custom rules from strings
Look up hashes via VirusTotal, MalwareBazaar, and NSRL
Analyze memory dumps with Volatility 3 (including plugin selection)
Run offline IOCs scans via mstrings or custom shell scripts
What’s Next for Toby
Building Toby was an exercise in maximizing power in a small footprint through deliberate choices. For educators, students, and curious tinkerers, Toby proves that hands-on, portable, and fun learning and teaching forensics can be achieved. If you’re building your own, start with what you have: a Pi, a Grid-It, and your imagination. Sometimes, the best tools aren’t the ones with the biggest screens or fastest chips—they’re the ones you have with you.
I’m already thinking about upgrades. One in consideration is a case upgrade, a true lunchbox-style metal enclosure — something retro and rugged, with a small screen inside the lid.
Let me know in the comments if you’d like a public release of toby-find as an add-on to install for Kali builds for forensics and malware analysis.
Ever since the 2021 iPad models with USB-C chargers came out, I’ve been intrigued by the notion of Raspberry Pi gadgets. In short, these are Raspberry Pi devices that draw their power, and/or networking from the USB-C port on the iPad Pro.
Having awakened my tinkering spirit with the internet speed monitor project, I was looking for another project. I had one unused Raspberry Pi Zero W in a box of spare Pi parts, so that’s where I started.
I chose Kali for the distribution to use because there are images specific to various Raspberry Pi hardware models, and because the distribution itself supports many popular Linux tools for Forensics and Reverse Engineering. REMnux is my default Linux for malware poking, but to date it’s only supported on Intel architectures.
Know from the start you’re not going to be using this device for processing on the scale of Enron, but for access to a wider toolset when on the go, and especially for training I think it’s a pretty cool setup. If you’re looking to set up a mobile development environment, or still run Kali but with more oomf – there’s number of resources to do so using a Pi 4. Since the Pi Zero W is powered by a USB-micro, it cannot support networking (iPad to Pi) over the USB port. Later models like the Pi 4 (USB-C powered) are capable, but at the time of the project, all mine be were occupied. In this case we’ll be connecting to the Pi over WiFi via SSH.
Grab the image for Pi Zero W (or whatever’s applicable for the model you’re running from https://www.kali.org/get-kali/#kali-arm. There’s plenty of documentation on enabling SSH if it isn’t by default. On this particular build for the Pi, it was. You’ll also want to install tightvncserver.
Depending on which Pi hardware version you’re using, the Pi will have different capabilities. Notably lacking on the Pi Zero W, the resources to run any modern browser. But since I have the iPad that it’s running from it’s not like I’m missing it at all.
Kali supports the installation of what they call meta-packages. These are specific sets of tools or features to support different capabilities (Bluetooth hacking, wireless hacking, etc.) For my build I chose the reverse engineering and forensics packages as those are the tools I’m most interested in experimenting with.
I had a bit of trial and error when it came to the physical USB connections. Originally I had a series of USB-C connecting adapters, terminating with a USB-C to USB micro adapter. When I had this franken-jack plugged into the iPad the Pi wouldn’t power up. However if I had a USC-C cable connected to the jack, or between the jack and the iPad, I could get power (just with a cable I didn’t need.) At some point I had the idea of introducing a USB-A into the mix and voila, power to the Pi. All that said, the final hardware combo consisted of a USB-C (male) to USB-A (female) 180 degree adapter, and a USB-A (male) to USB-Micro (male) adapter.
The 180 degree adapter enables a very low profile while having a reasonable gap for ventilation, even when connected to a Magic Keyboard.
Plug the device into the USB-C port on the iPad a give it a minute or two to boot up.
Windows Subsystem for Linux (WSL) adds a lot of capability and convenience for running DFIR applications on a Windows host. Previously I wrote about how to add a SIFT/REMnux Ubuntu distribution to WSL.
Another tip I’d like to share with you is setting up separate profiles for frequently used applications.
Volatility is one of the applications I’m in frequently, whether for work or lab(work). Sure, I can open a command window and then navigate to the appropriate application path; but why not make it a one-click option.
To begin, open Windows Terminal, and go to the Settings menu.
On the bottom left choose select ‘Add a new profile.’
PowerShell (Core) is my default shell environment. I’ll select this as the profile to duplicate.
After you hit ‘Duplicate’ you’ll be presented with a copy of the profile.
Update the Name and Starting directory to reflect the application path.
You can customize the Icon and Tab title. Under the Appearance tab you can assign a custom background for the WSL profile. Be sure to click Save when you’ve made your changes.
Now when I want to open a Volatility session, it’s right there on the drop down in WSL.
If you have WSL parked on the Taskbar, you can select the new profile (or any other profile) with a right-click.
If you want to have your WSL instances in separate windows, versus the default tabbed layout, right clicking from the taskbar will open the selected session in a new window.