As 2025 draws to a close, I’m taking a moment to reflect on what turned out to be one of my most productive years in code. From major releases to entirely new projects, this year saw significant evolution across my DFIR toolkit—driven by real-world incident response needs, classroom teaching experiences, and late-night tinkering sessions fueled by good bourbon and better puzzles.
What started as continuing work on CyberPipe evolved into a year of substantial innovation: creating MalChela for YARA and malware analysis, building a portable Raspberry Pi forensics platform, developing automated timeline generation workflows, and crafting specialized utilities that solve specific problems I encountered in the field. Each tool represents not just lines of code, but practical solutions to challenges that digital forensics and incident response professionals face daily.
Whether you’re a seasoned forensic analyst, an incident responder building your toolkit, or a student just getting started in DFIR, my hope is that these open-source projects make your work a little easier and a lot more efficient. All tools remain freely available on GitHub, because I believe the best way to advance our field is to share knowledge and capabilities openly.
Here’s what kept me busy in 2025:
MalChela – YARA & Malware Analysis Toolkit (Rust)
My flagship project that evolved significantly throughout 2025:
- March: Initial release – Combined 10 programs into one Rust workspace for YARA and malware analysis
- May: v2.1 – Added smoother workflows, better third-party tool integration, and enhanced argument handling
- May: v2.2 “REMnux Release” – Native support for REMnux, integrations with Volatility3, Tshark, YARA-X
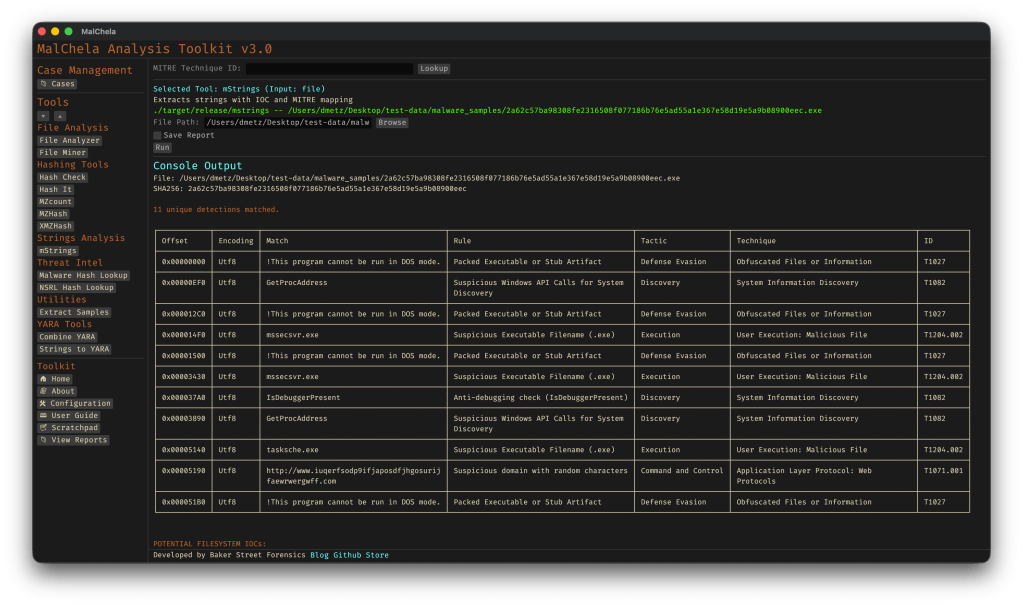
- June: v3.0 – Major update introducing Case Management system, FileMiner (replacing MismatchMiner), and tool suggestion capabilities based on file characteristics
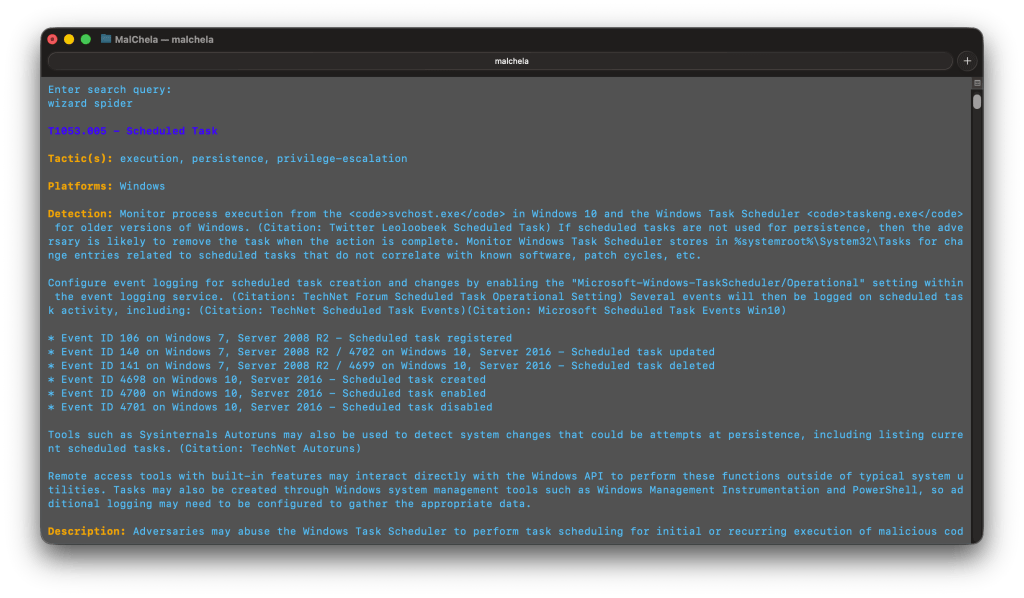
- July: v3.0.1 – Refinements to mStrings, improved MITRE mappings, “Select All” functionality, optimizations for running on Toby
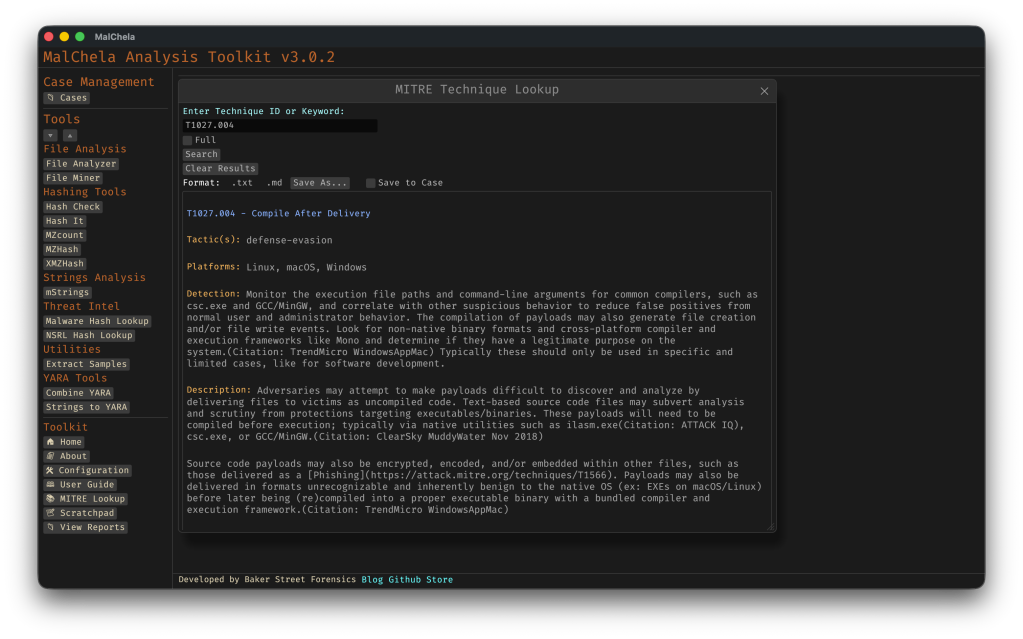
- August: v3.0.2 – Enhanced threat hunting with MITRE ATT&CK technique lookup
MalChela at a Glance
- Rust-based malware analysis toolkit combining YARA scanning, file analysis, hash generation, string extraction with MITRE ATT&CK mapping, and automated malware sample extraction from password-protected archives
- Multiple specialized utilities including mzhash/xmzhash for corpus generation, file type mismatch detection, entropy analysis, PE structure examination, and fuzzy hashing capabilities
- Integrated threat intelligence with VirusTotal and Malware Bazaar API support, NSRL database queries for known-good file filtering, and Sigma rule application for IOC identification
- Case management system (v3.0) featuring unified tracking of files, tools, and notes in case.yaml format with auto-saved outputs, tagging, search functionality, and VS Code integration
- Extensible architecture supporting custom tool integration via tools.yamlconfiguration, enhanced support for Volatility 3, TShark, and YARA-X, with both GUI and CLI modes (WSL2-compatible on Windows)
- Complete documentation embedded as PDF or online
https://github.com/dwmetz/MalChela
CyberPipe – Incident Response Collection Tool (PowerShell)
Continued evolution of the enterprise digital evidence collection script:
- May: v5.1 – Streamlined profiles with better flexibility, customizable collection profiles
- October: v5.2 – Improved collection methods with dual disk space validation, SHA-256 hashing of artifacts, single-file reporting, network collection simplification
- November: v5.3 – Critical PowerShell 5.1 compatibility fixes, dual validation logic, enhanced reliability across all PowerShell environments
https://github.com/dwmetz/CyberPipe
CyberPipe-Timeliner ✱New✱ (PowerShell)
- November: CyberPipe-Timeliner – New companion project to CyberPipe that automates the workflow from Magnet Response collections to unified forensic timelines using Eric Zimmerman’s EZ Tools and ForensicTimeliner
https://github.com/dwmetz/CyberPipe-Timeliner
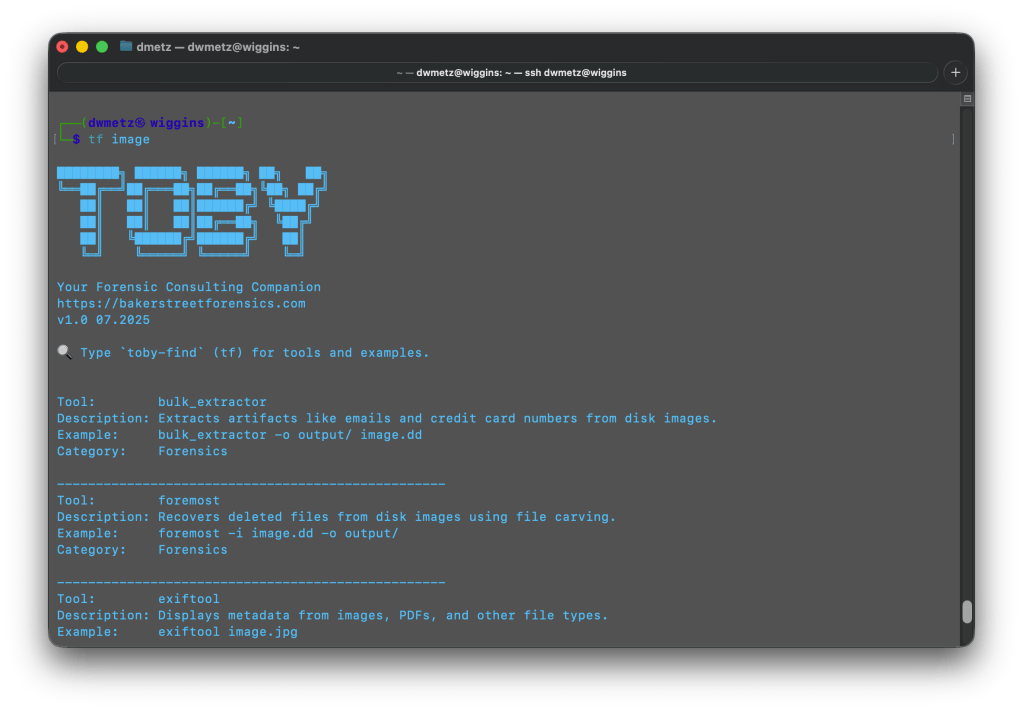
Toby – Portable Raspberry Pi Forensics Toolkit
- July: Released Toby – A compact forensics toolkit built on Raspberry Pi Zero 2 W running customized Kali Linux, designed for headless operation via SSH/VNC, perfect for field analysis and malware triage
Toby-Find
- July: Toby-Find – Terminal-based command-line helper tool for discovering CLI forensics tools in KALI and REMnux environments, created initially for university teaching
https://github.com/dwmetz/Toby
Crabwise – USB Device Benchmark Utility (Rust)
- August: Released Crabwise – A lightweight USB benchmarking tool that measures true read/write speeds of USB devices for forensic workflows. Tests write throughput with pseudo-random data and read performance under uncached conditions. Includes logging functionality to track performance across different cables, hubs, and connection paths, helping forensic investigators optimize their hardware setups.
https://github.com/dwmetz/Crabwise
Toolbox Utilities – Specialized Python and Bash Scripts
Standalone tools maintained in the Toolbox repository:
- October: CoreBreaker.py – Breaks large yara-rules-core files into smaller .yar files for tool ingestion
- October: EtTu.py – Caesar cipher brute force decoder (created for Murdle puzzle solving); After all, All work and no play makes Jack a dull boy.
- November: cloudtrail_timeline.py – Parses AWS CloudTrail JSON logs and outputs CSV format for Timeline Explorer
- November: mac_triage_timeline.sh – Processes Mac-Triage ZIP files and generates timeline for Timeline Explorer
- November: uac_timeline.sh – Processes UAC tar.gz files and generates timeline for Timeline Explorer (Linux/macOS)
https://github.com/dwmetz/Toolbox
All projects are available on my GitHub at github.com/dwmetz, with detailed documentation on bakerstreetforensics.com. My goal is making DFIR and malware analysis more accessible, automated, and efficient for incident responders and forensic analysts.