CSIRT-Collect USB can be found in the main repository for CSIRT-Collect. CSIRT-Collect is a PowerShell script to collect memory and (triage) disk forensics for incident response investigations.
CSIRT-Collect USB is designed to run directly from a USB device. While a network deployment certainly supports automation, as an Incident Responder I can think of several examples where that wouldn’t be an option:
An air-gapped manufacturing environment
Hospital/Medical Environments
Ransomware incidents when the assets have been detached from the network
Preparation is the first phase of the Incident Response lifecycle. (PICERL) Once you’ve tested and/or adapted the collection for your environment, consider prepping a handful of drives and having them pre-deployed to sites where you’re likely to need them.
The Setup
First off you’re going to need a high-capacity USB device. Larger sized flash drives will work. Personally I’m a fan of Samsung (T series) SSD drives, both for their size and their write speeds during acquisitions.
On the root of the USB device:
A (initially empty) folder named ‘Collections’
KAPE directory from default KAPE installation
EDD.exe in \KAPE\Modules\bin\EDD (Encrypted Disk Detector)
CSIRT-Collect_USB.ps1
MRC.exe (Magnet RAM Capture)
Launch
To run the script, open an elevated PowerShell prompt and browse to the USB device. Then simply
.\CSIRT-Collect_USB.ps1
CSIRT-Collect_USB.ps1 starting
What it Captures
The first process the script runs is Magnet RAM Capture. Once the RAM has been captured, the windows build (profile) is captured. The RAM image and the build info are named to reflect the asset hostname being collected.
The next process is the KAPE Triage collection. Host artifacts are acquired and then assembled as a .vhdx (portable hard disk) image. After the KAPE Targets portion completes, KAPE calls the Encrypted Disk Detector module which checks the local physical drives on a system for TrueCrypt, PGP, VeraCrypt, SafeBoot, or Bitlocker encrypted volumes. This information is saved into the Collections directory, as well as displayed to the responder to identify other volumes that may need to be collected while the system is live.
Lastly, if BitLocker is enabled for the OS drive the script will capture that information as well and back-up the recovery key.
Disk Encryption Check
Collection Contents
Inside the Collections folder, a subfolder will be created for each asset collected. The size of the USB device will determine how many collections can be captured before the results need to be offloaded.
The \Collections\%hostname% directory will include:
Console log capturing all KAPE targets activity
.vhdx of the host artifacts
collection complete date/time .txt
Memory acquisition .raw
Windows profile (build information) .txt
In the \Collections\%hostname%\Decrypt folder you will find
console log for KAPE modules (EDD)
recovery key for BitLocker (C) volume .txt
Live Response directory with the output of EDD .txt
I’ve been using Visual Studio Code as my go to editor for PowerShell, JSON, plain text, and recently even a dash of Python. VS Code is very extensible and much like the App Stores we’ve come to know, there’s an extension marketplace to broaden its capabilites.
One of my favorite extensions is the .NET Interactive Notebooks. Notebooks combine markdown text and code snippets that you can run right within the notebook. This can be very useful for designing playbooks for a SOC or Junior Analyst to execute as you can describe and provide guidance on how to utilize the code functions.
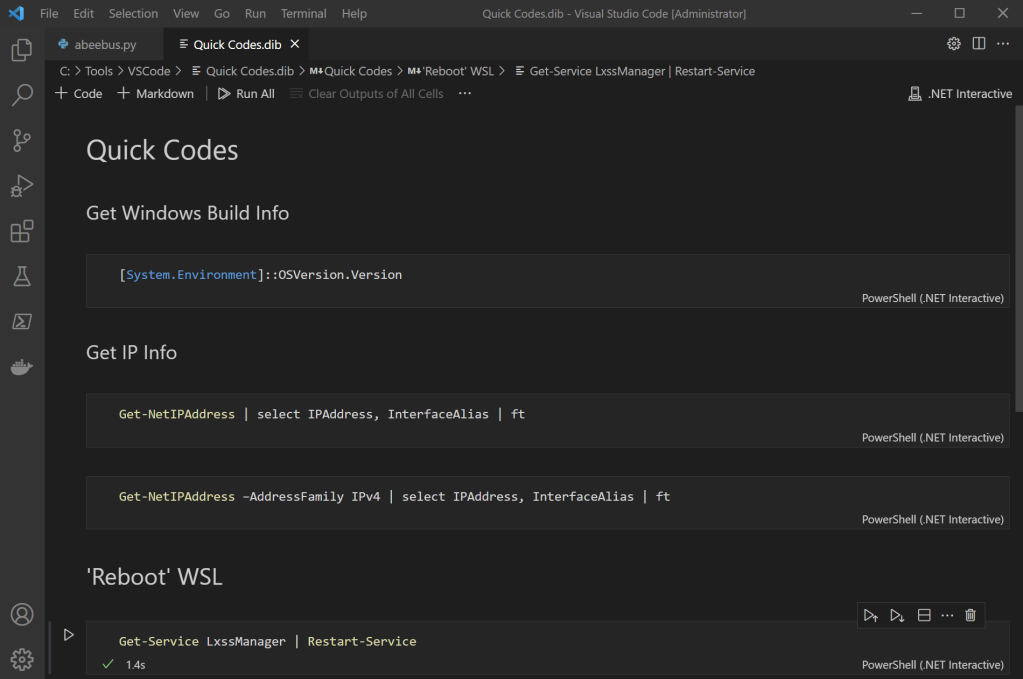
An easy way to get started with Interactive Notebooks is to create a “Quick Codes” notebook. Title it as you choose. For this particular notebook, I’ve got a number of commands saved that I may reference semi-frequently, but due to limited space in my mind palace I wind up googling them anyway, even if it’s googling my own site.
Trying to remember a specific PowerShell syntax
Note before installing: As your scripts and notebooks develop, there is a likelihood that you will want to run some either as Administrator or using another user credential. One way to do so simply launch VS code (right click) as Admin, or use the Run As feature when you launch the application.
Download and install VS Code. Note – as you may be running this with multiple credentials, the “System” installer is recommended. https://code.visualstudio.com/Download#
When inside VS code, bring up the Extensions view by clicking on the Extensions icon in the Activity Bar on the side of VS Code, or the View: Extensions command (Ctrl+Shift+X). Search for “interactive” Select .NET Interactive Notebooks and choose install
Once everything is all set, relaunch VS Code.
Hit Ctrl+Shift+P and select .NET Interactive – Create New Blank Notebook.
That’s it. Now start adding blocks for text and code. You can use simple markup codes for Heading (#), Heading 2 (##), Heading 3 (###), etc.
To execute the code snippet, just click on the small ‘play’ arrow to the left.
Do you have any novel uses for Interactive Notebooks? If so, please share in the comments area.
I’ve been a fan of the SIFT Linux distribution from my very first SANS class. I think back then Ed Skoudis was teaching Nmap subnetting on an abacus, but still it’s been a loyal companion ever since. I’ve got an archive of all the distributions (with their class specific tweaks) from all the courses I’ve taken throughout my career. Recently, I’ve been using REMnux, another SANS Linux distribution, specifically for Volatility 3 for memory analysis and some of the other tools for malicious document examinations.
Through all these years of use, it was almost all leveraging virtual machine (VM) images. Often there was at least one machine in my home lab that had SIFT running as the native OS – for when I had something processor or memory intensive to run. The challenge with VM’s is that they’re competing with the host system for resources. As Moore’s Law has advanced so have the clock cycles at my disposal – but there’s still always going to be a trade-off, so scale your systems appropriately.
A little over a year ago, I started using the “packages only” or “server mode” of the SIFT distribution, running under Windows Subsystem for Linux (WSL) on a Windows 10 machine. The installation wasn’t always smooth but once it was running – good times. I now had all my favorite Linux forensics tools running side by side on my Windows system.
The SIFT distribution was recently updated with full support for the latest LTS version of Ubuntu (20.04). REMnux as a standalone has been on 20.04 for a while. What I’m going to walk you through here is how to install both SIFT and REMnux within WSL, and how to backup and share your customized install.
On the first boot, Ubuntu will have you specify a username and password. Forensicator works for me and doesn’t present any OpSec issues if I have to include screenshots in reports (or intriguing blog posts).
Before installing SIFT, ensure the OS is up to date by running sudo apt update && sudo apt upgrade
Elevate to root to for the installation, otherwise there may be permissions issues during the install. sudo su
Install SIFT within WSL using the syntax sift install –mode=server
The process could take a while depending on both your hardware resources and internet speeds. Feel free to browse other posts here at Baker Street while you wait. Just make sure you come back as there’s more to do.
Adding REMnux to SIFT
Once the SIFT distribution is installed, we’re going to add the REMnux distribution over the top. Doing so will provide you the full toolset of both distributions, all running in one WSL instance.
Note: After the install, REMnux will suggest you reboot the pc. How do you reboot an Ubuntu instance in WSL? Open a PowerShell window as Administrator and type Get-Service LxssManager | Restart-Service
**update – If you’re running WSL 2, the command to ‘reboot’ WSL is
wsl --shutdown
When you launch the instance the next time wsl will start.
Great! Now we’ve got the full tool stack from both – running within our Windows environment. I prefer using WSL over a VM when I have the opportunity as the overhead resources used to run the 2nd OS (Ubuntu) in WSL is less intensive than booting up a full VM.
Just one more step and we’ll be able to backup, copy and reload the customized build.
Exporting your SIFT-REMnux Distro
Exporting your build will enable a number of things. If your environment gets corrupted for any reason you can reload the build from a known good state. You can also use this format to share the installation with members of your team so you’re all working from the same toolset. This also works well to add this customized build to a system that may have restricted or limited internet access and cannot access all the necessary repositories to pull down the tools.
In a PowerShell window as Administrator, wsl -l will list the installed WSL distributions. In this case the only installation is the Ubuntu installation we just customized.
In this example I’m exporting the instance to a location on a D:\ drive with the filename of SIFT-REMnux.tar. The syntax is wsl –export [name of WSL instance] [export file path and file name]. Tar is the required format for backing up and restoring WSL instances.
Voila! You’ve now got a backup of your SIFT and REMnux WSL installation. On the last step I’ll show you have you can import the customized distro to another Windows 10 system.
Importing your SIFT-REMnux Distro
Note: the new system will need to have WSL enabled as discussed in the beginning of the post. The Ubuntu distro does NOT need to be installed.
To import the distro use the syntax wsl –import [desired name for distro] [file path where distro will live] [tar file being imported]. In this case I have the .tar file in C:\WSL and will be installing to C:\WSL\SIFT-Linux folder. Once again you want to use an elevated PowerShell session to perform the import.
That’s it. You’ve now added the customized SIFT-REMnux WSL instance to your system.
Once the process completes you can verify the distro was loaded using the wsl -l command
In this case I had a previous Ubuntu 18.04 instance, and now the new SIFT-REMnux instance is visible as well.
To invoke your SIFT-REMnux instance wsl –distribution SIFT-REMnux
To validate the running version numbers for SIFT and REMnux use sift -v and remnux -v respectively.
There are two means by which to ingest Microsoft Teams information into Magnet Axiom for processing. The first approach uses Axiom Process. If you’re collecting in this manner you will need to have the credentials of the user you are collecting from. Axiom will use those credentials to log into O365 and retrieve the user’s data. Depending on the conditions of the investigation, you may have the option of resetting the password to gain access.
Magnet Axiom Cyber Teams Collection
If you don’t have the user’s credentials, but you do have administrative access to the Exchange environment, you can run a search from the Microsoft Security and Compliance center. Once the search completes you can export/download the results as a PST. To ingest the PST into Axiom just ‘add evidence’ , ‘files & folders’ and then browse to the PST file.
To speed up the process, I’ve written a small PowerShell script to build and run the Compliance Center search. The script depends on the ExchangeOnlineManagment module being installed. In this script we’re connecting to Security & Compliance PowerShell using MFA and modern authentication.
TeamsSearch.ps1
The script prompts for:
the identity (admin ID) of the investigator
a name to save the Compliance search
the email address of the user to collecting
Once this information is provided the script will build and run the Compliance Search in O365. From this point you can log into Compliance Center, navigate to the search and then export the contents as a PST.
<# MS Teams Security & Compliance Search
author: Doug Metz https://github.com/dwmetz
Note this script requires previous installation of the ExchangeOnlineManagement PowerShell module
See https://docs.microsoft.com/en-us/powershell/exchange/connect-to-scc-powershell?view=exchange-ps for more information.#>
[string]$user = Read-Host -Prompt 'Exchange Credentials'
Connect-IPPSSession -UserPrincipalName $user
[string]$name = Read-Host -Prompt 'Enter a name for the search'
[string]$email = Read-Host -Prompt 'Enter the users email address'
new-compliancesearch -name $name -ExchangeLocation $email -ContentMatchQuery 'kind=microsoftteams','ItemClass=IPM.Note.Microsoft.Conversation','ItemClass=IPM.Note.Microsoft.Missed','ItemClass=IPM.Note.Microsoft.Conversation.Voice','ItemClass=IPM.Note.Microsoft.Missed.Voice','ItemClass=IPM.SkypeTeams.Message'
Start-ComplianceSearch $name
Get-ComplianceSearch $name
New-ComplianceSearchAction -SearchName $name -Export
Write-Host "Search initiated"-ForegroundColor Blue
Write-Host "Proceed to https://protection.office.com/ to download the results."-ForegroundColor Blue
Either copy the code from here, or download from my GitHub repository.