“I consider that a man’s brain originally is like a little empty attic, and you have to stock it with such furniture as you choose.” — Sherlock Holmes, A Study in Scarlet
There’s a particular kind of frustration that I suspect a lot of researchers know well: you’re in the middle of something, an analysis, a blog post, a deck, and you know you’ve written or read or bookmarked something about this before. But where? Which device? What did you call it?
For me, that somewhere spans three places: folders on my computer (best described as neuro-spicy organized chaos – rabbit holes with rabbit holes), Apple Notes full of quick thoughts, and a Safari Reading List of unread articles related to a variety of subject areas. Good information lives in all three. Finding it quickly is another matter.
So I built something to fix that, and yes by built I do mean vibe-coding played a major factor. But this was something I was doing for fun. Don’t hate the game. Adapt how you play.
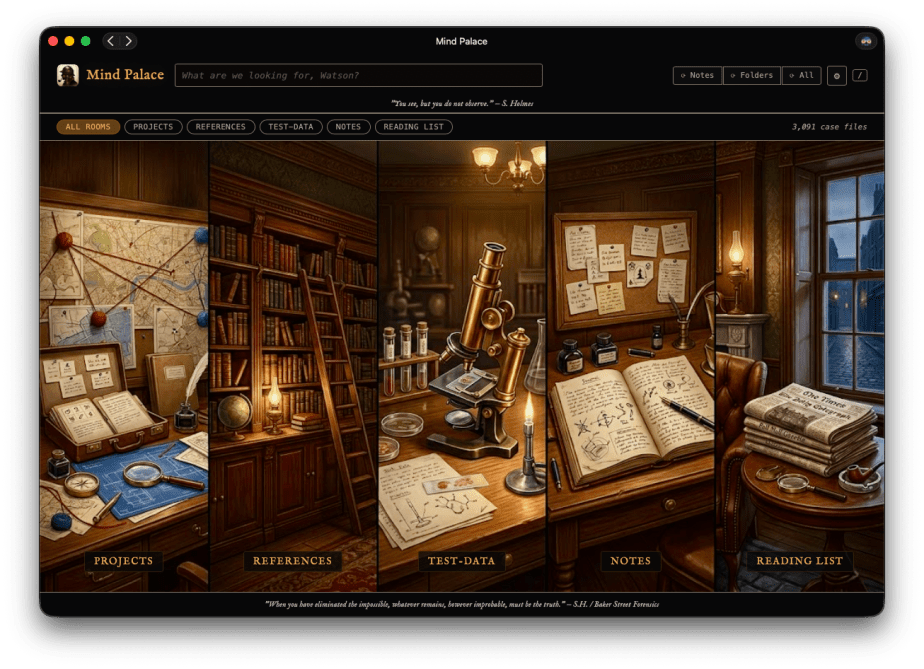
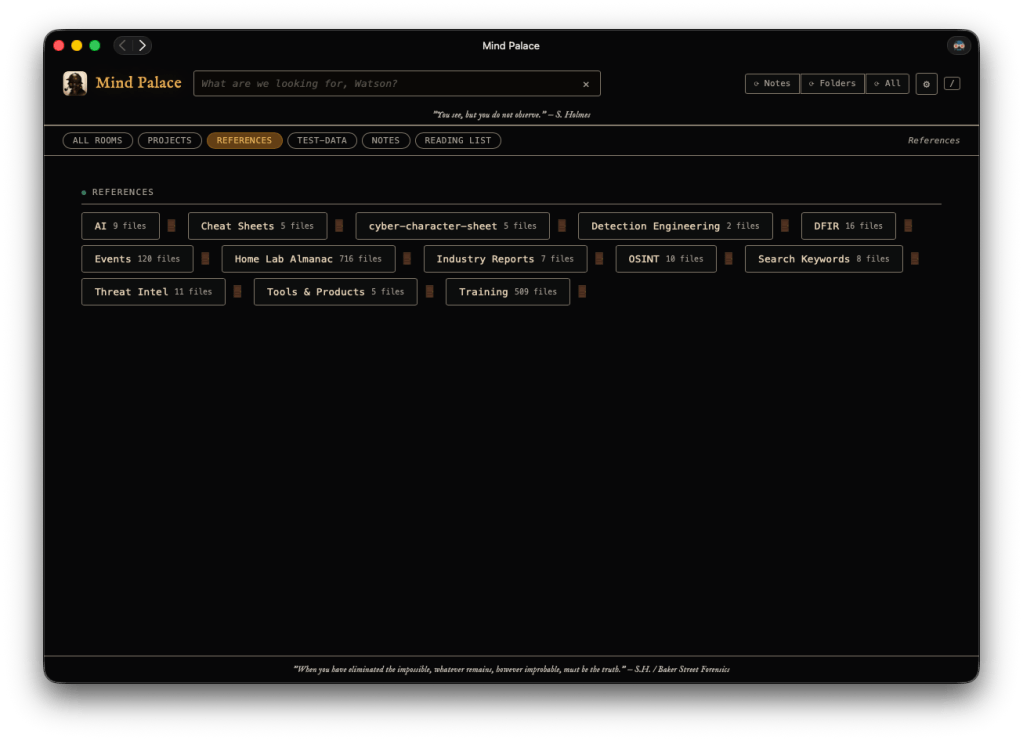
Mind Palace is a personal knowledge search engine for macOS. It runs locally — no cloud, no API calls, no data leaving your machine — and indexes your Desktop folders, Apple Notes, and Safari Reading List into a single, fast, full-text search interface. The UI leans into the Holmes aesthetic too. Categories are called Rooms and the home screen panels are illustrated like scenes from 221B Baker Street. I had a lot of fun with that part.
When you’re navigating on the main Mac device – the folder headings have 🚪 links, which opens the respective folder in Finder. Room with doors and doors within doors.
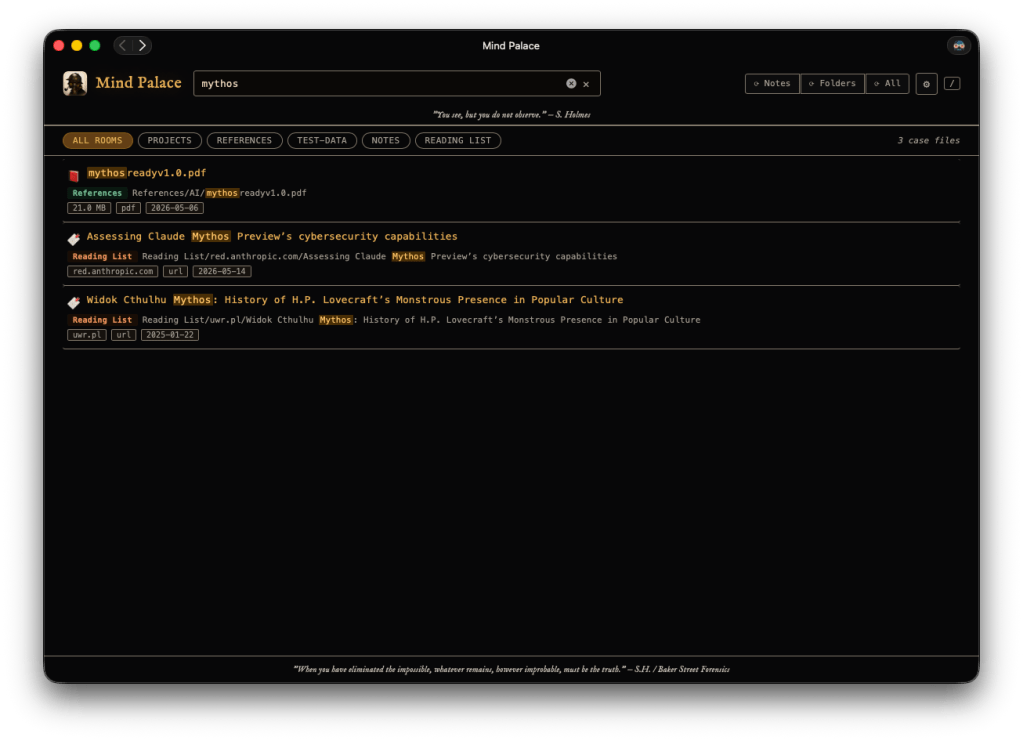
You run it, open a browser, and you’ve got one search box that reaches across everything. It also installs as a PWA, so I have it pinned on my iPad and phone. I can trigger a rescan from any of those devices and the search index updates on my Mac in the background. After the success I had with updating the interface for MalChela to a PWA, it had me thinking of other use cases I could adapt for myself.
The name felt obvious. The Baker Street brand has always leaned into the Holmes aesthetic, and the Mind Palace is my attempt to build something like that for the chaotic archive that is my actual working brain. I had a pretty clear picture of what I wanted: something that would index the three places I actually put things, serve a clean search UI I could use from any device on my network, and stay entirely local. Simple enough in concept.
The reality was a little more interesting. Apple Notes in particular has a lot going on under the hood. Some notes live in a local SQLite database. Others exist only in iCloud-synced folders and require a completely different access strategy. Getting both to work reliably, and fast, meant going down some rabbit holes I didn’t fully anticipate when I started. But that’s usually where the interesting engineering happens.
The UI came together in a single HTML file, no framework, no build step, just vanilla JavaScript served by a lightweight Python HTTP server. That decision paid off immediately when I wanted to use it from my iPad: install the PWA, point it at my Mac’s local IP, done. The processing stays on the Mac; the tablet is just a display.
Coming Soon
Mind Palace is not released yet, but it’s close. The Python reference implementation is working well in daily use, and I’ll be pushing it to GitHub soon. It came together pretty quickly so I want to do a little more stress testing on it before that happens. The longer-term goal is a proper native Mac app, a menu bar utility with an embedded server, and an iOS companion that discovers it automatically on your local network. That’s a future chapter, or even a novella.
For now, if you want to know when it drops, the best place to watch is my GitHub profile at github.com/dwmetz. I’ll also post here and on Bluesky when it’s live.
If you’ve got a Notes library, a Reading List, and a bunch of folders that hold more institutional knowledge than you can reliably remember, this was built for exactly that situation. More to come.
As one tends to do on Saturday mornings with coffee in hand, I was reviewing two samples that were attributed to the LunaStealer / LunaGrabber family. Originally I was validating that tiquery was working with the MCP configuration, however what started as a quick TI check turned into a full static analysis session — and it gave me a good opportunity to put the MalChela MCP integration through its paces in a real workflow. This post walks through how that investigation unfolded, what the pivot points were, and what we found at the bottom of the rabbit hole.
The Setup
If you haven’t seen the MalChela MCP plugin before, the short version is this: MalChela is a Rust-based malware analysis toolkit I’ve been building for a while — tools like tiquery, fileanalyzer, mstrings, and others. The MCP server exposes all of those tools to Claude Desktop natively, so instead of dropping to the terminal for every command, I can run analysis steps conversationally and let Claude help interpret the results and suggest next moves.
This is not replacing the terminal — it’s augmenting it. The pivot decisions still come from the analyst. But having a reasoning layer that can look at mstrings output and say “that SetDllDirectoryW + GetTempPathW combination is staging behavior, and here’s the ATT&CK mapping” is genuinely useful when you’re moving fast.
Both samples were sitting in a folder on my Desktop. I had SHA-256 hashes. Let’s go.
Phase 1: Threat Intelligence Query
First move is always TI. The MalChela tiquery tool hits MalwareBazaar, VirusTotal, Hybrid Analysis, MetaDefender, and Triage simultaneously and returns a combined results matrix. Two calls, two answers.
Sample 1 (4f3b8971...) came back confirmed LunaStealer across all five sources. First seen 2025-12-01. Original filename sdas.exe. VT tagged it trojan.generickdq/python — already telling us something about the build.
Sample 2 (d4f57b42...) was more interesting. MalwareBazaar returned both LunaGrabber and LunaStealer tags. Triage clustered it with BlankGrabber, GlassWorm, IcedID, and Luca-Stealer. The original filename was loader.exe. That’s a different kind of name than sdas.exe. One sounds like a throwaway test artifact. The other sounds deliberate.
The TI results alone suggested these weren’t just two copies of the same thing. They were potentially different components of the same campaign.
Phase 2: Static PE Analysis
fileanalyzer and mstrings on both samples.
The first thing that jumped out was the imphash — f3c0dbc597607baa2ea891bc3a114b19 — identical on both. Same section layout, same section sizes, same import count (146), same 7 PE sections including the .fptable section that PyInstaller uses for its frozen module table. These two samples were compiled from the same PyInstaller loader template with different payloads bundled inside.
But the entropy diverged sharply. Sample 1 (sdas.exe) came in at 3.9 — low, even for a PyInstaller bundle. Sample 2 (loader.exe) was 6.9 — high, indicating the embedded payload is compressed or encrypted more aggressively. Combined with the file size difference (47 MB vs 22 MB), this was the first signal that what was inside each bundle was meaningfully different.
mstrings gave us 22–23 ATT&CK-mapped detections across both samples — largely the same set: IsDebuggerPresent, QueryPerformanceCounter, SetDllDirectoryW, GetTempPathW, ExpandEnvironmentStringsW, OpenProcessToken. Standard infostealer staging behavior. Tcl_CreateThread showed up in both, which is a PyInstaller artifact from bundling Python with Tkinter. The VT python family tag made more sense in context.
Phase 3: PyInstaller Extraction
Both samples were extracted with pyinstxtractor-ng. This is where the two samples started to diverge clearly.
Sample 1 entry point: sdas.pyc — Python 3.13, 112 files in the CArchive, 752 modules in the PYZ archive.
The name cleaner.pyc inside a file called loader.exe is a tell. That’s not a stealer payload name. That’s something that runs after.
The bundled library sets were nearly identical between both — requests, requests_toolbelt, Cryptodome, cryptography, psutil, PIL, sqlite3, win32 — same stealer framework. But Sample 2 had a unique addition: a l.js reference (mapped to T1059 — Command and Scripting Interpreter). A JavaScript component not present in the December build. The OpenSSL versions also differed: Sample 1 bundled libcrypto-3.dll (OpenSSL 3.x), Sample 2 had libcrypto-1_1.dll (OpenSSL 1.1). Different build environments, roughly one month apart.
At this point the working theory was solid: Sample 1 is a standalone stealer. Sample 2 is a later-generation dropper/installer with an updated payload and additional capability.
Phase 4: Bytecode Decompilation
decompile3 couldn’t handle Python 3.11 or 3.13 bytecode. That’s a known limitation. pycdc (Decompyle++) handles both.
sdas.pyc decompiled cleanly — the import stack made the capability set immediately obvious:
from win32crypt import CryptUnprotectData
from Cryptodome.Cipher import AES
from PIL import Image, ImageGrab
from requests_toolbelt.multipart.encoder import MultipartEncoder
import sqlite3
CryptUnprotectData for browser master key decryption. AES for the decryption itself. ImageGrab for screenshots. MultipartEncoder for structured exfiltration. Classic infostealer, nothing surprising.
cleaner.pyc was a different story. The decompiler output opened with this:
Heavy obfuscation — byte arrays used to reconstruct eval, getattr, and __import__ at runtime so none of those strings appear in plain text. The approach is designed to evade static string detection. Decode the byte arrays and you get:
Standard Python malware obfuscation. But buried further down in the decompile output was a large binary blob — a bytes literal starting with \xfd7zXZ. That’s the LZMA magic header.
Phase 5: LZMA Stage 2 Extraction
The blob was located at offset 0x17d4 in the pyc file. Extract and decompress it:
import lzma
blob = open('cleaner.pyc', 'rb').read()
idx = blob.find(b'\xfd7zXZ')
decompressed = lzma.decompress(blob[idx:])
# → 102,923 bytes
One important detail: the decompression is wrapped in a try/except LZMAError block with os._exit(0) on failure. If the decompression fails — as it would in some emulated sandbox environments — the process exits silently with no error. That’s the anti-sandbox mechanism.
The decompressed payload was another obfuscated Python source using a custom alphabet substitution encoding. The final execution chain was compile() + exec(). Decoding the full stage 2 revealed everything:
This is the live Discord injection payload. The stage 2 pulls this JavaScript file from GitHub and injects it into the Discord desktop client’s core module, persisting across restarts.
The capability set from stage 2:
Anti-analysis checks on startup: process blacklist (~30 entries including wireshark, processhacker, vboxservice, ollydbg, x96dbg, pestudio), MAC address blacklist (80+ VM prefixes), HWID blacklist, IP blacklist, username/PC name blacklists
Discord token theft from all three release channels (stable, canary, PTB)
Browser credential theft across 20+ Chromium and non-Chromium browsers
Roblox session cookie harvesting (.ROBLOSECURITY= targeting with API validation)
The ping delay is a simple trick — the 3-second wait lets the process fully exit before the delete fires, so the file removes itself cleanly after execution.
What MalChela + MCP Added to This Workflow
The honest answer is: speed and synthesis.
tiquery hitting five TI sources in one call versus five separate browser tabs or CLI invocations is a meaningful time saving, but that’s the surface benefit. The deeper value showed up in the mstrings step — getting ATT&CK-mapped output with technique IDs alongside the raw strings meant the behavioral picture came together faster than manually correlating imports against the ATT&CK matrix.
The MCP integration meant each of those steps — TI query, PE analysis, string extraction — could happen within the same conversation context. Claude could see the fileanalyzer output and the mstrings output together and note that the entropy difference between the two samples was significant, that the identical imphash meant shared loader infrastructure, that the staging imports in mstrings were consistent with the exfil approach suggested by the TI tags. That cross-tool synthesis is where the integration earns its keep.
The parts that still required manual work: pyinstxtractor-ng, pycdc, the LZMA extraction, and decoding the stage 2. Those are terminal steps on the Mac.
If you’re running MalChela in your environment and want to reproduce the TI query steps, the MalChela MCP plugin source is on GitHub at github.com/dwmetz/MalChela. Questions or additions to the IOC list — find me on the usual channels.
MalChela’s 2.2 update is packed with practical and platform-friendly improvements. It includes native support for REMnux, better tool settings, and deeper integrations with analysis tools like YARA-X, Tshark, Volatility3, and the newly improved fileanalyzer module.
🦀 REMnux Edition: Built-In Support, Zero Tweaks
When the GUI loads a REMnux-specific tools.yaml profile, it enters REMnux mode.
Screenshot of yaml configuration applying REMnux mode
Native binaries and Python scripts like capa, oledump.py, olevba, and FLOSS are loaded into the MalChela tools menu, allowing you to mix and match operations with the embedded MalChela utilities and the full REMnux tool stack. No manual configuration needed—just launch and go. MalChela currently supports the following REMnux programs right out of the box:
Tool Name
Description
binwalk
Firmware analysis and extraction tool
capa
Identifies capabilities in executable files
radare2
Advanced reverse engineering framework
Volatility 3
Memory forensics framework for RAM analysis
exiftool
Extracts metadata from images, documents, and more
If you only need a subset of tools you can easily save and restore that a custom profile.
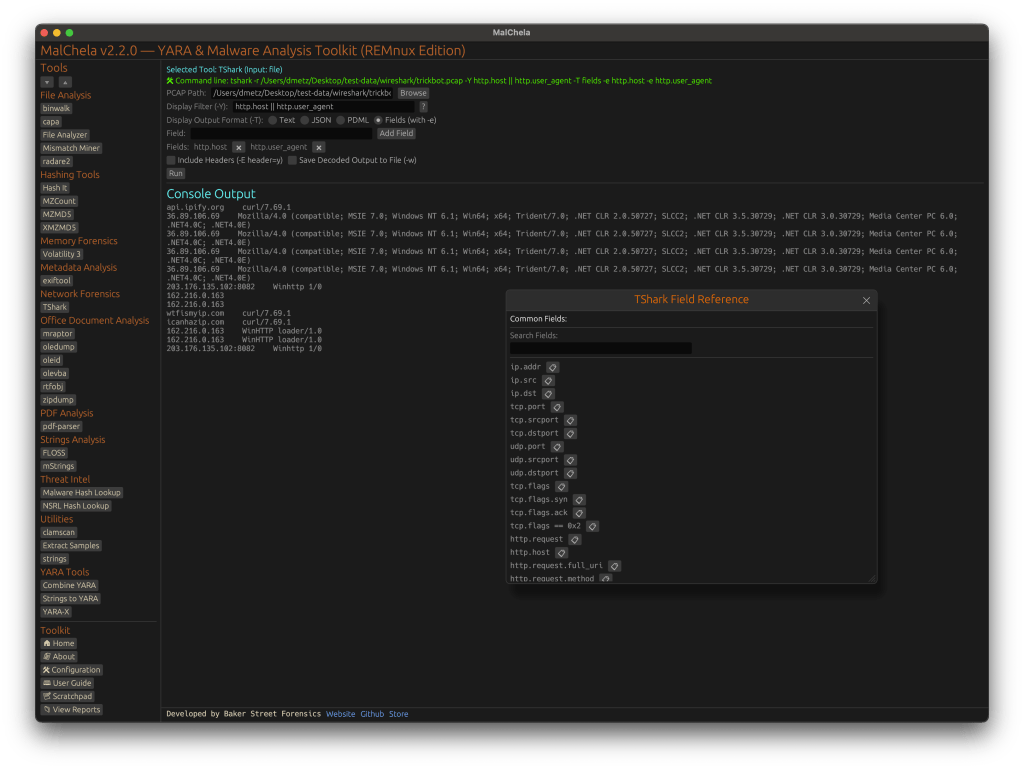
TShark Panel with Built-In Reference
Tshark and the integrated field reference
A new TShark integration exposes features including:
A filter builder panel
Commonly used fields reference
Tooltip hints for each example (e.g., `ip.addr == 192.168.1.1` shows “Any traffic to or from 192.168.1.1”)
One-click copy support
This helps analysts build and understand filters quickly—even if TShark isn’t something they use every day. Using the syntax builder in MalChela you can use the exact commands directly in Tshark or Wireshark.
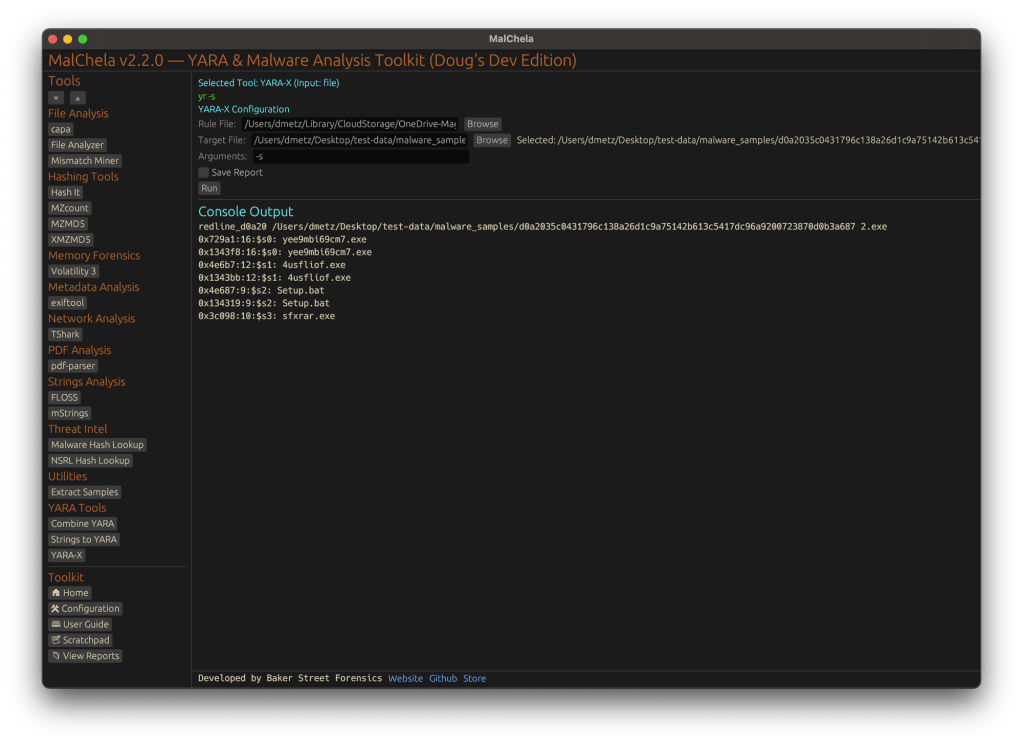
YARA-X Support (Install Guide Included)
YARA-X module in MalChela
Support for YARA-X (via the `yr` binary) is now built in. YARA-X is not bundled with REMnux by default, but install instructions are included in the User Guide for both macOS and Linux users.
Once installed, MalChela allows for rule-based scanning from the GUI,and with YARA-X, it’s faster than ever.
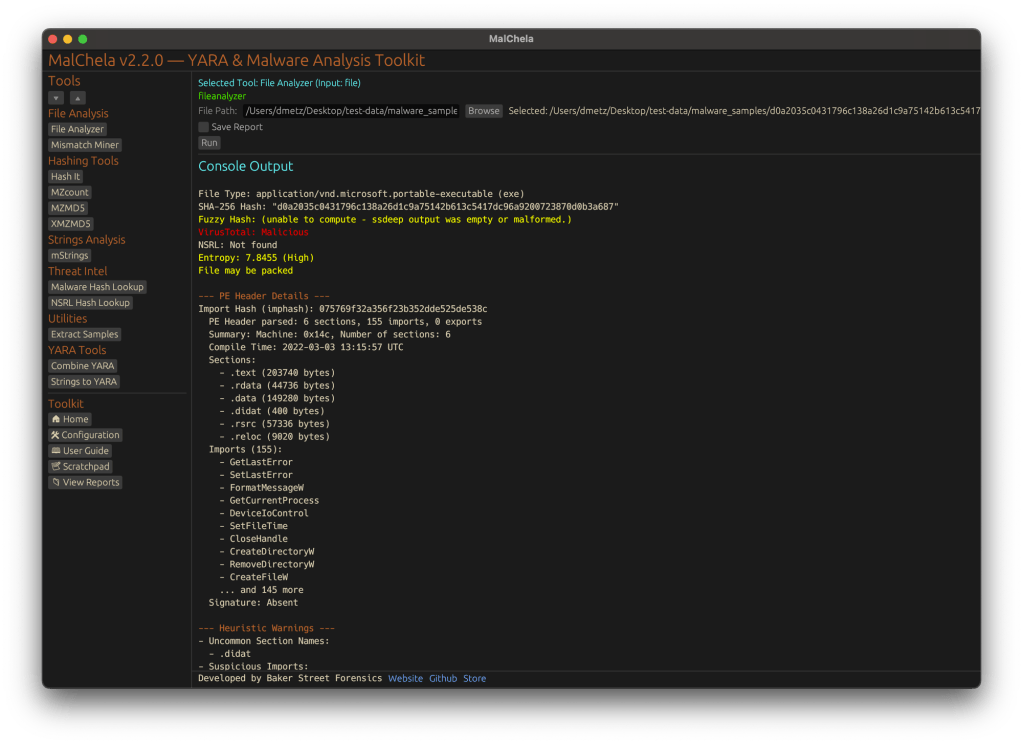
fileanalyzer: Fuzzy Hashing, PE Metadata, and More
Updated FileAnalyzer Module
MalChela’s fileanalyzer tool has also been updated to include:
Fuzzy hashing support via `ssdeep`
BLAKE3 hashing for fast, secure fingerprints
Expanded PE analysis, including:
Import and Export Table parsing (list of imported and exported functions)
Compilation Timestamp (for detection of suspicious or forged build times)
Section Characteristics (flags like IMAGE_SCN_MEM_EXECUTE, IMAGE_SCN_CNT_CODE, etc., for detecting anomalous sections)
These improvements provide deeper insight into executable structure, helping analysts detect anomalies such as packers, suspicious timestamps, or unexpected imports/exports. Useful for everything from sample triage to correlation, fileanalyzer now digs deeper—without slowing down.
Memory Forensics Gets a Boost: Volatility 3 Now Supported
With the 2.2 release, MalChela introduces support for Volatility 3, the modern Python-based memory forensics framework. Whether you’re running MalChela in REMnux or on a customized macOS or Linux setup, you can now access the full power of Volatility directly from the MalChela GUI.
Volatility 3 in MalChela
There’s an intuitive plugin selector that dynamically adjusts available arguments based on your chosen plugin,. You can search, sort, and browse available plugins, and even toggle output options like –dump-dir with ease.
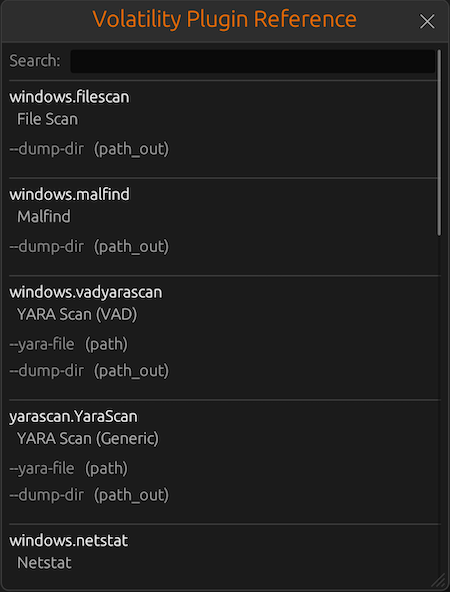
Like Tshark, there is an added plugin reference panel with searchable descriptions and argument overviews — a real time-saver when navigating Volatility’s deep and often complex toolset.
Volatility Plugin Reference
Smarter Tool Configuration via YAML
The tool configuration system continues to evolve:
Tools now declare their input type (file, folder, or hash)
The GUI dynamically adjusts the interface to match
Alternate profiles (like REMnux setups) can be managed simply by swapping `tools.yaml` files via the GUI
Easily backup or restore your custom setups
Restore the default toolset to get back to basics
This structure helps keep things clean—whether you’re testing, teaching, or deploying in a lab environment.
Embedded Documentation Access
The GUI now includes a link to the full MalChela User Guide in PDF. You can also access the documentation online.
From tool usage and CLI flags to configuration tips and install steps, it’s all just a click away—especially useful in offline environments or when onboarding new analysts. I’ll be honest, this is likely the most comprehensive user guide I’ve ever written.
Whether you’re reviewing binaries, building hash sets, or exploring network captures—MalChela 2.2 is designed bring together the tools you need, and make it easier to interoperate between them.
The new REMnux mode makes it even easier to get up and running with dozens of third party integrations.
Have an idea for a feature or application you’d like to see supported — reach out to me.
I don’t like to brag, he said, but you should see the size of my malware library.
For a recent project, I wanted to produce a hash set for all the malware files in my repository. Included in the library are malware samples for Windows and other platforms. Within the library there are also a lot of pdf’s with write ups corresponding to different samples. Lastly there are zip files that the malware samples haven’t been extracted from yet.
I didn’t want hashes for any of the pdf documents or zip files. I wanted one hash set for the malware specific to Windows, and a second set for all the other samples.
Using YARA and Python, and some (a lot of) AI coaching, I wound up with three scripts. Two of them are used to create the hash sets, and a third that does counting and indexing on the source directory for different file headers.
Windows Malware Hashing
The majority of Windows malware has an MZ header. The first Python script uses YARA to recursively search a directory. For any files with an MZ header, it will write the MD5 hash to a file.
launching MZMD5.py with PythonCompletion of the MZMD5.py script showing 22789 hashes generated for MZ files.
MZMD5.py
import os
import yara
import hashlib
import sys

def compile_yara_rules():
    """
    Compile YARA rules for detecting MZ headers.

    Returns:
        yara.Rules: Compiled YARA rules.
    """
    rules = """
rule mz_header {
    meta:
        description = "Matches files with MZ header (Windows Executables)"
    strings:
        $mz = {4D 5A}  // MZ header in hex
    condition:
        $mz at 0  // Match if MZ header is at the start of the file
}
"""
    return yara.compile(source=rules)

def calculate_md5(file_path):
    """
    Calculate the MD5 hash of a file.

    Args:
        file_path (str): Path to the file.

    Returns:
        str: MD5 hash in hexadecimal format.
    """
    md5_hash = hashlib.md5()
    try:
        with open(file_path, "rb") as f:
            for byte_block in iter(lambda: f.read(4096), b""):
                md5_hash.update(byte_block)
        return md5_hash.hexdigest()
    except Exception as e:
        return None

def scan_and_hash_files(directory, rules, output_file):
    """
    Scan files in a directory using YARA rules, calculate MD5 hashes for matches,
    and write results to an output file.

    Args:
        directory (str): Path to the directory to scan.
        rules (yara.Rules): Compiled YARA rules.
        output_file (str): Path to the output file where results will be saved.

    Returns:
        int: Total number of hashes written to the output file.
    """
    hash_count = 0
    with open(output_file, "w") as out_file:
        # Walk through the directory and its subdirectories
        for root, _, files in os.walk(directory):
            for file in files:
                file_path = os.path.join(root, file)

                try:
                    # Match YARA rules against the file
                    matches = rules.match(file_path)
                    if any(match.rule == "mz_header" for match in matches):
                        # Calculate MD5 hash if the file matches the MZ header rule
                        md5_hash = calculate_md5(file_path)
                        if md5_hash:
                            out_file.write(f"{md5_hash}\n")
                            # Print hash value and flush output immediately
                            print(md5_hash, flush=True)
                            hash_count += 1
                except Exception as e:
                    pass  # Suppress error messages

    return hash_count

if __name__ == "__main__":
    # Prompt user for directory to scan
    directory_to_scan = input("Enter the directory you want to scan: ").strip()

    # Verify that the directory exists
    if not os.path.isdir(directory_to_scan):
        print("Error: The specified directory does not exist.")
        exit(1)

    # Set output file path to MZMD5.txt in the current working directory
    output_file_path = "MZMD5.txt"

    # Check if the output file already exists
    if os.path.exists(output_file_path):
        overwrite = input(f"The file '{output_file_path}' already exists. Overwrite? (y/n): ").strip().lower()
        if overwrite != 'y':
            print("Operation canceled.")
            exit(0)

    # Compile YARA rules
    yara_rules = compile_yara_rules()

    # Scan directory, calculate MD5 hashes, and write results to an output file
    total_hashes = scan_and_hash_files(directory_to_scan, yara_rules, output_file_path)

    # Report total number of hashes written and location of the output file
    print(f"\nScan completed.")
    print(f"Total number of hashes written: {total_hashes}")
    print(f"Output file location: {os.path.abspath(output_file_path)}")
Non-Windows Malware Hashing
The second script is a little more complicated. Again we will use YARA to determine the filetype, however in this case we want to exclude anything with an MZ header, as well as exclude any zip files or pdfs. Based on the contents of the library, this should produce a hash set for all the other binaries in the library that aren’t targeted to Windows.
Launching XMZMD5.py in PythonResults of XMZMD5.py showing 5988 hashes calculated.
XMZMD5.py
import os
import yara
import hashlib

def compile_yara_rules():
    """
    Compile YARA rules for MZ, PDF, and ZIP headers.

    Returns:
        yara.Rules: Compiled YARA rules.
    """
    rules = """
rule mz_header {
    meta:
        description = "Matches files with MZ header (Windows Executables)"
    strings:
        $mz = {4D 5A}  // MZ header in hex
    condition:
        $mz at 0  // Match if MZ header is at the start of the file
}

rule pdf_header {
    meta:
        description = "Matches files with PDF header"
    strings:
        $pdf = {25 50 44 46}  // PDF header in hex (%PDF)
    condition:
        $pdf at 0  // Match if PDF header is at the start of the file
}

rule zip_header {
    meta:
        description = "Matches files with ZIP header"
    strings:
        $zip = {50 4B 03 04}  // ZIP header in hex
    condition:
        $zip at 0  // Match if ZIP header is at the start of the file
}
"""
    return yara.compile(source=rules)

def calculate_md5(file_path):
    """
    Calculate the MD5 hash of a file.

    Args:
        file_path (str): Path to the file.

    Returns:
        str: MD5 hash of the file, or None if an error occurs.
    """
    hasher = hashlib.md5()
    try:
        with open(file_path, 'rb') as f:
            for chunk in iter(lambda: f.read(4096), b""):
                hasher.update(chunk)
        return hasher.hexdigest()
    except Exception as e:
        print(f"[ERROR] Unable to calculate MD5 for {file_path}: {e}")
        return None

def scan_directory(directory, rules, output_file):
    """
    Scan a directory for files that do not match YARA rules and calculate their MD5 hashes.

    Args:
        directory (str): Path to the directory to scan.
        rules (yara.Rules): Compiled YARA rules.
        output_file (str): File to save MD5 hashes of unmatched files.
    """
    hash_count = 0  # Counter for total number of hashes written

    try:
        with open(output_file, 'w') as out:
            for root, _, files in os.walk(directory):
                for file in files:
                    file_path = os.path.join(root, file)
                    try:
                        # Check if the file matches any YARA rule
                        matches = rules.match(file_path)
                        if not matches:  # Only process files that do not match any rule
                            md5_hash = calculate_md5(file_path)
                            if md5_hash:
                                print(md5_hash)  # Print hash to console
                                out.write(md5_hash + '\n')  # Write only hash to output file
                                hash_count += 1
                    except yara.Error as ye:
                        print(f"[WARNING] YARA error scanning {file_path}: {ye}")
                    except Exception as e:
                        print(f"[ERROR] Unexpected error scanning {file_path}: {e}")

        # Report total number of hashes written and location of the output file
        print(f"\nScan completed.")
        print(f"Total number of hashes written: {hash_count}")
        print(f"Output file location: {os.path.abspath(output_file)}")

    except Exception as e:
        print(f"[ERROR] Failed to write to output file {output_file}: {e}")

if __name__ == "__main__":
    # Prompt user for directory to scan
    directory_to_scan = input("Enter directory to scan: ").strip()

    # Compile YARA rules
    try:
        yara_rules = compile_yara_rules()
    except Exception as e:
        print(f"[ERROR] Failed to compile YARA rules: {e}")
        exit(1)

    # Output filename for unmatched files' MD5 hashes
    output_filename = "XMZMD5.txt"

    # Check if the output file already exists and prompt user for action
    if os.path.exists(output_filename):
        overwrite_prompt = input(f"[WARNING] The file '{output_filename}' already exists. Do you want to overwrite it? (yes/no): ").strip().lower()

        if overwrite_prompt not in ['yes', 'y']:
            print("[INFO] Operation canceled by user.")
            exit(0)

    # Scan the directory
    if os.path.isdir(directory_to_scan):
        scan_directory(directory_to_scan, yara_rules, output_filename)
    else:
        print(f"[ERROR] The provided path is not a valid directory: {directory_to_scan}")
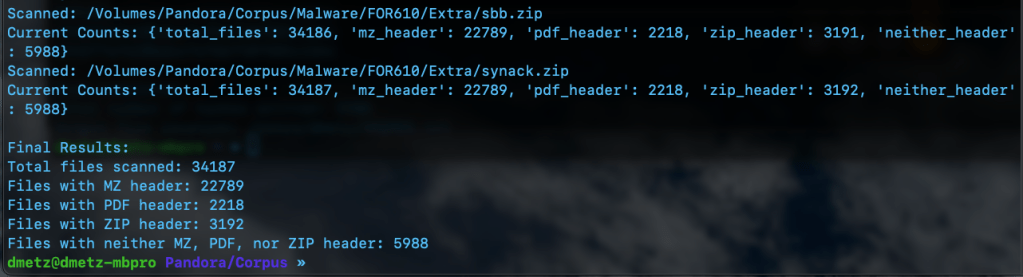
The third script is for counting and validation. I wanted to know the total number of files, and how many had the MZ header, were zip or pdf files, or none of the above. Based on the counts, the hash lists should contain a matching number of entries, the MZ’s for Windows malware samples and the “Neither Header Files” for the remaining binaries. Note: to run this script you will need to have the Python module “tabulate” installed. (pip install tabulate). There are 2 output options available, Detailed and Table View.
MZCount.py Table ViewMZCount.py Detailed View.Completed MZCount in Table View.Completed MZCount in Detailed View.
MZCount.py
import os
import yara
import time


def compile_yara_rules():
    """
    Compile YARA rules for MZ, PDF, and ZIP headers.

    Returns:
        yara.Rules: Compiled YARA rules.
    """
    rules = """
rule mz_header {
    meta:
        description = "Matches files with MZ header (Windows Executables)"
    strings:
        $mz = {4D 5A}  // MZ header in hex
    condition:
        $mz at 0  // Match if MZ header is at the start of the file
}

rule pdf_header {
    meta:
        description = "Matches files with PDF header"
    strings:
        $pdf = {25 50 44 46}  // PDF header in hex (%PDF)
    condition:
        $pdf at 0  // Match if PDF header is at the start of the file
}

rule zip_header {
    meta:
        description = "Matches files with ZIP header"
    strings:
        $zip = {50 4B 03 04}  // ZIP header in hex
    condition:
        $zip at 0  // Match if ZIP header is at the start of the file
}
"""
    try:
        return yara.compile(source=rules)
    except yara.SyntaxError as e:
        print(f"Error compiling YARA rules: {e}")
        raise


def display_table(counts):
    """
    Display the counts in a simple table format.

    Args:
        counts (dict): Dictionary containing counts for each file type.
    """
    # Clear console before displaying new table
    os.system('cls' if os.name == 'nt' else 'clear')  # Clears terminal for Windows ('cls') or Linux/Mac ('clear')

    # Print updated table
    print("\n+----------------------+---------+")
    print("| File Type           | Count   |")
    print("+----------------------+---------+")
    print(f"| Total Files         | {counts['total_files']:<7} |")
    print(f"| MZ Header Files     | {counts['mz_header']:<7} |")
    print(f"| PDF Header Files    | {counts['pdf_header']:<7} |")
    print(f"| ZIP Header Files    | {counts['zip_header']:<7} |")
    print(f"| Neither Header Files| {counts['neither_header']:<7} |")
    print("+----------------------+---------+")


def scan_and_count_files(directory, rules, use_table_display):
    """
    Scan files in a directory using YARA rules and count matches by header type.

    Args:
        directory (str): Path to the directory to scan.
        rules (yara.Rules): Compiled YARA rules.
        use_table_display (bool): Whether to use table display for live updates.

    Returns:
        dict: A dictionary with counts for total files, MZ headers, PDF headers, ZIP headers, and neither headers.
    """
    counts = {
        "total_files": 0,
        "mz_header": 0,
        "pdf_header": 0,
        "zip_header": 0,
        "neither_header": 0
    }

    # Walk through the directory and its subdirectories
    for root, _, files in os.walk(directory):
        for file in files:
            counts["total_files"] += 1
            file_path = os.path.join(root, file)

            try:
                # Open file in binary mode for YARA matching
                with open(file_path, "rb") as f:
                    data = f.read()

                # Match YARA rules against file content
                matches = rules.match(data=data)

                # Process matches
                if matches:
                    matched_rules = {match.rule for match in matches}
                    if "mz_header" in matched_rules:
                        counts["mz_header"] += 1
                    if "pdf_header" in matched_rules:
                        counts["pdf_header"] += 1
                    if "zip_header" in matched_rules:
                        counts["zip_header"] += 1
                else:
                    counts["neither_header"] += 1

            except Exception as e:
                print(f"Error scanning {file_path}: {e}")
                # Decrement total_files if an error occurs
                counts["total_files"] -= 1

            # Display updated output after processing each file
            if use_table_display:
                display_table(counts)
            else:
                print(f"Scanned: {file_path}")
                print(f"Current Counts: {counts}")

            time.sleep(0.1)  # Optional: Add a small delay for smoother updates

    return counts


if __name__ == "__main__":
    # Prompt user for directory to scan
    directory_to_scan = input("Enter directory to scan: ").strip()

    # Check if the directory exists
    if not os.path.isdir(directory_to_scan):
        print(f"Error: The directory '{directory_to_scan}' does not exist. Please enter a valid directory.")
        exit(1)

    # Prompt user for display format preference
    display_choice = input("Choose output format - (1) Detailed, (2) Table Display: ").strip()

    # Determine whether to use table display or original output format
    use_table_display = display_choice == "2"

    # Compile YARA rules
    yara_rules = compile_yara_rules()

    # Scan directory and count matches
    results = scan_and_count_files(directory_to_scan, yara_rules, use_table_display)

    # Final results display after completion
    print("\nFinal Results:")

    if use_table_display:
        display_table(results)

        # Handle case where no results were found
        if results["total_files"] == 0:
            print("No files were scanned. Please check your directory.")

    else:
        print(f"Total files scanned: {results['total_files']}")
        print(f"Files with MZ header: {results['mz_header']}")
        print(f"Files with PDF header: {results['pdf_header']}")
        print(f"Files with ZIP header: {results['zip_header']}")
        print(f"Files with neither MZ, PDF, nor ZIP header: {results['neither_header']}")
Double Checking the Hash Files
Finally we can use RegEx to count the number of MD5 hashes for each file. The RegEx looks for strings of 32 hexadecimal digits. (A-F and 0-9.)
Regex output showing counts for hashes, 22789 and 5988 respectively.
The number of hashes in the MZMD5.txt hash list matches the number of MZ files identified by YARA. Additionally, the number of non-MZ binaries in the hash list, XMZMD5.txt, matches the number of files when we exclude the Windows binaries and the pdf and zip files.
There you have it, the fruits of my labors combining a few of my favorite things (cue John Coltrane), YARA, Malware, Python, and using AI as tool to develop my coding skills. If you’d like to download the scripts for your own usage, they can be found at https://github.com/dwmetz/Toolbox/ (Miscellaneous PowerShell and Python scripts related to YARA and Malware Analysis.)