MalChela’s 2.2 update is packed with practical and platform-friendly improvements. It includes native support for REMnux, better tool settings, and deeper integrations with analysis tools like YARA-X, Tshark, Volatility3, and the newly improved fileanalyzer module.
🦀 REMnux Edition: Built-In Support, Zero Tweaks
When the GUI loads a REMnux-specific tools.yaml profile, it enters REMnux mode.
Screenshot of yaml configuration applying REMnux mode
Native binaries and Python scripts like capa, oledump.py, olevba, and FLOSS are loaded into the MalChela tools menu, allowing you to mix and match operations with the embedded MalChela utilities and the full REMnux tool stack. No manual configuration needed—just launch and go. MalChela currently supports the following REMnux programs right out of the box:
Tool Name
Description
binwalk
Firmware analysis and extraction tool
capa
Identifies capabilities in executable files
radare2
Advanced reverse engineering framework
Volatility 3
Memory forensics framework for RAM analysis
exiftool
Extracts metadata from images, documents, and more
If you only need a subset of tools you can easily save and restore that a custom profile.
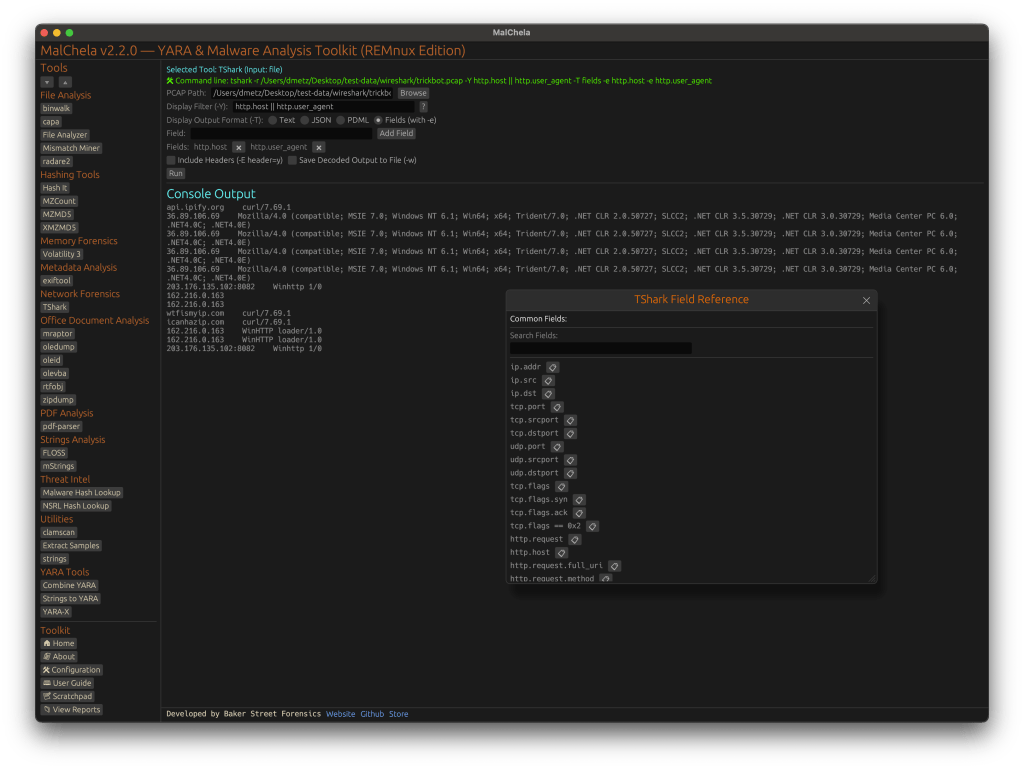
TShark Panel with Built-In Reference
Tshark and the integrated field reference
A new TShark integration exposes features including:
A filter builder panel
Commonly used fields reference
Tooltip hints for each example (e.g., `ip.addr == 192.168.1.1` shows “Any traffic to or from 192.168.1.1”)
One-click copy support
This helps analysts build and understand filters quickly—even if TShark isn’t something they use every day. Using the syntax builder in MalChela you can use the exact commands directly in Tshark or Wireshark.
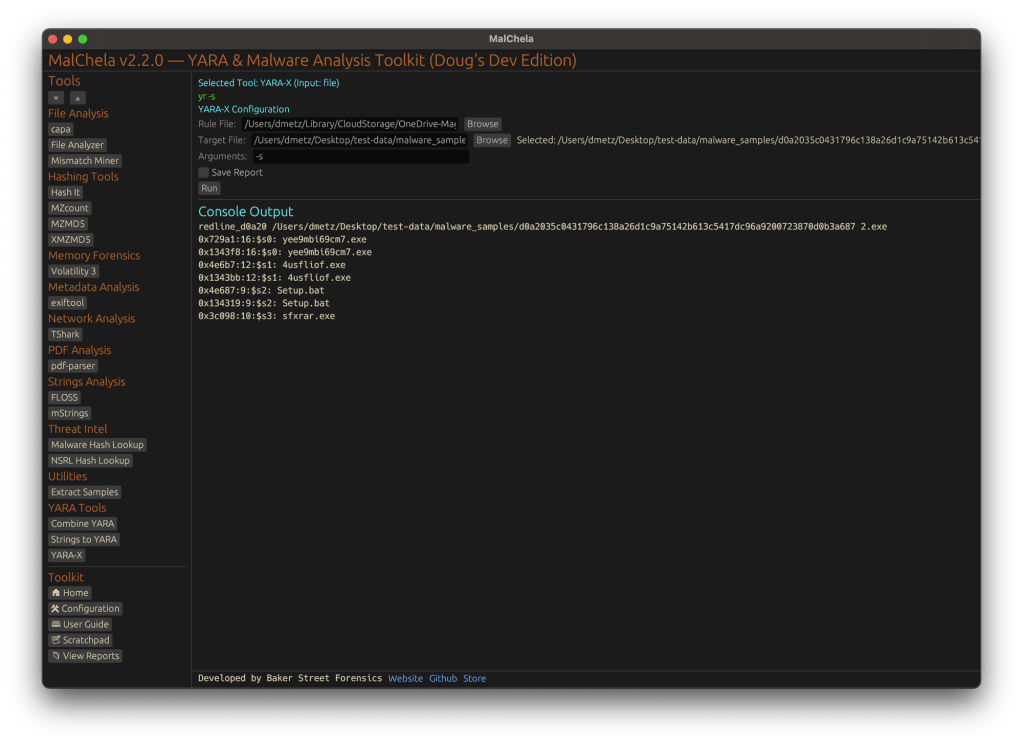
YARA-X Support (Install Guide Included)
YARA-X module in MalChela
Support for YARA-X (via the `yr` binary) is now built in. YARA-X is not bundled with REMnux by default, but install instructions are included in the User Guide for both macOS and Linux users.
Once installed, MalChela allows for rule-based scanning from the GUI,and with YARA-X, it’s faster than ever.
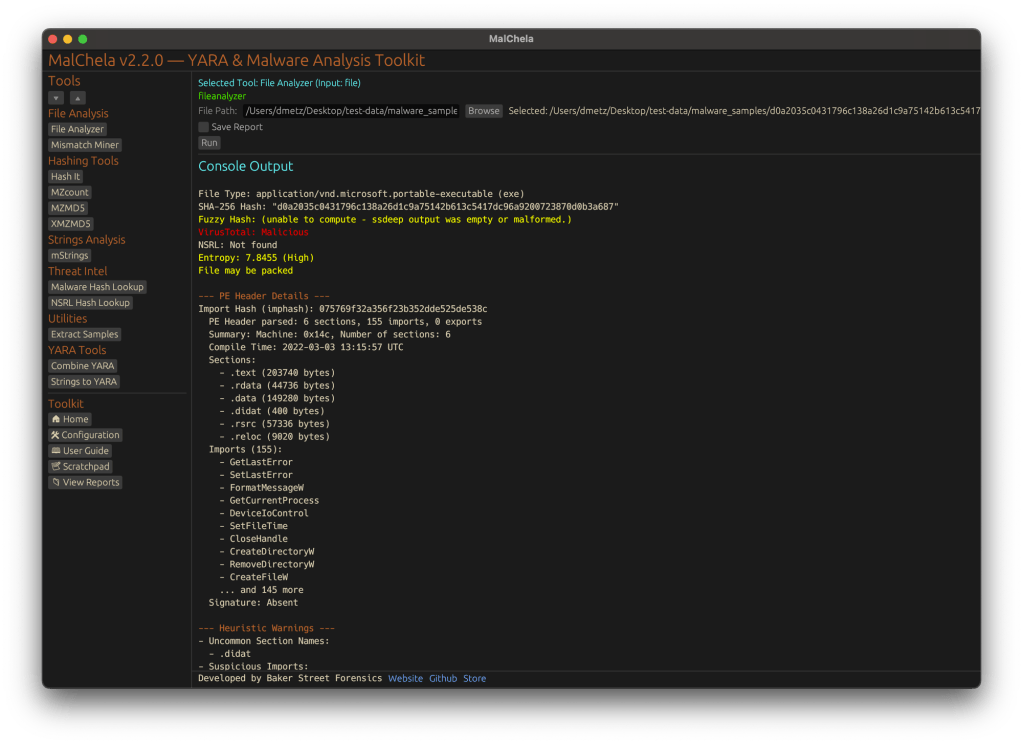
fileanalyzer: Fuzzy Hashing, PE Metadata, and More
Updated FileAnalyzer Module
MalChela’s fileanalyzer tool has also been updated to include:
Fuzzy hashing support via `ssdeep`
BLAKE3 hashing for fast, secure fingerprints
Expanded PE analysis, including:
Import and Export Table parsing (list of imported and exported functions)
Compilation Timestamp (for detection of suspicious or forged build times)
Section Characteristics (flags like IMAGE_SCN_MEM_EXECUTE, IMAGE_SCN_CNT_CODE, etc., for detecting anomalous sections)
These improvements provide deeper insight into executable structure, helping analysts detect anomalies such as packers, suspicious timestamps, or unexpected imports/exports. Useful for everything from sample triage to correlation, fileanalyzer now digs deeper—without slowing down.
Memory Forensics Gets a Boost: Volatility 3 Now Supported
With the 2.2 release, MalChela introduces support for Volatility 3, the modern Python-based memory forensics framework. Whether you’re running MalChela in REMnux or on a customized macOS or Linux setup, you can now access the full power of Volatility directly from the MalChela GUI.
Volatility 3 in MalChela
There’s an intuitive plugin selector that dynamically adjusts available arguments based on your chosen plugin,. You can search, sort, and browse available plugins, and even toggle output options like –dump-dir with ease.
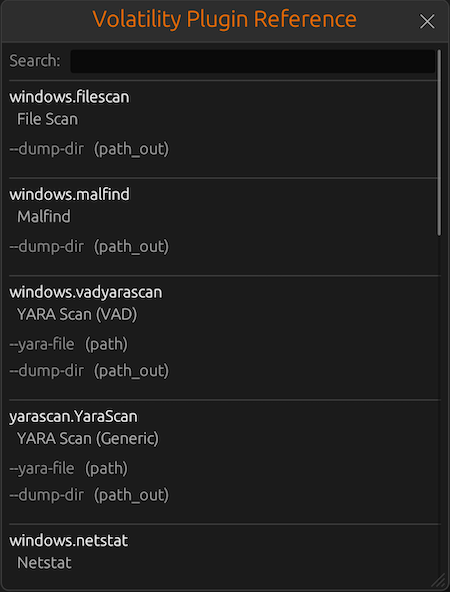
Like Tshark, there is an added plugin reference panel with searchable descriptions and argument overviews — a real time-saver when navigating Volatility’s deep and often complex toolset.
Volatility Plugin Reference
Smarter Tool Configuration via YAML
The tool configuration system continues to evolve:
Tools now declare their input type (file, folder, or hash)
The GUI dynamically adjusts the interface to match
Alternate profiles (like REMnux setups) can be managed simply by swapping `tools.yaml` files via the GUI
Easily backup or restore your custom setups
Restore the default toolset to get back to basics
This structure helps keep things clean—whether you’re testing, teaching, or deploying in a lab environment.
Embedded Documentation Access
The GUI now includes a link to the full MalChela User Guide in PDF. You can also access the documentation online.
From tool usage and CLI flags to configuration tips and install steps, it’s all just a click away—especially useful in offline environments or when onboarding new analysts. I’ll be honest, this is likely the most comprehensive user guide I’ve ever written.
Whether you’re reviewing binaries, building hash sets, or exploring network captures—MalChela 2.2 is designed bring together the tools you need, and make it easier to interoperate between them.
The new REMnux mode makes it even easier to get up and running with dozens of third party integrations.
Have an idea for a feature or application you’d like to see supported — reach out to me.
I don’t like to brag, he said, but you should see the size of my malware library.
For a recent project, I wanted to produce a hash set for all the malware files in my repository. Included in the library are malware samples for Windows and other platforms. Within the library there are also a lot of pdf’s with write ups corresponding to different samples. Lastly there are zip files that the malware samples haven’t been extracted from yet.
I didn’t want hashes for any of the pdf documents or zip files. I wanted one hash set for the malware specific to Windows, and a second set for all the other samples.
Using YARA and Python, and some (a lot of) AI coaching, I wound up with three scripts. Two of them are used to create the hash sets, and a third that does counting and indexing on the source directory for different file headers.
Windows Malware Hashing
The majority of Windows malware has an MZ header. The first Python script uses YARA to recursively search a directory. For any files with an MZ header, it will write the MD5 hash to a file.
launching MZMD5.py with PythonCompletion of the MZMD5.py script showing 22789 hashes generated for MZ files.
MZMD5.py
import os
import yara
import hashlib
import sys

def compile_yara_rules():
    """
    Compile YARA rules for detecting MZ headers.

    Returns:
        yara.Rules: Compiled YARA rules.
    """
    rules = """
rule mz_header {
    meta:
        description = "Matches files with MZ header (Windows Executables)"
    strings:
        $mz = {4D 5A}  // MZ header in hex
    condition:
        $mz at 0  // Match if MZ header is at the start of the file
}
"""
    return yara.compile(source=rules)

def calculate_md5(file_path):
    """
    Calculate the MD5 hash of a file.

    Args:
        file_path (str): Path to the file.

    Returns:
        str: MD5 hash in hexadecimal format.
    """
    md5_hash = hashlib.md5()
    try:
        with open(file_path, "rb") as f:
            for byte_block in iter(lambda: f.read(4096), b""):
                md5_hash.update(byte_block)
        return md5_hash.hexdigest()
    except Exception as e:
        return None

def scan_and_hash_files(directory, rules, output_file):
    """
    Scan files in a directory using YARA rules, calculate MD5 hashes for matches,
    and write results to an output file.

    Args:
        directory (str): Path to the directory to scan.
        rules (yara.Rules): Compiled YARA rules.
        output_file (str): Path to the output file where results will be saved.

    Returns:
        int: Total number of hashes written to the output file.
    """
    hash_count = 0
    with open(output_file, "w") as out_file:
        # Walk through the directory and its subdirectories
        for root, _, files in os.walk(directory):
            for file in files:
                file_path = os.path.join(root, file)

                try:
                    # Match YARA rules against the file
                    matches = rules.match(file_path)
                    if any(match.rule == "mz_header" for match in matches):
                        # Calculate MD5 hash if the file matches the MZ header rule
                        md5_hash = calculate_md5(file_path)
                        if md5_hash:
                            out_file.write(f"{md5_hash}\n")
                            # Print hash value and flush output immediately
                            print(md5_hash, flush=True)
                            hash_count += 1
                except Exception as e:
                    pass  # Suppress error messages

    return hash_count

if __name__ == "__main__":
    # Prompt user for directory to scan
    directory_to_scan = input("Enter the directory you want to scan: ").strip()

    # Verify that the directory exists
    if not os.path.isdir(directory_to_scan):
        print("Error: The specified directory does not exist.")
        exit(1)

    # Set output file path to MZMD5.txt in the current working directory
    output_file_path = "MZMD5.txt"

    # Check if the output file already exists
    if os.path.exists(output_file_path):
        overwrite = input(f"The file '{output_file_path}' already exists. Overwrite? (y/n): ").strip().lower()
        if overwrite != 'y':
            print("Operation canceled.")
            exit(0)

    # Compile YARA rules
    yara_rules = compile_yara_rules()

    # Scan directory, calculate MD5 hashes, and write results to an output file
    total_hashes = scan_and_hash_files(directory_to_scan, yara_rules, output_file_path)

    # Report total number of hashes written and location of the output file
    print(f"\nScan completed.")
    print(f"Total number of hashes written: {total_hashes}")
    print(f"Output file location: {os.path.abspath(output_file_path)}")
Non-Windows Malware Hashing
The second script is a little more complicated. Again we will use YARA to determine the filetype, however in this case we want to exclude anything with an MZ header, as well as exclude any zip files or pdfs. Based on the contents of the library, this should produce a hash set for all the other binaries in the library that aren’t targeted to Windows.
Launching XMZMD5.py in PythonResults of XMZMD5.py showing 5988 hashes calculated.
XMZMD5.py
import os
import yara
import hashlib

def compile_yara_rules():
    """
    Compile YARA rules for MZ, PDF, and ZIP headers.

    Returns:
        yara.Rules: Compiled YARA rules.
    """
    rules = """
rule mz_header {
    meta:
        description = "Matches files with MZ header (Windows Executables)"
    strings:
        $mz = {4D 5A}  // MZ header in hex
    condition:
        $mz at 0  // Match if MZ header is at the start of the file
}

rule pdf_header {
    meta:
        description = "Matches files with PDF header"
    strings:
        $pdf = {25 50 44 46}  // PDF header in hex (%PDF)
    condition:
        $pdf at 0  // Match if PDF header is at the start of the file
}

rule zip_header {
    meta:
        description = "Matches files with ZIP header"
    strings:
        $zip = {50 4B 03 04}  // ZIP header in hex
    condition:
        $zip at 0  // Match if ZIP header is at the start of the file
}
"""
    return yara.compile(source=rules)

def calculate_md5(file_path):
    """
    Calculate the MD5 hash of a file.

    Args:
        file_path (str): Path to the file.

    Returns:
        str: MD5 hash of the file, or None if an error occurs.
    """
    hasher = hashlib.md5()
    try:
        with open(file_path, 'rb') as f:
            for chunk in iter(lambda: f.read(4096), b""):
                hasher.update(chunk)
        return hasher.hexdigest()
    except Exception as e:
        print(f"[ERROR] Unable to calculate MD5 for {file_path}: {e}")
        return None

def scan_directory(directory, rules, output_file):
    """
    Scan a directory for files that do not match YARA rules and calculate their MD5 hashes.

    Args:
        directory (str): Path to the directory to scan.
        rules (yara.Rules): Compiled YARA rules.
        output_file (str): File to save MD5 hashes of unmatched files.
    """
    hash_count = 0  # Counter for total number of hashes written

    try:
        with open(output_file, 'w') as out:
            for root, _, files in os.walk(directory):
                for file in files:
                    file_path = os.path.join(root, file)
                    try:
                        # Check if the file matches any YARA rule
                        matches = rules.match(file_path)
                        if not matches:  # Only process files that do not match any rule
                            md5_hash = calculate_md5(file_path)
                            if md5_hash:
                                print(md5_hash)  # Print hash to console
                                out.write(md5_hash + '\n')  # Write only hash to output file
                                hash_count += 1
                    except yara.Error as ye:
                        print(f"[WARNING] YARA error scanning {file_path}: {ye}")
                    except Exception as e:
                        print(f"[ERROR] Unexpected error scanning {file_path}: {e}")

        # Report total number of hashes written and location of the output file
        print(f"\nScan completed.")
        print(f"Total number of hashes written: {hash_count}")
        print(f"Output file location: {os.path.abspath(output_file)}")

    except Exception as e:
        print(f"[ERROR] Failed to write to output file {output_file}: {e}")

if __name__ == "__main__":
    # Prompt user for directory to scan
    directory_to_scan = input("Enter directory to scan: ").strip()

    # Compile YARA rules
    try:
        yara_rules = compile_yara_rules()
    except Exception as e:
        print(f"[ERROR] Failed to compile YARA rules: {e}")
        exit(1)

    # Output filename for unmatched files' MD5 hashes
    output_filename = "XMZMD5.txt"

    # Check if the output file already exists and prompt user for action
    if os.path.exists(output_filename):
        overwrite_prompt = input(f"[WARNING] The file '{output_filename}' already exists. Do you want to overwrite it? (yes/no): ").strip().lower()

        if overwrite_prompt not in ['yes', 'y']:
            print("[INFO] Operation canceled by user.")
            exit(0)

    # Scan the directory
    if os.path.isdir(directory_to_scan):
        scan_directory(directory_to_scan, yara_rules, output_filename)
    else:
        print(f"[ERROR] The provided path is not a valid directory: {directory_to_scan}")
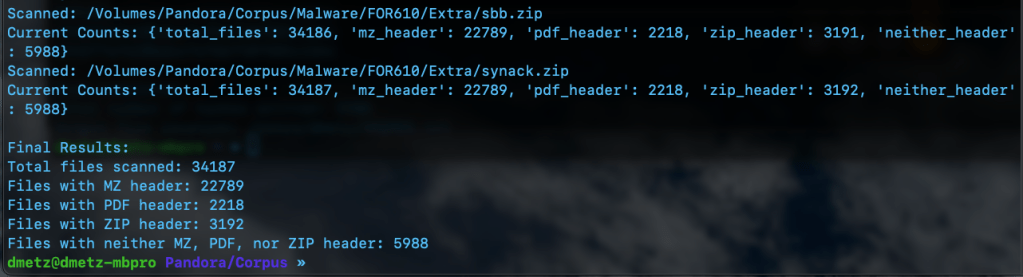
The third script is for counting and validation. I wanted to know the total number of files, and how many had the MZ header, were zip or pdf files, or none of the above. Based on the counts, the hash lists should contain a matching number of entries, the MZ’s for Windows malware samples and the “Neither Header Files” for the remaining binaries. Note: to run this script you will need to have the Python module “tabulate” installed. (pip install tabulate). There are 2 output options available, Detailed and Table View.
MZCount.py Table ViewMZCount.py Detailed View.Completed MZCount in Table View.Completed MZCount in Detailed View.
MZCount.py
import os
import yara
import time


def compile_yara_rules():
    """
    Compile YARA rules for MZ, PDF, and ZIP headers.

    Returns:
        yara.Rules: Compiled YARA rules.
    """
    rules = """
rule mz_header {
    meta:
        description = "Matches files with MZ header (Windows Executables)"
    strings:
        $mz = {4D 5A}  // MZ header in hex
    condition:
        $mz at 0  // Match if MZ header is at the start of the file
}

rule pdf_header {
    meta:
        description = "Matches files with PDF header"
    strings:
        $pdf = {25 50 44 46}  // PDF header in hex (%PDF)
    condition:
        $pdf at 0  // Match if PDF header is at the start of the file
}

rule zip_header {
    meta:
        description = "Matches files with ZIP header"
    strings:
        $zip = {50 4B 03 04}  // ZIP header in hex
    condition:
        $zip at 0  // Match if ZIP header is at the start of the file
}
"""
    try:
        return yara.compile(source=rules)
    except yara.SyntaxError as e:
        print(f"Error compiling YARA rules: {e}")
        raise


def display_table(counts):
    """
    Display the counts in a simple table format.

    Args:
        counts (dict): Dictionary containing counts for each file type.
    """
    # Clear console before displaying new table
    os.system('cls' if os.name == 'nt' else 'clear')  # Clears terminal for Windows ('cls') or Linux/Mac ('clear')

    # Print updated table
    print("\n+----------------------+---------+")
    print("| File Type           | Count   |")
    print("+----------------------+---------+")
    print(f"| Total Files         | {counts['total_files']:<7} |")
    print(f"| MZ Header Files     | {counts['mz_header']:<7} |")
    print(f"| PDF Header Files    | {counts['pdf_header']:<7} |")
    print(f"| ZIP Header Files    | {counts['zip_header']:<7} |")
    print(f"| Neither Header Files| {counts['neither_header']:<7} |")
    print("+----------------------+---------+")


def scan_and_count_files(directory, rules, use_table_display):
    """
    Scan files in a directory using YARA rules and count matches by header type.

    Args:
        directory (str): Path to the directory to scan.
        rules (yara.Rules): Compiled YARA rules.
        use_table_display (bool): Whether to use table display for live updates.

    Returns:
        dict: A dictionary with counts for total files, MZ headers, PDF headers, ZIP headers, and neither headers.
    """
    counts = {
        "total_files": 0,
        "mz_header": 0,
        "pdf_header": 0,
        "zip_header": 0,
        "neither_header": 0
    }

    # Walk through the directory and its subdirectories
    for root, _, files in os.walk(directory):
        for file in files:
            counts["total_files"] += 1
            file_path = os.path.join(root, file)

            try:
                # Open file in binary mode for YARA matching
                with open(file_path, "rb") as f:
                    data = f.read()

                # Match YARA rules against file content
                matches = rules.match(data=data)

                # Process matches
                if matches:
                    matched_rules = {match.rule for match in matches}
                    if "mz_header" in matched_rules:
                        counts["mz_header"] += 1
                    if "pdf_header" in matched_rules:
                        counts["pdf_header"] += 1
                    if "zip_header" in matched_rules:
                        counts["zip_header"] += 1
                else:
                    counts["neither_header"] += 1

            except Exception as e:
                print(f"Error scanning {file_path}: {e}")
                # Decrement total_files if an error occurs
                counts["total_files"] -= 1

            # Display updated output after processing each file
            if use_table_display:
                display_table(counts)
            else:
                print(f"Scanned: {file_path}")
                print(f"Current Counts: {counts}")

            time.sleep(0.1)  # Optional: Add a small delay for smoother updates

    return counts


if __name__ == "__main__":
    # Prompt user for directory to scan
    directory_to_scan = input("Enter directory to scan: ").strip()

    # Check if the directory exists
    if not os.path.isdir(directory_to_scan):
        print(f"Error: The directory '{directory_to_scan}' does not exist. Please enter a valid directory.")
        exit(1)

    # Prompt user for display format preference
    display_choice = input("Choose output format - (1) Detailed, (2) Table Display: ").strip()

    # Determine whether to use table display or original output format
    use_table_display = display_choice == "2"

    # Compile YARA rules
    yara_rules = compile_yara_rules()

    # Scan directory and count matches
    results = scan_and_count_files(directory_to_scan, yara_rules, use_table_display)

    # Final results display after completion
    print("\nFinal Results:")

    if use_table_display:
        display_table(results)

        # Handle case where no results were found
        if results["total_files"] == 0:
            print("No files were scanned. Please check your directory.")

    else:
        print(f"Total files scanned: {results['total_files']}")
        print(f"Files with MZ header: {results['mz_header']}")
        print(f"Files with PDF header: {results['pdf_header']}")
        print(f"Files with ZIP header: {results['zip_header']}")
        print(f"Files with neither MZ, PDF, nor ZIP header: {results['neither_header']}")
Double Checking the Hash Files
Finally we can use RegEx to count the number of MD5 hashes for each file. The RegEx looks for strings of 32 hexadecimal digits. (A-F and 0-9.)
Regex output showing counts for hashes, 22789 and 5988 respectively.
The number of hashes in the MZMD5.txt hash list matches the number of MZ files identified by YARA. Additionally, the number of non-MZ binaries in the hash list, XMZMD5.txt, matches the number of files when we exclude the Windows binaries and the pdf and zip files.
There you have it, the fruits of my labors combining a few of my favorite things (cue John Coltrane), YARA, Malware, Python, and using AI as tool to develop my coding skills. If you’d like to download the scripts for your own usage, they can be found at https://github.com/dwmetz/Toolbox/ (Miscellaneous PowerShell and Python scripts related to YARA and Malware Analysis.)
In an earlier post titled “Growing Your Malware Corpus”, I outlined methods for building a comprehensive test corpus of malware for detection engineering. It covers using sources like VX-Underground for malware samples and details how to organize and unzip these files using Python scripts.
In today’s post we’re going to cover using Python to apply a standard naming methodology to all our malware samples.
Depending on where you curate your samples from, they could be named by their hash, or as they were identified during investigation, like invoice.exe. Depending on the size of your collection, I’d surmise it’s highly unlikely that they have a consistent naming format.
I don’t know about you, but a title that indicates the malware family and platform is a lot more useful to me than a hash value when perusing the corpus for a juicy malware sample. We can rename all our malware files using Python and the command line utility for Windows Defender.
Step 1: You’ll need to install Python on a Windows box that has Windows Defender.
Install Python
If you don’t have Python installed on your Windows machine, you can do so by downloading the installer from python.org, or alternatively, installing from the Windows store.
Windows Store installer for Python versions 3.7 to 3.12
Directory Exclusion
Within the Windows Defender Virus & Threat protection settings, add an exclusion for the directory you’re going to be using with the malware. Make sure the exclusion is in place before connecting the drive with the malware so it doesn’t get nuked.
Note: Doing this assumes you’ve evaluated the potential risks associated with handling malware, even in controlled settings, and have taken safety precautions. This is not an exercise to be conducted on your corporate workstation.
Screenshot of the D:\Malware Directory being excluded from Windows Defender.
Automatic Sample submission
It’s up to you if you want to disable the Automatic Sample submission. If you do, you’ll still may get prompted to send some.
Automatic Sample Submission turned off in Windows Defender Configuration.Windows Defender requesting to send samples to Microsoft for further analysis.
Rename_Malware.py
The star of this show is the python script that was shared on twitter from vx-underground.
The post walks through various options for utilizing Windows Defender command line, MpCPmdRun.exe. Using that information a Python script was developed to loop through the contents of a directory, analyze those files with Windows Defender, and then rename the files accordingly based on the malware identification.
Python code for rename_malware.py in VS Code.
You can grab the code from the linked post, or a copy on my Github here.
Once you’ve got Python installed, directory exclusion configured, and a pocketful of kryptonite (malware), – you’re ready to go.
python rename_malware.py D:\Malware
Windows Defender command line will run through each file and rename them based on its detection.
The script recursively renames the analyzed files.
I’m running this on a copy of my malware corpus of 30,000+ malware samples.
Counting the Corpus
A bit of handy PowerShell math. Before and after the process I wanted to be sure of how many files were present to ensure that the antivirus didn’t remove any. I also wanted to exclude counting pdfs as many of the samples in my corpus also have accompanying write-ups.
The script continues recursively renaming the analyzed files.Energizer Rabbit. “Still Going!”
Finally… not begrudgingly at all considering over 30,000 samples were analyzed, the script has reached the end of the samples.
Script has reached the end of the files.
If we do a directory listing on the contents of the malware directory, we see that the majority of the files have all been renamed based on their malware identification.
File listing showing malware files named Trojan.Powershell… Trojan.Script… etc.
Hooray!
That makes it much easier to search and query through the malware repository.
If you’re writing YARA rules or doing other kinds of detection engineering, you’ll want to have a test bed that you can run your rules against. This is known as a corpus. For your corpus you’ll want to have both Goodware (known good operating system files), as well as a library of malware files.
One source to get a lot of malware samples is from VX-Underground. What I really appreciate about VX-Underground is that in addition to providing lots of malware samples, they also produce an annual archive of samples and papers. You can download a whole year’s worth of samples and papers, from 2010 to 2023.
Pandora’s Box
Just to understand the structure here, I have a USB device called “Pandora.” On the root of the drive is a folder called “APT”, and within that is a “Samples” directory. Inside the samples directory is the .7z download for 2023 from VX-Underground. There’s also a python script… we’ll get to that soon enough.
The first thing we’ll need to do is unzip the download with the usual password.
7zz x 2023.7z
Once the initial extraction is complete you can delete the original 2023.7z archive.
Within the archive for each year, there is a directory for the sample, with sub-directories of ‘Samples’ and ‘Papers.’ Every one of the samples is also password protected zip file.
This makes sense from a safety perspective, but it makes it impossible to scan against all the files at once.
Python to the Rescue
We can utilize a Python script to recursively go through the contents of our malware folder and unzip all the password protected files, while keeping those files in their original directories.
You may have noticed in the first screenshot that I have a script called ExtractSamples.py in my APT directory.
We will use this for the recursive password protected extractions.
Python ExtractSamples.py
A flurry of code goes by, and you congratulate yourself on you Python prowess. Now if we look again at our contents, we’ve got the extracted sample and the original zip file.
Let’s get rid of all the zip files as we don’t need them cluttering up the corpus.
We can start by running a find command to identify all the 7zip files.
find . -type f -name '*.7z' -print
After you’ve checked the output and verified the command above is only grabbing the 7z files you want to delete, we can update the command to delete the found files.
find . -type f -name '*.7z' -delete
One more a directory listing to verify:
Success. All the 7z files are removed and all the sample files are intact.