Getting Started with a PowerShell Menu

We’re often using PowerShell within the Incident Response team. I’m a big practitioner of spending 5 hours coding something to automate a 5 minute job. At first the math may not compute, but when that 5 minute job may be requested hundreds of times – and with it scripted it takes 30 seconds… that’s where it pays off. It also enforces consistency and removes some of the possibility for human error.

We have a collection of internal scripts that we use frequently. As more scripts (or scriptlets) are added to the frequently used, I wanted a means to expose all the scripts to the team and to put some organization to it. I also wanted to easily support changes or additions to the referenced scripts. What I wound up building was a simple PowerShell menu structure.

Each individual script is referenced by a 2 letter code in the menu. Right now in our environment there’s 38 scripts in the menu. Many of those are proprietary (can’t share), however I gathered a handful to share here to illustrate the concept of the menu process.

https://github.com/dwmetz/PSHero

Once you’ve downloaded and unzipped the repository, you’ll want to edit the PSHero.ps1 file to ensure that the paths for the scripts reflect where you’ve got them saved to.

To add or remove scripts from the menu, there are 2 modifications:
In the top section is the menu listing

Write-Host "EX: MX Header Analysis"

Which pairs with

'EX' {
D:\PowerShell\PSHero\Parse-EmailHeader.ps1
}

in the lower section. Use the other scripts as examples and add what you like. Just watch your brackets.

The scripts included in this demo menu include:

Have a favorite PS script you use? Post a recommendation in the comments below.

Forensic Imaging a Microsoft Surface Pro

Pre-Requisites:

UEFI Configuration:

Make sure the device is fully powered down (not in standby state) by holding down the power button (15-30 seconds) until the screen goes black.

Remove the Surface Pro keyboard and disconnect any accessories

Boot to the UEFI configuration (BIOS) by holding down the Volume-Up button while pressing the power button. Release the power button and hold the volume button until you see the Surface logo.

Under Security turn off Secure Boot

UEFI Security

Under Boot configuration select “USB Storage” and drag to the top of the list.

UEFI Boot configuration

Power off the device again.

Booting with Paladin

Connect the USB hub to the Surface Pro.

Attached to the USB hub you should have:

USB hub and peripherals

PRO Tip – if the USB hub has power buttons for the individual devices make sure all the ports are powered on. 😉  Yes, I did spend about 10 minutes troubleshooting this. (Mondays)

Hold down the Volume-Down key and press the Power button. Continue holding the Volume-down button until you see the Surface logo.

System should now boot to the Paladin USB

Booting from Paladin USB

Select the default (top) option – Sumiri Paladin Live Session – Forensic Mode

Boot menu selection

Once booting is complete, you will be presented with the Paladin Desktop.

Paladin Desktop on Surface Pro

Imaging:

Click on shortcut for  Paladin Toolbox

Note the Warning about Dates/Times and click OK

Date/time warning

Select the Source Device. In this case I’m choosing /dev/sda which will be the entire disk (3 partitions) on the host hard drive.

Specify the image format: Expert Witness Format, EWF (E01)


Populate the case details for the EWF based on case requirements

Populate E01 Case Information

Specify the image Destination

Specify Destination Drive

Label: $hostname of asset

Check Verify after creation

Click Start

Imaging in process

A full disk image and verification will take several hours. When completed you will see Image completed and Verification completed in the green text at the bottom.

Click on the shield in the left corner and select the power button icon to shut down.

Disconnect the bootable USB drive and your destination USB drive.

Verify files/folders created by mounting the external USB drive to your examination system.

Magnet Weekly CTF, Week 12 Solution Walk Through

The final challenge (#12) – Part 1:

What is the PID of the application where you might learn “how hackers hack, and how to stop them”?

Format: #### Warning: Only 1 attempt allowed!

The first thing I did was open the memdump file in HxD Hex Editor. A quick search found several hits.

I considered mapping the Offset back to the process memory but before going down that road (anticipating it to be math heavy) I decided to drop the individual process memory instead. Looking at the text surrounding “How Hackers Hack…” it appears to be html code. Looking even closer I’d say that it was in response to a search request for “how to stop getting hacked over and over.” Based on that I knew I’d be looking for a browser process.

Running pslist in Volatility we see that there’s multiple browser processes running for both Chrome and Internet Explorer.

I decided to focus on the iexplore.exe processes for Internet Explorer first – for 2 reasons. 1 – there were less running than Chrome so it was a smaller set to work through first. 2 – I did happen to find a Parsed Search Query in Axiom for “how to stop getting hacked over and over.”

The URL indicates a search from Bing.com. Only a sociopath would use Bing to search within Chrome so Internet Explorer it is.

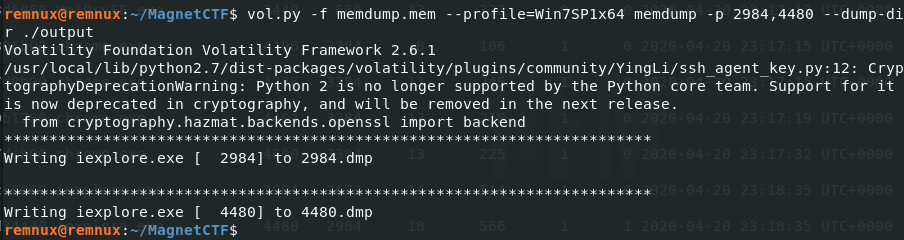
I used the memdump Volatility plugin to dump the process memory for both IE processes.

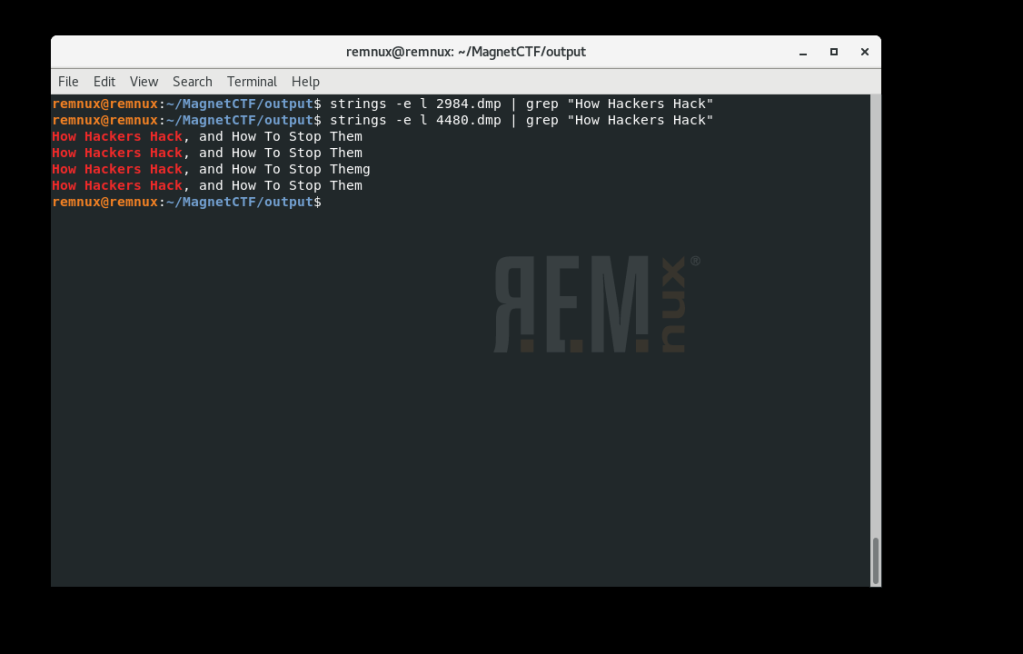
Next I ran strings against each dump file to see if there was a hit.

We see that in the second file 4480.dmp (associated with PID 4480) contains the content we’re looking for. What is the PID of the application where you might learn “how hackers hack, and how to stop them”? 4480 [Flag 1]


The final challenge (#12) – Part 2:

What is the product version of the application from Part 1?

Format: XX.XX.XXXX.XXXXX

OK, so we need to know what version of Internet Explorer was used for the Bing search. Off to the Google to find that the IE version information is stored in the registry in HKEY_LOCAL_MACHINE\Software\Microsoft\Internet Explorer in the svcVersion value.

From here I mount the full memory image using MemprocFS.

Using the file structure to navigate to the registry key I open svcVersion.txt and verify that the IE version running is 11.0.9600.18860. Back to the scoreboard to submit the bittersweet ending to a very fun challenge and ….. WRONG.

Hmm, so everything I knew (which was limited to be honest) told me that I had the version right, but that wasn’t the right answer. Over on the Discord channel I saw I wasn’t the only one to have the same quandry.

I waited and lurked, waited and lurked – but wasn’t seeing any update to the question. The following day while meditating on the matter in the shower I was thinking about what other means existed to identify details like this.

I used the procdump Volatility plugin to dump the process executable for PID 4480.

Once I had executable.4480.exe I uploaded the file to Virus Total.

Scrolling down on the details tab we see that the exe is correctly identified as Internet Explorer and shows a File Version of 11.00.9600.18858. This is very similar to what we identified earlier (…58 vs …60).

Answer: 11.00.9600.18858 [Flag 2] CORRECT!

I’ll be very interested to learn how others who got the flag identified the correct version information. I suspect there’s additional artifacts that I didn’t explore that hold those clues but for the time being – it’s a mystery to me.

Who am I kidding? It’s gonna be killing me til I know the answer.

Magnet Weekly CTF, Week 11 Solution Walk Through

Challenge 11, Part 1: What is the IPv4 address that myaccount.google.com resolves to?

I was able to find this pretty quick going back to last week’s artifacts. In week 10, I used bulk_extractor to carve a PCAP out of the memory image.

Opening the same PCAP file I applied a String filter for ‘myaccount’.

Wireshark viewing PCAP carved from Memory

In the highlighted row we can see a DNS resolution for myaccount.google.com coming back as 172.217.10.238. [Flag 1]

Challenge 11, Part 2: What is the canonical name (cname) associated with Part 1?

Scrolling further to the right on the same entry, we see that the CNAME for myacccount.google.com was www3.l.google.com. [Flag 2]