Raspberry Pi Forensics Hacking Gadget

Ever since the 2021 iPad models with USB-C chargers came out, I’ve been intrigued by the notion of Raspberry Pi gadgets. In short, these are Raspberry Pi devices that draw their power, and/or networking from the USB-C port on the iPad Pro.

Having awakened my tinkering spirit with the internet speed monitor project, I was looking for another project. I had one unused Raspberry Pi Zero W in a box of spare Pi parts, so that’s where I started.

I chose Kali for the distribution to use because there are images specific to various Raspberry Pi hardware models, and because the distribution itself supports many popular Linux tools for Forensics and Reverse Engineering. REMnux is my default Linux for malware poking, but to date it’s only supported on Intel architectures.

Know from the start you’re not going to be using this device for processing on the scale of Enron, but for access to a wider toolset when on the go, and especially for training I think it’s a pretty cool setup. If you’re looking to set up a mobile development environment, or still run Kali but with more oomf – there’s number of resources to do so using a Pi 4. Since the Pi Zero W is powered by a USB-micro, it cannot support networking (iPad to Pi) over the USB port. Later models like the Pi 4 (USB-C powered) are capable, but at the time of the project, all mine be were occupied. In this case we’ll be connecting to the Pi over WiFi via SSH.

Grab the image for Pi Zero W (or whatever’s applicable for the model you’re running from https://www.kali.org/get-kali/#kali-arm. There’s plenty of documentation on enabling SSH if it isn’t by default. On this particular build for the Pi, it was. You’ll also want to install tightvncserver.

Depending on which Pi hardware version you’re using, the Pi will have different capabilities. Notably lacking on the Pi Zero W, the resources to run any modern browser. But since I have the iPad that it’s running from it’s not like I’m missing it at all.

Kali supports the installation of what they call meta-packages. These are specific sets of tools or features to support different capabilities (Bluetooth hacking, wireless hacking, etc.) For my build I chose the reverse engineering and forensics packages as those are the tools I’m most interested in experimenting with.

I had a bit of trial and error when it came to the physical USB connections. Originally I had a series of USB-C connecting adapters, terminating with a USB-C to USB micro adapter. When I had this franken-jack plugged into the iPad the Pi wouldn’t power up. However if I had a USC-C cable connected to the jack, or between the jack and the iPad, I could get power (just with a cable I didn’t need.) At some point I had the idea of introducing a USB-A into the mix and voila, power to the Pi. All that said, the final hardware combo consisted of a USB-C (male) to USB-A (female) 180 degree adapter, and a USB-A (male) to USB-Micro (male) adapter.

The 180 degree adapter enables a very low profile while having a reasonable gap for ventilation, even when connected to a Magic Keyboard.

Plug the device into the USB-C port on the iPad a give it a minute or two to boot up.

For SSH on the iPad there’s no better than Blink.

I don’t have VNC running at boot to save on resources, but I have a script in my home directory to quickly turn it on when GUI access is needed.

For VNC I use Jump Desktop, and have a configuration saved for VNC tunneled over SSH.

CSIRT-Collect

A PowerShell script to collect memory and (triage) disk forensics for incident response investigations

There’s a number of tools that support a one-to-many remote operation capability. However, not all organizations have that level of capability. I’ve also seen that in some large organizations how things are designed to work with remote assets, and how they actually work, may not be the same. What I wanted was a repeatable pre-defined collection mechanism, that could scale out to be supported by non-forensics team members to participate in forensic evidence collection for incident response examinations. The intent is that the collection process can be distributed among remote team members, be it site support or Security Operations Center (SOC). The script can also be integrated into SOAR and EDR platforms.

CSIRT-Collect was written to fill that role.

https://github.com/dwmetz/CSIRT-Collect

CSIRT-Collect leverages a network share, from which it will access and copy the required executables and subsequently upload the acquired evidence to the same share post-collection.

Permission requirements for said directory will be dependent on the nuances of the environment and what credentials are used for the script execution (interactive vs. automation). In the demonstration code, a network location of \\Synology\Collections can be seen. This should be changed to reflect the specifics of your environment.

The Collections folder will need to include:
– subdirectory KAPE; copy the directory from any existing install
– subdirectory MEMORY; 7za.exe command line version of 7zip and winpmem.exe

CSIRT-Collect Operations:

  • Maps to existing network drive –
  • Subdir 1: “Memory” – Winpmem and 7zip executables
  • Subdir 2: ”KAPE” – directory (copied from local install)
  • Creates a local directory on asset
  • Copies the Memory exe files to local directory
  • Captures memory with Winpmem
  • When complete, ZIPs the memory image
  • Renames the zip file based on hostname
  • Documents the OS Build Info (no need to determine profile for Volatility)
  • Compressed image is copied to network directory and deleted from host after transfer complete
  • New temp Directory on asset for KAPE output
  • KAPE !SANS_Triage collection is run using VHDX as output format [$hostname.vhdx] **
  • VHDX transfers to network
  • Removes the local KAPE directory after completion
  • Writes a “Process complete” text file to network to signal investigators that collection is ready for analysis.

** Note: you can build different KAPE collection profiles by modifying just one line of code. Profiles can be chosen to support the requirements of the investigation.

CSIRT-Collect_USB

This is a separate script that performs essentially the same functionality as CSIRT-Collect.ps1 with the exception that it is intended to be run from a USB device. There is no need for a temporary host directory as the information is written direct to the USB device. The extra compression operations on the memory image and KAPE .vhdx have also been omitted. There is a slight change noted below to the folder structure for the USB version. On the root of the USB:

  • CSIRT-Collect_USB.ps1
  • folder (empty to start) titled ‘Collections’
  • folders for KAPE and Memory – same as above
  • Execution: -Open PowerShell as Adminstrator -Navigate to the USB device -Execute ./CSIRT-Collect_USB.ps1

To see a demonstration of CSIRT-Collect in action please register for my talk this Thursday, PowerShell Tools for IR Forensics Collection as part of the Enterprise Pulse lecture series hosted by Magnet Forensics.

Q&A will be live on Discord during the event.

Magnet Weekly CTF, Week 12 Solution Walk Through

The final challenge (#12) – Part 1:

What is the PID of the application where you might learn “how hackers hack, and how to stop them”?

Format: #### Warning: Only 1 attempt allowed!

The first thing I did was open the memdump file in HxD Hex Editor. A quick search found several hits.

I considered mapping the Offset back to the process memory but before going down that road (anticipating it to be math heavy) I decided to drop the individual process memory instead. Looking at the text surrounding “How Hackers Hack…” it appears to be html code. Looking even closer I’d say that it was in response to a search request for “how to stop getting hacked over and over.” Based on that I knew I’d be looking for a browser process.

Running pslist in Volatility we see that there’s multiple browser processes running for both Chrome and Internet Explorer.

I decided to focus on the iexplore.exe processes for Internet Explorer first – for 2 reasons. 1 – there were less running than Chrome so it was a smaller set to work through first. 2 – I did happen to find a Parsed Search Query in Axiom for “how to stop getting hacked over and over.”

The URL indicates a search from Bing.com. Only a sociopath would use Bing to search within Chrome so Internet Explorer it is.

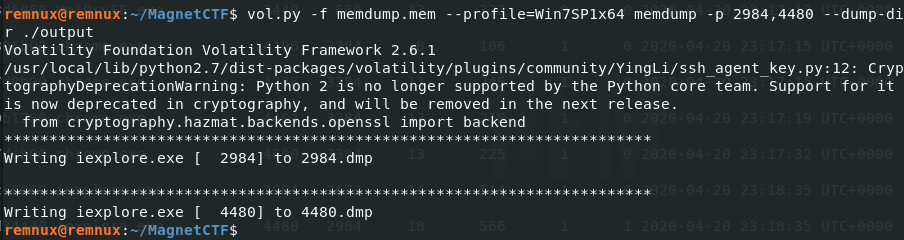
I used the memdump Volatility plugin to dump the process memory for both IE processes.

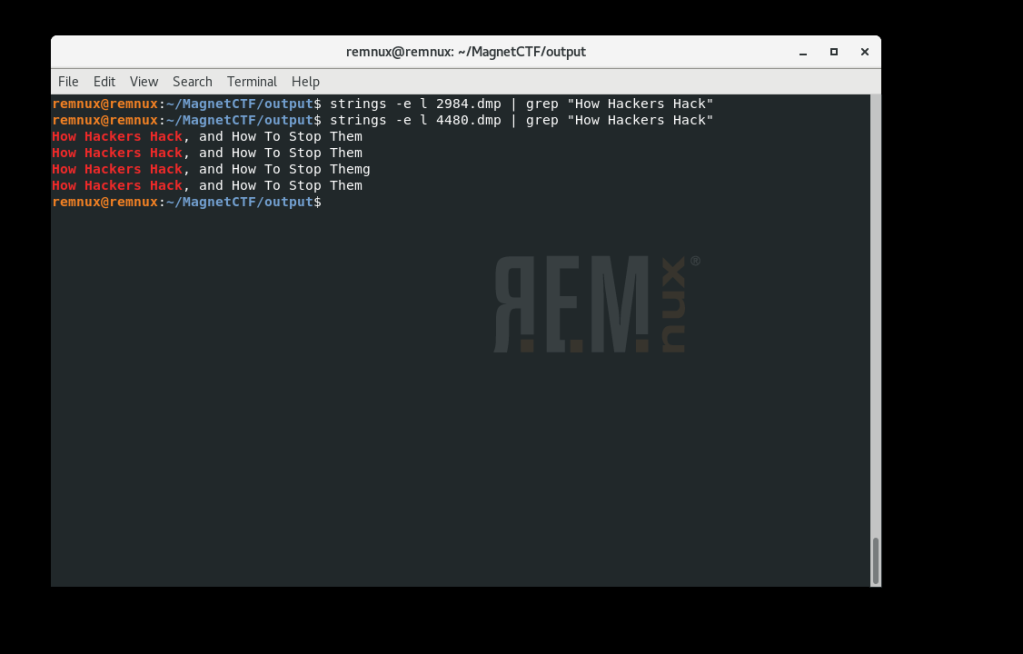
Next I ran strings against each dump file to see if there was a hit.

We see that in the second file 4480.dmp (associated with PID 4480) contains the content we’re looking for. What is the PID of the application where you might learn “how hackers hack, and how to stop them”? 4480 [Flag 1]


The final challenge (#12) – Part 2:

What is the product version of the application from Part 1?

Format: XX.XX.XXXX.XXXXX

OK, so we need to know what version of Internet Explorer was used for the Bing search. Off to the Google to find that the IE version information is stored in the registry in HKEY_LOCAL_MACHINE\Software\Microsoft\Internet Explorer in the svcVersion value.

From here I mount the full memory image using MemprocFS.

Using the file structure to navigate to the registry key I open svcVersion.txt and verify that the IE version running is 11.0.9600.18860. Back to the scoreboard to submit the bittersweet ending to a very fun challenge and ….. WRONG.

Hmm, so everything I knew (which was limited to be honest) told me that I had the version right, but that wasn’t the right answer. Over on the Discord channel I saw I wasn’t the only one to have the same quandry.

I waited and lurked, waited and lurked – but wasn’t seeing any update to the question. The following day while meditating on the matter in the shower I was thinking about what other means existed to identify details like this.

I used the procdump Volatility plugin to dump the process executable for PID 4480.

Once I had executable.4480.exe I uploaded the file to Virus Total.

Scrolling down on the details tab we see that the exe is correctly identified as Internet Explorer and shows a File Version of 11.00.9600.18858. This is very similar to what we identified earlier (…58 vs …60).

Answer: 11.00.9600.18858 [Flag 2] CORRECT!

I’ll be very interested to learn how others who got the flag identified the correct version information. I suspect there’s additional artifacts that I didn’t explore that hold those clues but for the time being – it’s a mystery to me.

Who am I kidding? It’s gonna be killing me til I know the answer.