MalChela v3.0: Case Management, FileMiner, and Smarter Triage

With the release of MalChela v3.0, I’m introducing features that shift the focus from tool-by-tool execution to a more structured investigative workflow. While the core philosophy of lightweight, file-first analysis remains unchanged, this version introduces smarter ways to manage investigations, track findings, and automate common analysis patterns, all with minimal fuss.

In this post, I’ll walk through the new Case Management system, the replacement of MismatchMiner with FileMiner, and the ability to identify and launch suggested tools — even in batch — based on file characteristics. These changes aim to reduce friction in multi-tool workflows and help analysts move faster without losing visibility or control.

Cases: A Lightweight Way to Stay Organized

Until now, MalChela has operated in an ephemeral mode. You selected a tool, pointed it at a file or folder, and reviewed the output. Any saved results would be grouped by tool, but without much context.

Cases change that. In v3.0, you can start a new case from a file or folder — and everything from that point forward is grouped under that case. Tool outputs are saved to a dedicated case folder, file hashes are tracked, and metadata is preserved for review or reanalysis.

Case Management

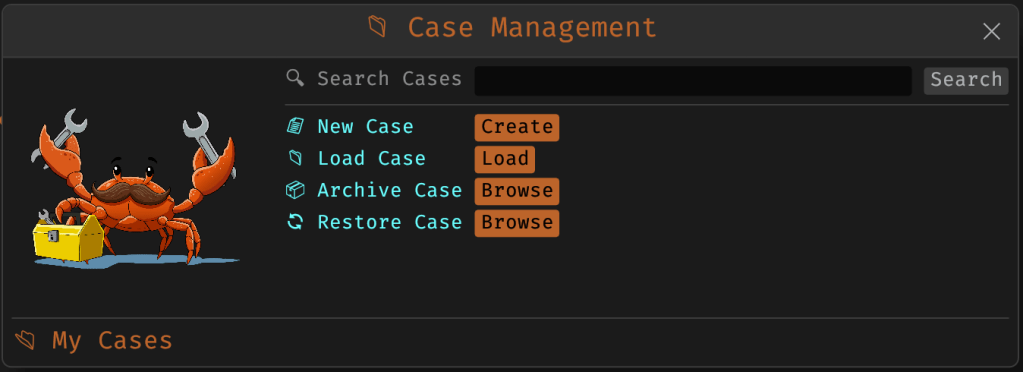
You don’t need to create a case for every run — MalChela still supports standalone tool execution. But when you’re working with a malware sample set, an incident directory, or a disk image extract, cases give you the ability to:

  • Save tool results in a consistent location
  • Track analysis history per file
  • Reopen previous sessions with full context
  • Add notes, tags, and categorization (e.g., “suspicious”, “clean”, “needs review”)

Hello FileMiner: Goodbye MismatchMiner

The MismatchMiner tool was originally designed to surface anomalies between file names and actual content — a common trick in malicious attachments or script dropper chains. It worked well, but its scope was narrow.

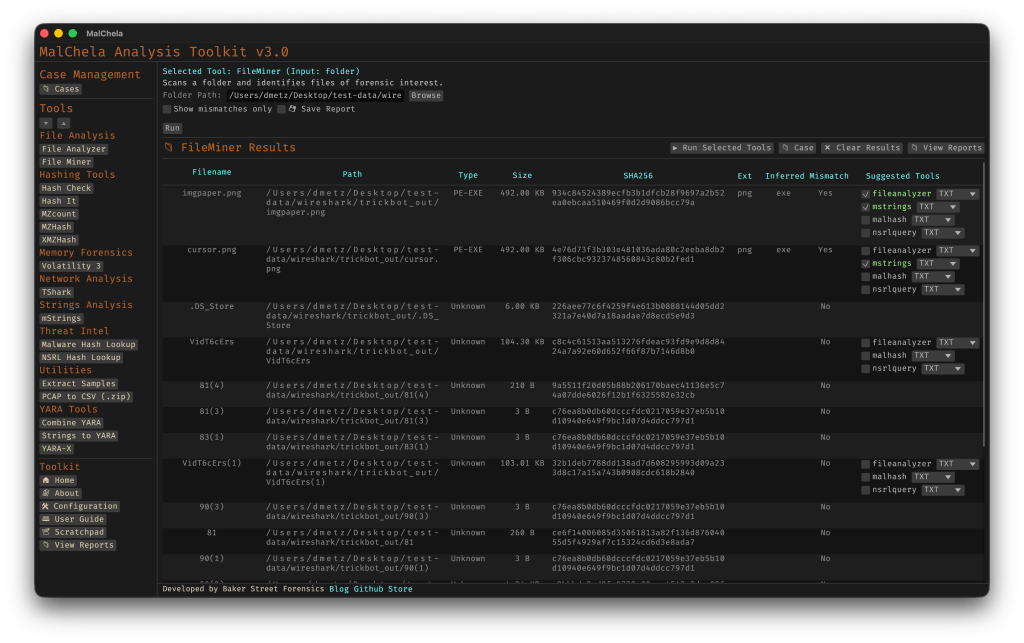
FileMiner replaces it, expanding the logic to support full file-type classification and metadata inspection across an entire folder. It still flags mismatches, but now it also:

  • Detects embedded file types using magic bytes
  • Groups files by class (e.g., images, documents, executables, archives)
  • Calculates hashes for correlation and NSRL comparison
  • Extracts size, extension, and other key metadata
  • Saves both a human-readable .txt summary and a structured .json report

The output is designed to be used both manually and programmatically — which brings us to one of v3.0’s most important additions: tool suggestions.

The new FileMiner app

Suggested Tools and Batch Execution

Once FileMiner runs, it doesn’t just stop at reporting. Based on each file’s type and characteristics, it can now suggest one or more appropriate tools from the MalChela suite.  These suggestions are surfaced right in the GUI — or in the CLI if you’re running FileMiner interactively. From there, you can choose to launch the recommended tool(s) on a per-file basis or queue up several for batch execution.

This makes it much faster to pivot from triage to deeper inspection. No more switching tools manually or copying paths. You stay within the flow — and more importantly, you reduce the risk of skipping important analysis steps.

CLI and GUI Improvements Aligned

These features are available in both the CLI and GUI editions of MalChela. In the CLI, FileMiner presents an interactive table of results. You can pick a file, see its suggested tools, and choose which one to run. When you’re done, you can return to the table and continue with the next file.

The GUI extends this even further, allowing you to:

  • View and scroll through full case history
  • Run tools with live output streaming
  • Reopen previous FileMiner runs from saved reports
  • Run all suggested tools on all files with one click (if desired)

These features let you treat MalChela more like a toolbox with memory, not just a launcher.


CLI Enhancements:

The command-line interface has also received a quiet but meaningful upgrade. Tool menus are now organized with clear numeric indexes and shortcodes, making it faster to navigate and launch tools without needing to retype full names. This small change goes a long way during repetitive tasks or when working in a time-constrained triage setting.

FileMiner supports an interactive loop: after running a tool on a selected file, you’re returned to the main results table — no need to restart the scan or re-navigate the menu. This allows you to run additional tools on different files within the same dataset, making FileMiner feel more like a lightweight control center for follow-up actions. It’s a subtle shift, but one that significantly reduces friction in batch-style or exploratory workflows.


Closing Thoughts

MalChela 3.0 reflects a steady evolution — not a revolution. It’s built on real-world feedback and a desire to make forensic and malware analysis a little less scattered. Whether you’re a one-person IR team or just trying to stay organized during a reverse engineering exercise, the new case features and smarter triage capabilities should save you time.

If you’ve been using MalChela already, I think this update will feel like a natural (and welcome) extension. And if you haven’t tried it yet, there’s never been a better time to start.

Download: https://github.com/dwmetz/MalChela/releases

User Guide: https://dwmetz.github.io/MalChela/

Book Review: Cloud Forensics Demystified

At this point, we’ve all heard the expression ‘There is no cloud; It’s just someone else’s computer.’ While there is some truth to that, there are some fundamental differences when it comes to digital forensics when cloud resources are part of the investigation.

Recently, I had the chance to read Cloud Forensics Demystified: Decoding cloud investigation complexities for digital forensic professionals, by Ganesh Ramakrishnan and Mansoor Haqanee. I received a complimentary this book in exchange for an honest and unbiased review. All opinions expressed are my own.

I’ve been doing DFIR for about 15 years now. In the early days, almost all investigations involved having hands on access to the data or devices being investigated. As I moved into Enterprise Incident Response, it became more and more frequent that the devices I would be investigating would be in a remote location, be it another state – or even another country. As the scope of my investigations grew, so did my techniques need to evolve and adapt.

Cloud Forensics is the next phase of that evolution. While the systems under investigation may still be in another state or country, extra factors come into play like multi-tenancy and shared responsibility models. Cloud Forensics Demystified does a solid job of shedding light on those nuances.

The book is divided into three parts.

  • Part 1: Cloud Fundamentals
  • Part 2: Forensic Readiness: Tools, Techniques, and Preparation for Cloud Forensics
  • Part 3: Cloud Forensic Analysis: Responding to an Incident in the Cloud

Part 1: Cloud Fundamentals

This section provides a baseline knowledge of the three major cloud providers, Amazon Web Services (AWS), Google Cloud Platform (GCP) and Microsoft Azure. It breaks down the different architectural components of each, and how the platforms each handle the functions of virtual systems, networking and storage.

Part 1 also includes a broad yet thorough introduction to the different Cyber and Privacy legislation that come into play for cloud investigations. This section is not only valuable to investigators. Whether you’re a lawyer providing legal counsel for an organization, or responsible for an organizations overall security at a CISO level, this material is beneficial in understanding the challenges and responsibilities that come from hosting your data or systems in the cloud, and the different legislation and regulations that follow those choices.

Part 2: Forensic Readiness: Tools, Techniques, and Preparation for Cloud Forensics

As with enterprise investigations, logging is often where the hunting for incident indicators begins with telemetry and the correlation of different log sources. This section focuses on the different log sources available in AWS, GCP, and Azure. It also provides a detailed list of log types that are enabled by default and those that require manual activation to ensure that you have access to the most relevant data for your investigations when an incident occurs. This section also covers the different providers offerings for log analysis in the cloud including AWS Cloud Watch, Microsoft Sentinel and Google’s Cloud Security Command Center (Cloud SCC) as examples.

Part 3: Cloud Forensic Analysis: Responding to an Incident in the Cloud

As an Incident Responder, this was the section I enjoyed the most. While the first two sections are foundational for understanding the architectures of networking and storage, part three provides detailed information on how to acquire evidence for cloud investigations. The section covers both log analysis techniques as well as recommendations for host forensics and memory analysis tools. The book covers the use of commercial forensic suites, like Magnet Axiom, as well as open-source tools like CyLR and HAWK. Besides covering investigations of the three Cloud Service Providers (CSPs), there is also a section covering the cloud productivity services of Microsoft M365 and Google Workspace, as well as a brief section on Kubernetes.

Summary

Whether you’re a gray-haired examiner like me, or a neophyte in the world of digital forensics, chances are high that if you’re not running investigations in the cloud yet – you will be soon enough.  Preparation is the first step in the Incident Response lifecycle. To properly prepare for incidents you need to know both what sources will be most informative to your investigations, as well as the methodology to capture and process that evidence efficiently. 

Cloud Forensics Demystified is a comprehensive guide that covers cloud fundamentals, forensic readiness, and incident response. It provides valuable insights into cloud investigation techniques, log analysis, and evidence acquisition for major cloud providers and productivity services. The book is valuable for both experienced and novice digital forensics professionals to prepare for cloud investigations.

Huntress CTF: Week 4 – Forensics: Bad Memory

Bad Memory

I spent a bit of time on this trying to get Volatility 2 to work with the Mimikatz plug-in. I was not successful. I was able to run the Volatility hashdump module.

I switched to Volatility3 and ran hashdump. For whatever reason the output of Volatility3 was different.

The only user besides the default accounts is for ‘Congo.’ Copy the hashed password and head over to https://hashes.com/en/decrypt/hash where we can search for the hash.

Yay, we got a match.

[Note: anecdotally I was advised that you could do this offline as well with Hashcat and the rockyou wordlist. I had tried that earlier but was using the Volatility2 output. 😦 ]

The last step is to convert ‘goldfish#’ to MD5.

Now just wrap it in the flag { } and you’re good to go.


Use the tag #HuntressCTF on BakerStreetForensics.com to see all related posts and solutions for the 2023 Huntress CTF.

Huntress Capture the Flag – A CTF Marathon

Throughout October, as part of Cyber Security Awareness Month, the team over at Huntress put on a ~30 day Capture the Flag event with 58 unique challenges.

First and foremost, kudos to the organizers for pulling off an event of this size and duration. There were only minor technical difficulties noticed throughout the month, and on more than one occasion those were due to people not observing the rules and using brute force tools where they weren’t needed (or allowed.)

Overall, I found the event to be a great learning experience that challenged me, increased my confidence, and gave me an avenue to pursue skills I want to develop further.

The challenges covered a wide area of subjects with the majority being DFIR related. The categories included:

  • Warm Ups (14)
  • Forensics (10)
  • Malware (16)
  • M365 (4)
  • OSINT (3)
  • Steganography (1)
  • Miscellaneous (10)

Today the final challenge of the event, graced us with another lovely malware sample to analyze.

I was very pleased with myself at having solved nearly 80% of the challenges. There’s still another 20 or so hours to go, so we’ll see if that improves any further. The only categories I didn’t have 100% in were Miscellaneous and Malware. I think this is fair considering my skill levels. The Malware scenarios were appropriately challenging for someone newer to this area. This is an area that I’ve been developing my skills in more recently. I’m looking forward to seeing others’ write-ups on those challenges where I didn’t make it all the way through, and following along with my own data.

Tools used in the CTF

I added a number of new tools to my toolkit throughout the CTF, and got more experienced with some old friends as well. Depending on the challenge I switched between operating systems including MacOS, REMnux (Linux), and a customized Windows VM with a plethora of malware analysis utilities. By the end of the event the tools used included:

  • PowerShell
  • Strings
  • CyberChef
  • Gimp
  • Curl
  • Firepwd.py
  • rita
  • the_silver_searcher
  • nmap
  • dcode.fr
  • meld
  • Cutter
  • Ghidra
  • Python
  • ChatGPT
  • Google Chrome Developer Tools
  • iSteg
  • exiftool
  • Google Lens
  • Google Maps
  • detonaRE
  • Process Monitor (procmon)
  • Visual Studio Code
  • Site Sucker
  • 7zip
  • Magnet AXIOM
  • olevba
  • x64dbg
  • AADInternals
  • Microsoft Excel
  • Event Viewer
  • chainsaw
  • PowerDecode
  • PowerShell ISE
  • rclone
  • Volatility3
  • hashcat
  • impacket

Write-Ups

Over the next few days I’ll be releasing the write-ups on how I solved each of the completed challenges. The organizers requested that no solutions be posted until 24 hours after the conclusion of the CTF.

Based on the amount of content, I’ll be breaking the write-ups down by week number (1-4) and challenge category.

Wednesday:

Thursday:

Friday:

Saturday:

You can follow along through the week, or come back on the weekend to read them all.

Once again, I want to extend my thanks to the Huntress team for a great event. I hope you’ll follow along with my solutions, and please comment with other ways to solve if you have them. It’s all about the learning.


Use the tag #HuntressCTF on BakerStreetForensics.com to see all related posts and solutions for the 2023 Huntress CTF.