Forensic investigations are an intense and detail-oriented field where accuracy and efficiency are paramount. However, the constant pressure can often lead to stress and burnout. Whether dealing with IR (incident response) or ICAC (child exploitation cases), the weight of these responsibilities can take a toll on even the most resilient investigators.
I believe the principles of Zen offer a meaningful antidote to these challenges. Rooted in mindfulness, simplicity, and presence, Zen can provide forensic investigators with tools to manage stress, maintain focus, and approach their work with clarity.
By integrating Zen principles into forensic practices, investigators can navigate complex cases with a calm and focused mindset, enhancing both their effectiveness and well-being.

The Intersection of Zen and Forensic Investigation
Forensic investigations demand precision, attention to detail, and the ability to think clearly under pressure—qualities that align closely with Zen’s tenets. Zen, a branch of Mahayana Buddhism, emphasizes mindfulness, non-attachment, and direct experience. When applied to forensic work, these principles offer a balanced approach that helps investigators stay present and focused, even amid chaos and complexity.
At its core, Zen promotes mindfulness, simplicity, and patience. It encourages focusing on the present moment, embracing simplicity, and approaching life with balance and harmony. Unlike many traditional religions, Zen emphasizes personal practice over dogma, making it uniquely suited for practical application in various fields—including forensics.
Zen in Action: Enhancing Forensic Practice
Zen principles have been successfully applied in various fields. In art, minimalist movements reflect Zen’s emphasis on simplicity. In business, leaders like Steve Jobs drew inspiration from Zen’s focus on cutting away distractions to emphasize what truly matters. Athletes have credited mindfulness as the key to achieving “flow” or being “in the zone.”
These same principles can also benefit forensic investigators, helping them sift through overwhelming amounts of data to find what is essential.
Forensic investigations involve meticulous processes: evidence collection, analysis, interpretation, and testimony. Investigators must work under tight deadlines, with vast amounts of data, while maintaining the highest standards of accuracy and objectivity. Success in this field requires a sharp mind, logical thinking, and effective stress management.
Introducing Zen to digital forensics offers a methodology for finding calm amid complexity. Let’s explore how specific Zen principles—mindfulness, non-attachment, simplicity, and patience—can enhance forensic practices.
Mindfulness (Nen): Staying Present
Mindfulness is the practice of being fully present in the moment, and it is central to Zen. In forensic investigations, this means staying focused on the immediate task at hand, whether collecting evidence or analyzing data. By practicing mindfulness, investigators can significantly reduce errors, as their full attention is on the work in front of them.
This enhanced focus not only improves accuracy but also helps investigators maintain emotional control, enabling them to remain composed in high-pressure situations.
Non-Attachment (Muga): Letting Go of Bias
Non-attachment in Zen refers to letting go of ego and preconceptions. For forensic investigators, this means avoiding the temptation to form conclusions too early. Instead, they must allow the evidence to guide their analysis. Zen’s principle of non-attachment aligns perfectly with the objective nature of forensic work, where staying open to new insights is crucial.
By letting go of preconceived notions, investigators can avoid confirmation bias and follow where the facts truly lead.
Simplicity (Kanso): Focusing on the Essential
In today’s digital age, forensic investigators are often overwhelmed with vast amounts of data. The Zen principle of simplicity—focusing on what is essential and filtering out the rest—can help prevent burnout and increase efficiency.
By prioritizing relevant evidence, eliminating distractions, and simplifying their approach, investigators can better uncover the truth. This is especially important in triaging evidence and making decisions on what data to focus on in high-stakes cases.
Patience (Nintai): Embracing Perseverance
Forensic investigations often require piecing together seemingly disconnected fragments of data to understand the full scope of an incident. This process takes time, and rushing can lead to missed details or flawed conclusions. Zen teaches patience, which is invaluable for investigators who must wait for the full puzzle to come together before making final judgments.
In digital forensics, patience is essential when dealing with complex, fragmented, or encrypted data. Investigators must accept that not every case will yield complete answers and be willing to work with the available evidence.

Beginner’s Mind (Shoshin): Staying Open to New Possibilities
“Beginner’s mind,” or Shoshin, refers to an attitude of openness and curiosity, free from preconceptions. In digital forensics, where technology is constantly evolving, maintaining a beginner’s mind helps investigators remain open to new tools, techniques, and types of evidence.
By approaching each case with curiosity and humility, forensic investigators can discover new insights and avoid relying solely on past methods. This adaptability is significant in a field where outdated approaches can quickly become obsolete.
In Beginners Mind, you don’t know what you do know.
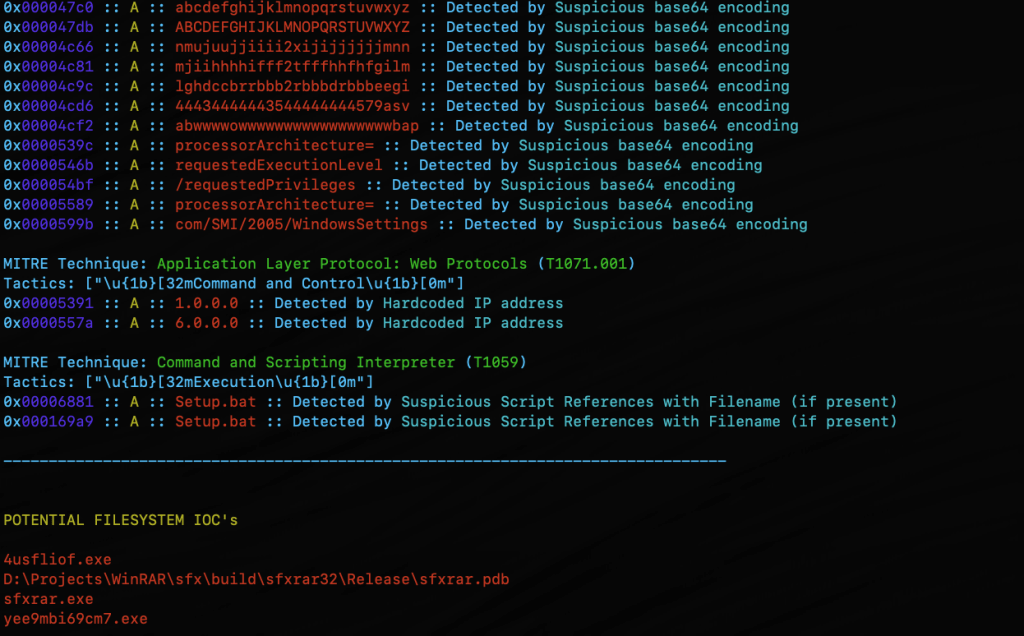
When we apply Beginners Mind to Digital forensics, we can say ‘ you don’t know what you don’t know’; but we can also say, ‘you don’t know what you DO know.’ Artifacts, and the techniques for their analysis, are constantly evolving. As devices update, the means by which artifacts are stored and how we interpret them are subject to change.
Practical Zen Techniques for Forensic Investigators
- Meditation: Regular meditation can enhance mental clarity, reduce anxiety, and improve focus—key qualities for investigators working under pressure.
- Breathing Techniques: Simple breathing exercises can help investigators regain composure during stressful moments, allowing them to think more clearly.
- Mindful Walking: Taking mindful breaks during long investigations can help reset the mind, promoting relaxation and sustained focus.
- Attention to Detail: Mindfulness exercises can sharpen the ability to notice subtle yet critical details, which is vital in forensic investigations
Conclusion
Zen and digital forensics share core values such as focus, objectivity, patience, and clarity. A forensic investigator, much like a Zen practitioner, must cultivate a clear, focused mind, remain patient and persistent, and be open to whatever truth the evidence reveals. By integrating Zen principles into forensic practices, investigators can not only improve their performance but also maintain their mental well-being in a high-pressure environment.
In essence, Zen offers a path to calmness and clarity in a field where chaos and complexity often reign. Through mindfulness, non-attachment, simplicity, and patience, forensic investigators can enhance both their effectiveness and their personal sense of balance.

Note: This topic was first presented at the 2025 Magnet Virtual Summit. You can access the recording here.