CyberPipe-Timeliner: From Collection to Timeline in One Script

You know how these things go. A colleague asks a simple question, and before you know it, you’re knee-deep in PowerShell creating something that didn’t exist a few weeks ago. That’s exactly how CyberPipe-Timeliner came to be.

After a recent update to CyberPipe, someone asked whether there was a way to pipe Magnet Response collections through to something like ForensicTimeliner. It was one of those “that should exist” moments. So I made it exist.

A Quick History Lesson

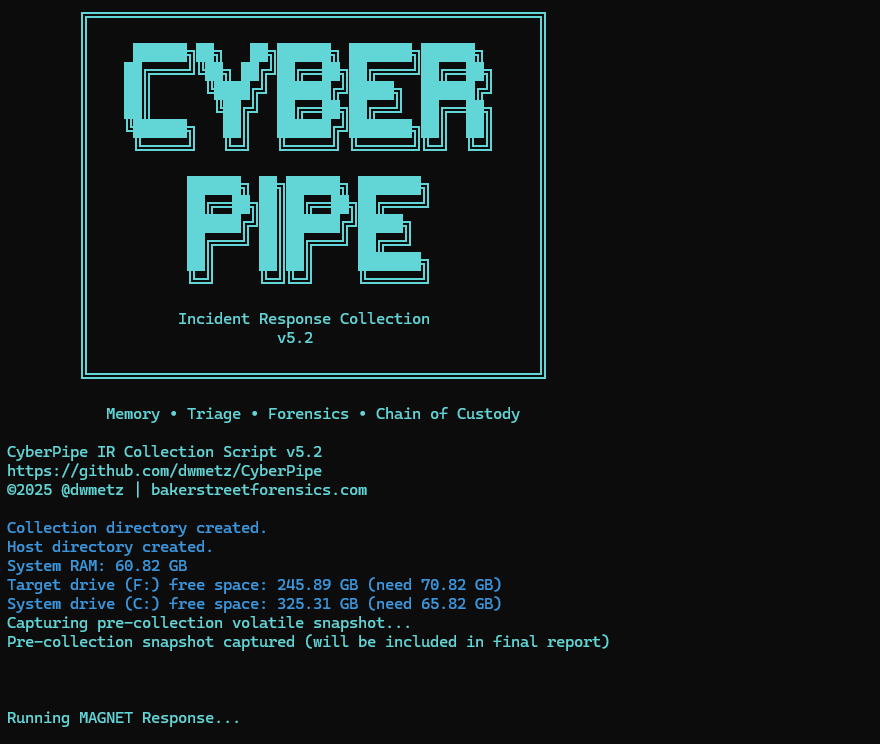
For those who haven’t been following along, CyberPipe (formerly CSIRT-Collect) has been around since my IR days. It went public in 2021 and has been steadily maintained and updated since then. The tool has proven itself useful for rapid incident response collection, and it’s evolved based on real-world needs and feedback from the community.

CyberPipe-Timeliner is its companion project—taking that collection data and turning it into something immediately actionable: a unified forensic timeline.

What It Actually Does

The script automates the entire workflow from collection to timeline:

Extraction – It unpacks your Magnet Response archive, whether that’s a ZIP file or an already-extracted directory.

Processing – All the heavy lifting happens here using Eric Zimmerman’s EZ Tools to generate CSVs from your artifacts.

Organization – The CSVs get structured specifically for ForensicTimeliner compatibility, because nobody wants to spend time wrestling with file formats.

Aggregation – Everything merges into a consolidated timeline, giving you that unified view we’re all after.

Built for Real-World Use

The script includes some practical features that came from actual use cases:

  • Date filtering – Need to focus on a specific incident window? Use -StartDate and -EndDate to narrow your timeline to what matters.
  • Flexible input – Point it at a ZIP file or an already-extracted collection folder. Either works.
  • Verbose and diagnostic modes – Because sometimes you need to see exactly what’s happening under the hood.
  • Auto-generated output folders – Timestamped folders keep your timelines organized without any extra effort.

Getting Started

Setting it up is straightforward. You’ll need PowerShell 7+, Eric Zimmerman’s EZ Tools, ForensicTimeliner, and Microsoft .NET SDK (v9 recommended). The GitHub repository has detailed setup instructions, including handy one-liners for downloading and configuring the required tools.

Once you’re set up, a basic run looks like this:

.\CyberPipe-Timeliner.ps1 -InputFile "collection.zip"

That’s it. The script handles the rest, creating a timestamped output folder with your complete timeline.

Why It Matters

Forensic timeline generation shouldn’t be a multi-tool, multi-step headache. CyberPipe-Timeliner takes what would normally be several manual processes and condenses them into a single automated pipeline. You collect with Magnet Response or CyberPipe, run the timeliner script, and get actionable timeline data.

It’s available now on GitHub, and as always, feedback and contributions are welcome. If you run into issues or have ideas for improvements, open an issue or reach out.

Sometimes the best tools come from simple questions and the willingness to build the answer.

CyberPipe v5.3: Enhanced PowerShell Compatibility and Reliability

I’m pleased to announce the release of CyberPipe v5.3, bringing critical compatibility improvements for Windows PowerShell 5.1 and enhanced reliability across all PowerShell environments.

The Problem

After releasing v5.2 with the new unified banner design, several users reported an interesting issue: CyberPipe would execute perfectly in PowerShell Core, but in Windows PowerShell 5.1, the script would complete the Magnet Response collection successfully—then immediately fail with an exit code error and stop before running EDD and BitLocker key recovery.

The collected artifacts were there. The output looked successful. But the script refused to continue.

The Root Cause

This turned out to be a known quirk in Windows PowerShell 5.1: the $process.ExitCode property isn’t always reliably populated after calling WaitForExit() on a process object. Even when Magnet Response completed successfully with exit code 0, PowerShell 5.1 would sometimes report a non-zero value, causing CyberPipe to think the collection had failed.

The Solution

Version 5.3 introduces dual validation logic that checks both the exit code and verifies that files were actually collected. If Magnet Response reports a non-zero exit code but artifacts were successfully collected, CyberPipe recognizes this as a PS 5.1 reporting issue and continues the workflow with a warning message.

The script now validates success based on what actually matters: did we collect the evidence?

Bonus: Adaptive Banners

While fixing the PS 5.1 compatibility, I also enhanced the banner display:

  • PowerShell Core: Displays the full Unicode box-drawing banner with visual flair
  • Windows PowerShell 5.1: Shows a clean ASCII banner optimized for automation, EDR deployment, and environments where Unicode rendering may be inconsistent

The script automatically detects which PowerShell edition is running and adjusts accordingly.

Testing & Validation

CyberPipe v5.3 has been tested and verified on:

  • ✅ Windows PowerShell 5.1
  • ✅ PowerShell Core 7.x
  • ✅ All collection profiles (Volatile, RAMOnly, RAMPage, RAMSystem, QuickTriage, Full)

The script now executes flawlessly in both environments with no workflow interruptions.

Compatibility Notes

This is a drop-in replacement for v5.2 with no breaking changes:

  • All command-line parameters work identically
  • Existing automation scripts require no modifications
  • All collection profiles function as before

Why This Matters

For incident response work, reliability is non-negotiable. When you’re collecting evidence from a potentially compromised system, you need tools that work consistently across different Windows environments—corporate workstations running PS 5.1, modern systems with PS Core, virtual machines, and physical hardware.

CyberPipe v5.3 ensures that whether you’re running an interactive collection or deploying via EDR automation, the script executes reliably from start to finish.

Get CyberPipe v5.3

DownloadCyberPipe v5.3 on GitHub

DocumentationGitHub Repository

As always, feedback and issue reports are welcome on the GitHub repository.


CyberPipe is a free, open-source incident response collection tool for Windows systems, automating memory capture, triage collection, encrypted disk detection, and BitLocker key recovery.

Streamline Digital Evidence Collection with CyberPipe 5.2

I first wrote CyberPipe when I was on the front lines of incident response, driven by the need for more robust and efficient triage collections, whether online or off.  Over the years, CyberPipe continues to adapt and improve, addressing the ever-changing challenges faced by incident response practitioners. 

CyberPipe (formerly CSIRT-Collect) is a PowerShell script that is designed to streamline the collection of digital evidence using Magnet Response in enterprise environments, ensuring that responders can gather critical data efficiently and effectively.  Other features include detection of encrypted drives, BitLocker key recovery, and memory image collection.

The most recent update includes enhancements in three areas: Collection, Capabilities, and Reliability.

Screenshot of CyberPipe

🔍 What’s New in 5.2

Intelligent Collection

  • The script now includes dual disk space validation, checking both the target drive and the system drive with profile-aware thresholds to prevent sudden failures due to insufficient space. 
  • A pre-collection volatile snapshot captures uptime, users, connections, and processes to preserve transient state before heavy operations begin.
  • Reports virtual environment detection (VMware, Hyper-V, VirtualBox, etc.) to help analysts understand collection limitations.
  • Real-time progress indicators provide accurate size tracking during the collection, offering responders visibility into the remaining data capture.

Enhanced Capabilities

  • The new QuickTriage profile allows for rapid collection of volatile and system artifacts when time is ticking.
  • BitLocker recovery now includes all volumes, not just the C: drive.
  • A single-file report (CyberPipe-Report.txt) consolidates metadata and a summary of collected artifacts in a human-readable format.
  • All collected artifacts and logs are hashed using SHA-256 to enhance integrity and chain of custody.
  • Output compression is available via the -Compress flag, aiding in storage and transfer.
  • Network collection is simplified with the -Net parameter, eliminating the need for manual network path or configuration edits.

Improved Reliability

  • Profile-aware space checks alert when free space is insufficient for a chosen profile, preventing silent failures.
  • The script now validates exit codes from MAGNET Response to detect failures more effectively.
  • Artifact verification after collection ensures that all expected items were gathered.
  • Error handling and messaging have been refined to provide clearer feedback to the operator.

What I’m hoping this delivers

CyberPipe 5.2 aims to address some challenges observed in real-world triage and live-response operations:

  • Resilience in constrained environments — dual drive checks and profile awareness help prevent mid-collection failures.
  • Better transparency and oversight — real-time progress display and post-collection verification enhance confidence.
  • Faster response options — the QuickTriage profile is suitable when speed is paramount.
  • Stronger forensic hygiene — SHA-256 hashing, improved error detection, and full-volume BitLocker key recovery contribute to defensibility.
  • Easier network deployments — built-in ‘-Net‘ support facilitates smoother remote collection.

As always, CyberPipe is freely available at https://github.com/dwmetz/CyberPipe. Forks and Contributions welcome and appreciated. 

Is there a feature you’d like to see? I think next I might work on support for copying output to AWS/Azure. Thoughts?

Toby-Find: Simplifying Command-Line Forensics Tools

In digital forensics, we often take a toolbox approach — success hinges on having the right tool for the job. Some tools offer broad functionality, while others are deeply specialized. Distributions like KALI and REMnux do a fantastic job bundling a wide range of forensic and security tools, but keeping track of what’s actually installed can be a challenge.

If you’re using a graphical interface, browsing through available packages is fairly intuitive. But when you’re living in the terminal — as many analysts do — that discoverability disappears. There’s no built-in index of command-line tools or how to invoke them.

The first version of Toby-Find was born out of necessity. I teach a Network Forensics course at the university, using a custom VM loaded with tools like Zeek, Tshark, Suricata, and more. I wanted students to have an easy, searchable way to see what CLI tools were available and how to run them — without needing to memorize commands or dig through man pages.

Later, when I built Toby (a forensic-focused Raspberry Pi rig running a customized KALI install), I updated Toby-Find to include the complete CLI toolset geared toward forensics and malware analysis from the KALI ecosystem.

And because I can’t leave well enough alone, I decided to build a REMnux-compatible version too.

Once installed, you can launch Toby-Find (via tf, toby-find, or tf-help) from any terminal and instantly search for tools, descriptions, examples, and more.

Toby-Find on REMnux
Toby-Find on Kali

📦 Installation

1. Clone the repository:

git clone https://github.com/dwmetz/Toby.git

2. Make the install script executable:

cd Toby
chmod +x install.sh

3. Run the installer:

./install.sh

4. Follow the prompt to choose your environment (KALI or REMnux)
5. Open a new terminal or run:

source ~/.bashrc   # or ~/.zshrc depending on shell

🚀 Usage

tf [keyword]

Examples:

tf yara
tf volatility
tf hash

To view the full list:

tf-help

Whether you’re working from a custom VM, a rugged Pi, or a hardened REMnux box, Toby-Find gives you a fast, terminal-friendly way to surface the tools at your disposal — without breaking focus. It’s lightweight, portable, and easy to extend for your own lab or classroom.

You can grab the full installer from GitHub, and contributions are always welcome. If you find it helpful — or build on it — I’d love to hear about it.