Exploring Magnet Virtual Summit 2025 CTF Challenges (iOS)

A couple weeks ago, I participated in the Magnet Virtual Summit 2025 CTF (Capture the Flag). While I don’t think I will ever see a day where I win one of these, (speed is not my forte), I enjoyed working through a good number of the challenges, starting with the lower point values and working my way up. The CTF covered images/sources including: Cipher challenges, iOS and Android full file system images, Google takeouts, and images of a Windows 11 workstation and a Chromebook. I spent my available time working on the iOS and Windows challenges. I wasn’t able to complete all of them, but I’ll share what I was able to complete.

In this post I’ll be sharing my solutions for the iOS challenges. Warning: SPOILERS AHEAD!


To determine the version of iOS, I used the iLEAPP report for the device.

Another way of finding this information in Axiom is to review the Powerlog Battery Shutdown events.
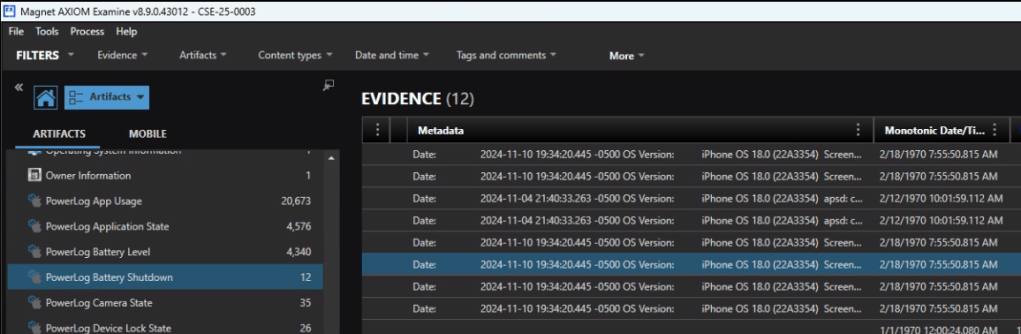
The answer is 18.0


Looking at the Owner information in Axiom is quick way to identify the telephone number associated with the device. 18024959063.


For this one you could start in Contacts or start with a Date/Time filter as that was very specific to the question. The answer is Mary.


Reviewing the iOS Call Logs in Axiom we see that the user never answers their phone. (I can relate.) The answer is “0”.


That’s a ducking odd thing to be curious about. According the the Keyboard Usage Stats, the answer is 51.


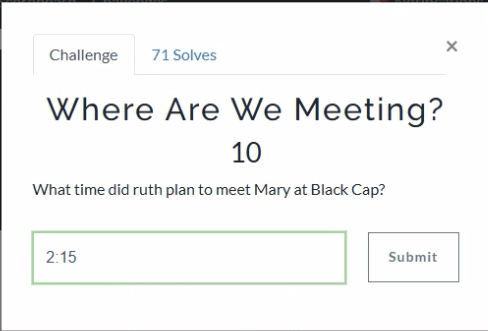
In a Discord chat, Mary and Ruth agree to meet up at 2:15 for coffee.


Started off with a global search on ‘bitmoji’ and then reviewed the media files. (Brown)


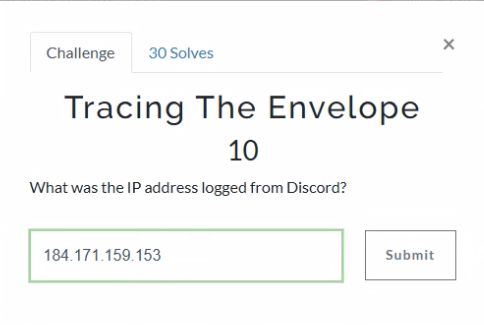
A global search on Discord narrows the results. There is an apple mail message from Discord about the user signing in from a new location. The IP address is 184.171.159.153.


Ah, Nashville. Home of the Magnet User Summit coming up in just a few weeks. iLEAPP can provide us with the Lat and Long of the cities configured in the Weather app.


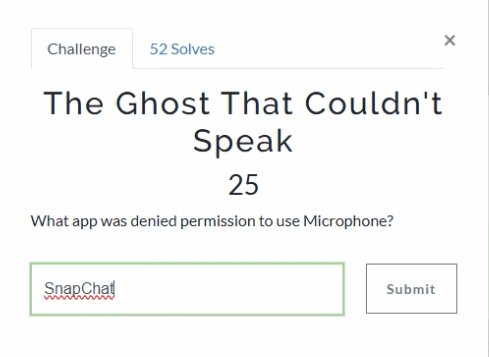
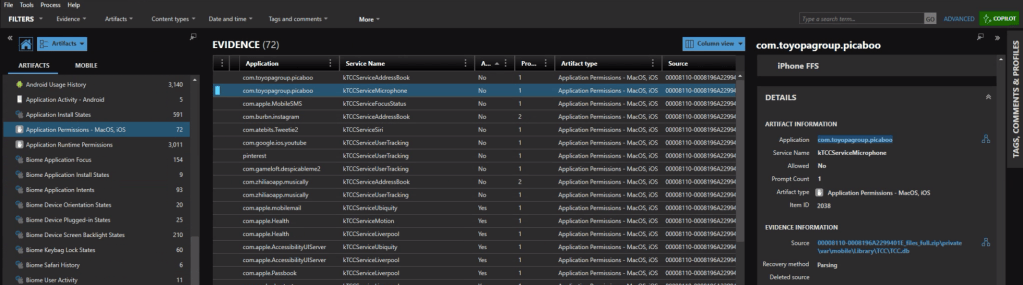
Looking at the Application Permission we can see which applications had (or were denied) access to the microphone. The app identifier com.toyopagroup.picaboo corresponds to Snapchat. The name “Picaboo” refers to Snapchat’s original name before it was rebranded.


In the iOS Messages, we find a number of ‘sale’ announcement from Zenni. EARLYBF24 is the code associated with the 40% off promotion.


First off, we need to know what TikTok video this is referring to. In the iOS messages we see a TikTok video that was shared.

Copy the url and head over to Ryan Benson’s Unfurl. Unfurl decodes the different elements of the url string. One of the details embedded in the string is the time the video was posted. 2024-11-12 22:11:09.


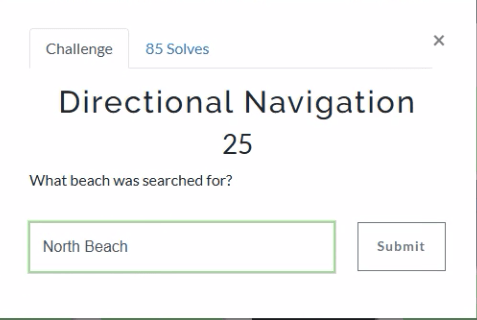
For this one we can take a look at the Apple Maps – Biome App Intents, and see a search for directions to North Beach Park.


When I first looked at this one I thought there could be a “Welcome to your new iPhone” message or something similar. No dice. Besides, that would be too easy for a 25 pointer. A quick googling indicated was that one way to confirm the purchase date of an iPhone is too look up the warranty status on checkcoverage.apple.com.

We can grab the serial number for the device from iLEAPP.

Plugging that into the warranty coverage site we get: December 2022 (2022-12).


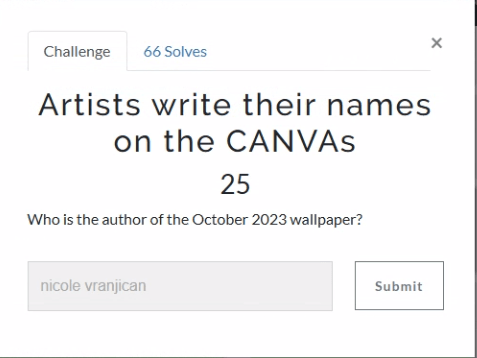
“October” is a good search to start with. Within the PDF documents we find a reference for an October-2023-iphone-wallpaper. In the details we see that the author of this image was nicole vranjican.


There were a few more higher point challenges in the iOS section, but that’s as far as I made it in the allotted time. I’m looking forward to reading other’s write-ups, both for the questions I was unable to solve, as well as seeing the unique and alternative ways that others solved the ones I did.

Stay tuned for my next post on the solutions for the Windows challenges.

If you’d like to access the images used for the CFT for your own training and investigation, you can find them at https://cfreds.nist.gov/all/Hexordia/2025MVSCTF.

Last but not least, my heartfelt appreciation to the team at Hexordia who put together the CTF. Another PUNderful job!

Upcoming talks at Magnet Virtual Summit 2025

Just two more weeks to the Magnet Virtual Summit 2025! If you’ve been procrastinating on registering, don’t miss out. It’s completely free! The conference is scheduled for February 10th through the 14th.

I’m excited to present two talks this year. The first one is titled “Unlocking DFIR: Free Resources for Efficient Triage and Acquisition.” In this talk, I’ll cover free triage acquisition solutions for Windows, Mac, and Linux.

The second talk is called “Zen & the Art of Digital Forensics: Enhancing Insight through Mindfulness.” In this talk, I’ll explore how applying Zen principles like mindfulness, non-attachment, and the ‘beginner’s mind’ can lead to improved investigations and mental well-being.

Register at https://magnetvirtualsummit.com/.

While you’re there, don’t forget to sign up for the Capture the Flag.

Beyond Hashes: Simplifying Malware Identification with Python and MpCmdRun

In an earlier post titled Growing Your Malware Corpus, I outlined methods for building a comprehensive test corpus of malware for detection engineering. It covers using sources like VX-Underground for malware samples and details how to organize and unzip these files using Python scripts.

In today’s post we’re going to cover using Python to apply a standard naming methodology to all our malware samples.

Depending on where you curate your samples from, they could be named by their hash, or as they were identified during investigation, like invoice.exe. Depending on the size of your collection, I’d surmise it’s highly unlikely that they have a consistent naming format.

I don’t know about you, but a title that indicates the malware family and platform is a lot more useful to me than a hash value when perusing the corpus for a juicy malware sample. We can rename all our malware files using Python and the command line utility for Windows Defender.

Step 1: You’ll need to install Python on a Windows box that has Windows Defender.

Install Python

If you don’t have Python installed on your Windows machine, you can do so by downloading the installer from python.org, or alternatively, installing from the Windows store.

Windows Store installer for Python versions 3.7 to 3.12

Directory Exclusion

Within the Windows Defender Virus & Threat protection settings, add an exclusion for the directory you’re going to be using with the malware. Make sure the exclusion is in place before connecting the drive with the malware so it doesn’t get nuked.

Note: Doing this assumes you’ve evaluated the potential risks associated with handling malware, even in controlled settings, and have taken safety precautions. This is not an exercise to be conducted on your corporate workstation.

Screenshot of the D:\Malware Directory being excluded from Windows Defender.

Automatic Sample submission

It’s up to you if you want to disable the Automatic Sample submission. If you do, you’ll still may get prompted to send some.

Automatic Sample Submission turned off in Windows Defender Configuration.
Windows Defender requesting to send samples to Microsoft for further analysis.

Rename_Malware.py

The star of this show is the python script that was shared on twitter from vx-underground.

The post walks through various options for utilizing Windows Defender command line, MpCPmdRun.exe. Using that information a Python script was developed to loop through the contents of a directory, analyze those files with Windows Defender, and then rename the files accordingly based on the malware identification.

Python code for rename_malware.py in VS Code.

You can grab the code from the linked post, or a copy on my Github here.

Once you’ve got Python installed, directory exclusion configured, and a pocketful of kryptonite (malware), – you’re ready to go.

python rename_malware.py D:\Malware

Windows Defender command line will run through each file and rename them based on its detection.

The script recursively renames the analyzed files.

I’m running this on a copy of my malware corpus of 30,000+ malware samples.

Counting the Corpus

A bit of handy PowerShell math. Before and after the process I wanted to be sure of how many files were present to ensure that the antivirus didn’t remove any. I also wanted to exclude counting pdfs as many of the samples in my corpus also have accompanying write-ups.

Using PowerShell for selective file counting.
Get-ChildItem -Recurse -file | Where-Object { $_.Extension ne *.pdf" } | Measure-Object | Select Count

Back at the console the script is still running.

The script continues recursively renaming the analyzed files.
Energizer Rabbit. “Still Going!”

Finally… not begrudgingly at all considering over 30,000 samples were analyzed, the script has reached the end of the samples.

Script has reached the end of the files.

If we do a directory listing on the contents of the malware directory, we see that the majority of the files have all been renamed based on their malware identification.

File listing showing malware files named Trojan.Powershell… Trojan.Script… etc.

Hooray!

That makes it much easier to search and query through the malware repository.

The last step… make a BACKUP. 😉

Installing the latest SIFT Workstation in WSL

If you’re like me and have your favorite forensic tools for Linux, and your favorite tools for Windows, you can run them both on the same machine without having to diminish resources with the use of a virtual machine. You can do this by installing SIFT (SANS Investigative Forensic Toolkit) within WSL (Windows Subsystem for Linux).

Note: this article assumes that WSL is already installed. If not, GTS.

Start off by grabbing Ubuntu 22.04 from the Windows store, or if you prefer the command line. 

wsl --install -d Ubuntu-22.04

New UNIX username: sansforensics

Password: ***************

Retype new password: ***************

Download cast from GitHub. 

wget https://github.com/ekristen/cast/releases/download/v0.14.30/cast-v0.14.30-linux-amd64.deb

Install cast from the download with the command

sudo dpkg -i cast-v0.14.30-linux-amd64.deb

Finally, install the server mode version of SIFT.  Server mode only installs the SIFT command line applications, which is most appropriate for running under WSL.

sudo cast install --mode=server teamdfir/sift-saltstack

If all goes right you’ll see a wall of text that concludes (after a few minutes) with ‘salt-call completed successfully.’

My go-to test for SIFT installations has always been to run Volatility (-h for help).

vol.py -h

If you’re seeing output, the mission was a success.

Besides saving the resources needed for a full VM, you also don’t have to worry about duplicating copies of evidence items as both Windows and Ubuntu are running on the same machine.

Now get yourself familiar with the Linux tools of the SIFT Workstation and enjoy running them in parallel with your favorite Windows forensic applications.

SIFT Cheat Sheet: https://pentest.sans.org/security-resources/posters/sift-cheat-sheet/355/download