String analysis is a cornerstone of malware investigation, revealing embedded commands, URLs, and other artifacts that can expose a threat’s intent. mStrings, a Rust-based tool, simplifies this process by scanning files, extracting meaningful strings, and structuring results for efficient analysis.
At its core, mStrings is more than a simple string extraction tool. It integrates regex-based detection rules to identify key indicators, offering a refined approach to analyzing malware artifacts. In addition to console output it also presents data in a structured JSON format, allowing for seamless integration into other security workflows.
screenshot from mStrings
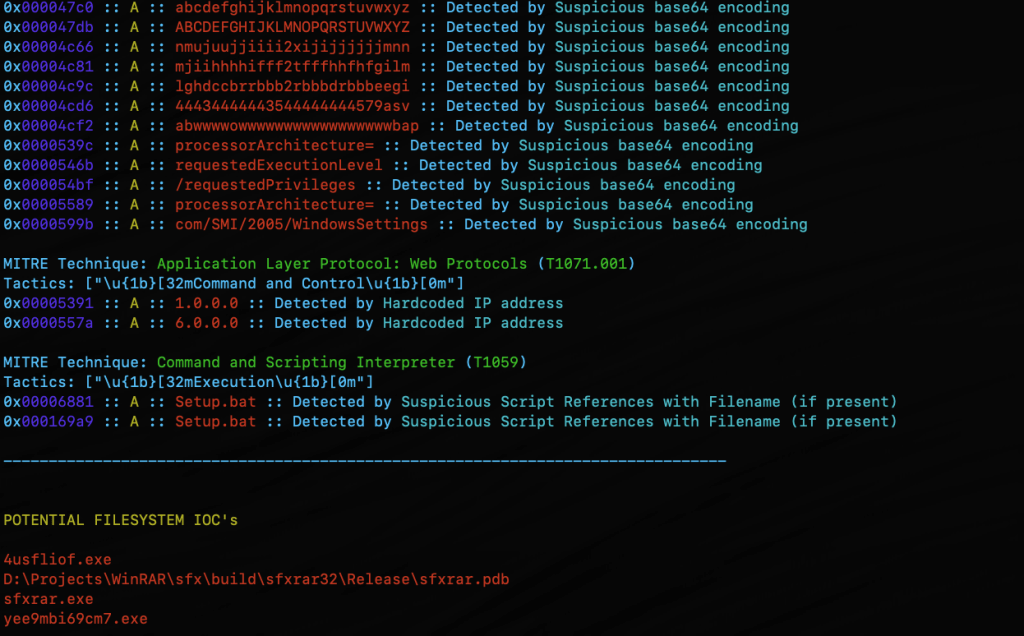
In addition to specialized string searching, mStrings detections associate results with MITRE ATT&CK. When malware indicators map to known MITRE ATT&CK techniques, analysts can quickly understand the intent and behavior of a threat. Instead of just seeing a suspicious string, they can recognize that it corresponds to credential dumping, command-and-control, or privilege escalation, enabling faster triage and response.
Optimized for Practical Investigation
Security professionals often need to cross-reference findings in a hex editor. mStrings accounts for this by capturing detailed string locations in hex, allowing for immediate context when reviewing suspicious files. This level of granularity is particularly valuable when analyzing packed or obfuscated malware, where offsets can provide crucial insights.
mStrings showing hex location for identified string
After the scan, reviewing the complete strings dump is just as easy with an option to open the results directly in VS Code.
mStrings prompt to review saved strings
Technology That Powers It
Built in Rust, mStrings leverages its robust ecosystem to enhance performance and reliability. Sigma-based detection rules allow for flexible and easily modifiable patterns, giving analysts control over what indicators to track. The tool’s structured approach ensures that results are not just extracted but meaningfully categorized for deeper analysis.
A Tool That Grows with You
mStrings is extensible, enabling you to customize detections. Not satisfied with the existing detection rules? You can easily write your own in Sigma. Future improvements will refine regex patterns, enhance Windows compatibility, and introduce new features to improve investigative workflows. Designed with usability in mind, mStrings serves as a practical companion for analysts who need clear, structured, and insightful data extraction.
MStrings is one of many malware analysis utilities included in MalChela. Download from Github and let me know what you think. If you’ve already installed Malchela, git pull will download the latest updates.
Try this out for a workflow. Use Hash It (3) and give it the file path for a malware file. Use the hash from Hash It and check it against VirusTotal an Malware Bazaar with the Malware Hash Lookup (10). Then jump into mStrings (4), give it the same file path again, and start pulling out the interesting strings. Once you have what you think is a good number of indicators, run Strings to YARA (9) and generate a fully formatted YARA rule for use in any of your security tools.
After my success with the Python + YARA + Hashing, I decided to take things to the next level. Over the past few years I’ve created a number of Python and PowerShell scripts related to YARA and Malware Analysis. What if I combined them into a single utility? While we’re at it, let’s rewrite them all from scratch in Rust. Boy, do I know how to let loose on the weekends.
MalChela
MalChela combines (currently 10) programs in one Rust workspace, that can be invoked using a launcher.
MalChela screenshot
Features:
Combine YARA
Point it at a directory of YARA files and it will output one combined rule
Extract Samples
Point it at a directory of password protected malware files to extract all
Hash It
Point it to a file and get the MD5, SHA1 and SHA256 hash
MZMD5
Recurse a directory, for files with MZ header, create hash list
MZcount
Recurse a directory, uses YARA to count MZ, Zip, PDF, other
NSRL MD5 Lookup
Query a MD5 hash against NSRL
NSRL SHA1 Lookup
Query a SHA1hash against NSRL
Strings to YARA
Prompts for metadata and strings (text file) to create a YARA rule
Malware Hash Lookup
Query a hash value against VirusTotal & Malware Bazaar*
XMZMD5
Recurse a directory, for files without MZ, Zip or PDF header, create hash list
*The Malware Hash Lookup requires an api key for Virus Total and Malware Bazaar. If unidentified , MalChela will prompt you to create them the first time you run the malware lookup function.
What’s with the Name?
mal — malware
chela — “crab hand”
A chela on a crab is the scientific term for a claw or pincer. It’s a specialized appendage, typically found on the first pair of legs, used for grasping, defense, and manipulating things; just like these programs.
I don’t like to brag, he said, but you should see the size of my malware library.
For a recent project, I wanted to produce a hash set for all the malware files in my repository. Included in the library are malware samples for Windows and other platforms. Within the library there are also a lot of pdf’s with write ups corresponding to different samples. Lastly there are zip files that the malware samples haven’t been extracted from yet.
I didn’t want hashes for any of the pdf documents or zip files. I wanted one hash set for the malware specific to Windows, and a second set for all the other samples.
Using YARA and Python, and some (a lot of) AI coaching, I wound up with three scripts. Two of them are used to create the hash sets, and a third that does counting and indexing on the source directory for different file headers.
Windows Malware Hashing
The majority of Windows malware has an MZ header. The first Python script uses YARA to recursively search a directory. For any files with an MZ header, it will write the MD5 hash to a file.
launching MZMD5.py with PythonCompletion of the MZMD5.py script showing 22789 hashes generated for MZ files.
MZMD5.py
import os
import yara
import hashlib
import sys

def compile_yara_rules():
    """
    Compile YARA rules for detecting MZ headers.

    Returns:
        yara.Rules: Compiled YARA rules.
    """
    rules = """
rule mz_header {
    meta:
        description = "Matches files with MZ header (Windows Executables)"
    strings:
        $mz = {4D 5A}  // MZ header in hex
    condition:
        $mz at 0  // Match if MZ header is at the start of the file
}
"""
    return yara.compile(source=rules)

def calculate_md5(file_path):
    """
    Calculate the MD5 hash of a file.

    Args:
        file_path (str): Path to the file.

    Returns:
        str: MD5 hash in hexadecimal format.
    """
    md5_hash = hashlib.md5()
    try:
        with open(file_path, "rb") as f:
            for byte_block in iter(lambda: f.read(4096), b""):
                md5_hash.update(byte_block)
        return md5_hash.hexdigest()
    except Exception as e:
        return None

def scan_and_hash_files(directory, rules, output_file):
    """
    Scan files in a directory using YARA rules, calculate MD5 hashes for matches,
    and write results to an output file.

    Args:
        directory (str): Path to the directory to scan.
        rules (yara.Rules): Compiled YARA rules.
        output_file (str): Path to the output file where results will be saved.

    Returns:
        int: Total number of hashes written to the output file.
    """
    hash_count = 0
    with open(output_file, "w") as out_file:
        # Walk through the directory and its subdirectories
        for root, _, files in os.walk(directory):
            for file in files:
                file_path = os.path.join(root, file)

                try:
                    # Match YARA rules against the file
                    matches = rules.match(file_path)
                    if any(match.rule == "mz_header" for match in matches):
                        # Calculate MD5 hash if the file matches the MZ header rule
                        md5_hash = calculate_md5(file_path)
                        if md5_hash:
                            out_file.write(f"{md5_hash}\n")
                            # Print hash value and flush output immediately
                            print(md5_hash, flush=True)
                            hash_count += 1
                except Exception as e:
                    pass  # Suppress error messages

    return hash_count

if __name__ == "__main__":
    # Prompt user for directory to scan
    directory_to_scan = input("Enter the directory you want to scan: ").strip()

    # Verify that the directory exists
    if not os.path.isdir(directory_to_scan):
        print("Error: The specified directory does not exist.")
        exit(1)

    # Set output file path to MZMD5.txt in the current working directory
    output_file_path = "MZMD5.txt"

    # Check if the output file already exists
    if os.path.exists(output_file_path):
        overwrite = input(f"The file '{output_file_path}' already exists. Overwrite? (y/n): ").strip().lower()
        if overwrite != 'y':
            print("Operation canceled.")
            exit(0)

    # Compile YARA rules
    yara_rules = compile_yara_rules()

    # Scan directory, calculate MD5 hashes, and write results to an output file
    total_hashes = scan_and_hash_files(directory_to_scan, yara_rules, output_file_path)

    # Report total number of hashes written and location of the output file
    print(f"\nScan completed.")
    print(f"Total number of hashes written: {total_hashes}")
    print(f"Output file location: {os.path.abspath(output_file_path)}")
Non-Windows Malware Hashing
The second script is a little more complicated. Again we will use YARA to determine the filetype, however in this case we want to exclude anything with an MZ header, as well as exclude any zip files or pdfs. Based on the contents of the library, this should produce a hash set for all the other binaries in the library that aren’t targeted to Windows.
Launching XMZMD5.py in PythonResults of XMZMD5.py showing 5988 hashes calculated.
XMZMD5.py
import os
import yara
import hashlib

def compile_yara_rules():
    """
    Compile YARA rules for MZ, PDF, and ZIP headers.

    Returns:
        yara.Rules: Compiled YARA rules.
    """
    rules = """
rule mz_header {
    meta:
        description = "Matches files with MZ header (Windows Executables)"
    strings:
        $mz = {4D 5A}  // MZ header in hex
    condition:
        $mz at 0  // Match if MZ header is at the start of the file
}

rule pdf_header {
    meta:
        description = "Matches files with PDF header"
    strings:
        $pdf = {25 50 44 46}  // PDF header in hex (%PDF)
    condition:
        $pdf at 0  // Match if PDF header is at the start of the file
}

rule zip_header {
    meta:
        description = "Matches files with ZIP header"
    strings:
        $zip = {50 4B 03 04}  // ZIP header in hex
    condition:
        $zip at 0  // Match if ZIP header is at the start of the file
}
"""
    return yara.compile(source=rules)

def calculate_md5(file_path):
    """
    Calculate the MD5 hash of a file.

    Args:
        file_path (str): Path to the file.

    Returns:
        str: MD5 hash of the file, or None if an error occurs.
    """
    hasher = hashlib.md5()
    try:
        with open(file_path, 'rb') as f:
            for chunk in iter(lambda: f.read(4096), b""):
                hasher.update(chunk)
        return hasher.hexdigest()
    except Exception as e:
        print(f"[ERROR] Unable to calculate MD5 for {file_path}: {e}")
        return None

def scan_directory(directory, rules, output_file):
    """
    Scan a directory for files that do not match YARA rules and calculate their MD5 hashes.

    Args:
        directory (str): Path to the directory to scan.
        rules (yara.Rules): Compiled YARA rules.
        output_file (str): File to save MD5 hashes of unmatched files.
    """
    hash_count = 0  # Counter for total number of hashes written

    try:
        with open(output_file, 'w') as out:
            for root, _, files in os.walk(directory):
                for file in files:
                    file_path = os.path.join(root, file)
                    try:
                        # Check if the file matches any YARA rule
                        matches = rules.match(file_path)
                        if not matches:  # Only process files that do not match any rule
                            md5_hash = calculate_md5(file_path)
                            if md5_hash:
                                print(md5_hash)  # Print hash to console
                                out.write(md5_hash + '\n')  # Write only hash to output file
                                hash_count += 1
                    except yara.Error as ye:
                        print(f"[WARNING] YARA error scanning {file_path}: {ye}")
                    except Exception as e:
                        print(f"[ERROR] Unexpected error scanning {file_path}: {e}")

        # Report total number of hashes written and location of the output file
        print(f"\nScan completed.")
        print(f"Total number of hashes written: {hash_count}")
        print(f"Output file location: {os.path.abspath(output_file)}")

    except Exception as e:
        print(f"[ERROR] Failed to write to output file {output_file}: {e}")

if __name__ == "__main__":
    # Prompt user for directory to scan
    directory_to_scan = input("Enter directory to scan: ").strip()

    # Compile YARA rules
    try:
        yara_rules = compile_yara_rules()
    except Exception as e:
        print(f"[ERROR] Failed to compile YARA rules: {e}")
        exit(1)

    # Output filename for unmatched files' MD5 hashes
    output_filename = "XMZMD5.txt"

    # Check if the output file already exists and prompt user for action
    if os.path.exists(output_filename):
        overwrite_prompt = input(f"[WARNING] The file '{output_filename}' already exists. Do you want to overwrite it? (yes/no): ").strip().lower()

        if overwrite_prompt not in ['yes', 'y']:
            print("[INFO] Operation canceled by user.")
            exit(0)

    # Scan the directory
    if os.path.isdir(directory_to_scan):
        scan_directory(directory_to_scan, yara_rules, output_filename)
    else:
        print(f"[ERROR] The provided path is not a valid directory: {directory_to_scan}")
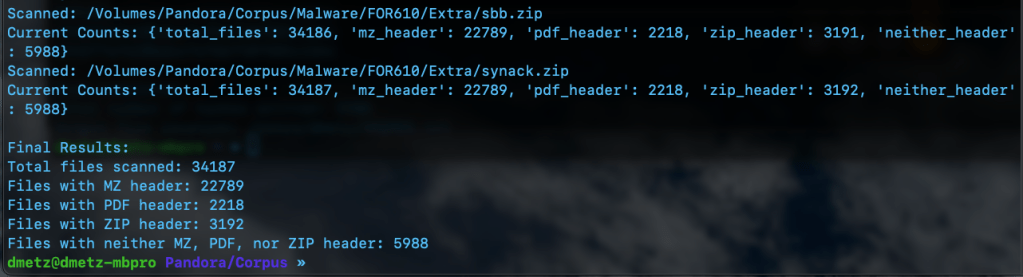
The third script is for counting and validation. I wanted to know the total number of files, and how many had the MZ header, were zip or pdf files, or none of the above. Based on the counts, the hash lists should contain a matching number of entries, the MZ’s for Windows malware samples and the “Neither Header Files” for the remaining binaries. Note: to run this script you will need to have the Python module “tabulate” installed. (pip install tabulate). There are 2 output options available, Detailed and Table View.
MZCount.py Table ViewMZCount.py Detailed View.Completed MZCount in Table View.Completed MZCount in Detailed View.
MZCount.py
import os
import yara
import time


def compile_yara_rules():
    """
    Compile YARA rules for MZ, PDF, and ZIP headers.

    Returns:
        yara.Rules: Compiled YARA rules.
    """
    rules = """
rule mz_header {
    meta:
        description = "Matches files with MZ header (Windows Executables)"
    strings:
        $mz = {4D 5A}  // MZ header in hex
    condition:
        $mz at 0  // Match if MZ header is at the start of the file
}

rule pdf_header {
    meta:
        description = "Matches files with PDF header"
    strings:
        $pdf = {25 50 44 46}  // PDF header in hex (%PDF)
    condition:
        $pdf at 0  // Match if PDF header is at the start of the file
}

rule zip_header {
    meta:
        description = "Matches files with ZIP header"
    strings:
        $zip = {50 4B 03 04}  // ZIP header in hex
    condition:
        $zip at 0  // Match if ZIP header is at the start of the file
}
"""
    try:
        return yara.compile(source=rules)
    except yara.SyntaxError as e:
        print(f"Error compiling YARA rules: {e}")
        raise


def display_table(counts):
    """
    Display the counts in a simple table format.

    Args:
        counts (dict): Dictionary containing counts for each file type.
    """
    # Clear console before displaying new table
    os.system('cls' if os.name == 'nt' else 'clear')  # Clears terminal for Windows ('cls') or Linux/Mac ('clear')

    # Print updated table
    print("\n+----------------------+---------+")
    print("| File Type           | Count   |")
    print("+----------------------+---------+")
    print(f"| Total Files         | {counts['total_files']:<7} |")
    print(f"| MZ Header Files     | {counts['mz_header']:<7} |")
    print(f"| PDF Header Files    | {counts['pdf_header']:<7} |")
    print(f"| ZIP Header Files    | {counts['zip_header']:<7} |")
    print(f"| Neither Header Files| {counts['neither_header']:<7} |")
    print("+----------------------+---------+")


def scan_and_count_files(directory, rules, use_table_display):
    """
    Scan files in a directory using YARA rules and count matches by header type.

    Args:
        directory (str): Path to the directory to scan.
        rules (yara.Rules): Compiled YARA rules.
        use_table_display (bool): Whether to use table display for live updates.

    Returns:
        dict: A dictionary with counts for total files, MZ headers, PDF headers, ZIP headers, and neither headers.
    """
    counts = {
        "total_files": 0,
        "mz_header": 0,
        "pdf_header": 0,
        "zip_header": 0,
        "neither_header": 0
    }

    # Walk through the directory and its subdirectories
    for root, _, files in os.walk(directory):
        for file in files:
            counts["total_files"] += 1
            file_path = os.path.join(root, file)

            try:
                # Open file in binary mode for YARA matching
                with open(file_path, "rb") as f:
                    data = f.read()

                # Match YARA rules against file content
                matches = rules.match(data=data)

                # Process matches
                if matches:
                    matched_rules = {match.rule for match in matches}
                    if "mz_header" in matched_rules:
                        counts["mz_header"] += 1
                    if "pdf_header" in matched_rules:
                        counts["pdf_header"] += 1
                    if "zip_header" in matched_rules:
                        counts["zip_header"] += 1
                else:
                    counts["neither_header"] += 1

            except Exception as e:
                print(f"Error scanning {file_path}: {e}")
                # Decrement total_files if an error occurs
                counts["total_files"] -= 1

            # Display updated output after processing each file
            if use_table_display:
                display_table(counts)
            else:
                print(f"Scanned: {file_path}")
                print(f"Current Counts: {counts}")

            time.sleep(0.1)  # Optional: Add a small delay for smoother updates

    return counts


if __name__ == "__main__":
    # Prompt user for directory to scan
    directory_to_scan = input("Enter directory to scan: ").strip()

    # Check if the directory exists
    if not os.path.isdir(directory_to_scan):
        print(f"Error: The directory '{directory_to_scan}' does not exist. Please enter a valid directory.")
        exit(1)

    # Prompt user for display format preference
    display_choice = input("Choose output format - (1) Detailed, (2) Table Display: ").strip()

    # Determine whether to use table display or original output format
    use_table_display = display_choice == "2"

    # Compile YARA rules
    yara_rules = compile_yara_rules()

    # Scan directory and count matches
    results = scan_and_count_files(directory_to_scan, yara_rules, use_table_display)

    # Final results display after completion
    print("\nFinal Results:")

    if use_table_display:
        display_table(results)

        # Handle case where no results were found
        if results["total_files"] == 0:
            print("No files were scanned. Please check your directory.")

    else:
        print(f"Total files scanned: {results['total_files']}")
        print(f"Files with MZ header: {results['mz_header']}")
        print(f"Files with PDF header: {results['pdf_header']}")
        print(f"Files with ZIP header: {results['zip_header']}")
        print(f"Files with neither MZ, PDF, nor ZIP header: {results['neither_header']}")
Double Checking the Hash Files
Finally we can use RegEx to count the number of MD5 hashes for each file. The RegEx looks for strings of 32 hexadecimal digits. (A-F and 0-9.)
Regex output showing counts for hashes, 22789 and 5988 respectively.
The number of hashes in the MZMD5.txt hash list matches the number of MZ files identified by YARA. Additionally, the number of non-MZ binaries in the hash list, XMZMD5.txt, matches the number of files when we exclude the Windows binaries and the pdf and zip files.
There you have it, the fruits of my labors combining a few of my favorite things (cue John Coltrane), YARA, Malware, Python, and using AI as tool to develop my coding skills. If you’d like to download the scripts for your own usage, they can be found at https://github.com/dwmetz/Toolbox/ (Miscellaneous PowerShell and Python scripts related to YARA and Malware Analysis.)
At this point, we’ve all heard the expression ‘There is no cloud; It’s just someone else’s computer.’ While there is some truth to that, there are some fundamental differences when it comes to digital forensics when cloud resources are part of the investigation.
I’ve been doing DFIR for about 15 years now. In the early days, almost all investigations involved having hands on access to the data or devices being investigated. As I moved into Enterprise Incident Response, it became more and more frequent that the devices I would be investigating would be in a remote location, be it another state – or even another country. As the scope of my investigations grew, so did my techniques need to evolve and adapt.
Cloud Forensics is the next phase of that evolution. While the systems under investigation may still be in another state or country, extra factors come into play like multi-tenancy and shared responsibility models. Cloud Forensics Demystified does a solid job of shedding light on those nuances.
The book is divided into three parts.
Part 1: Cloud Fundamentals
Part 2: Forensic Readiness: Tools, Techniques, and Preparation for Cloud Forensics
Part 3: Cloud Forensic Analysis: Responding to an Incident in the Cloud
Part 1: Cloud Fundamentals
This section provides a baseline knowledge of the three major cloud providers, Amazon Web Services (AWS), Google Cloud Platform (GCP) and Microsoft Azure. It breaks down the different architectural components of each, and how the platforms each handle the functions of virtual systems, networking and storage.
Part 1 also includes a broad yet thorough introduction to the different Cyber and Privacy legislation that come into play for cloud investigations. This section is not only valuable to investigators. Whether you’re a lawyer providing legal counsel for an organization, or responsible for an organizations overall security at a CISO level, this material is beneficial in understanding the challenges and responsibilities that come from hosting your data or systems in the cloud, and the different legislation and regulations that follow those choices.
Part 2: Forensic Readiness: Tools, Techniques, and Preparation for Cloud Forensics
As with enterprise investigations, logging is often where the hunting for incident indicators begins with telemetry and the correlation of different log sources. This section focuses on the different log sources available in AWS, GCP, and Azure. It also provides a detailed list of log types that are enabled by default and those that require manual activation to ensure that you have access to the most relevant data for your investigations when an incident occurs. This section also covers the different providers offerings for log analysis in the cloud including AWS Cloud Watch, Microsoft Sentinel and Google’s Cloud Security Command Center (Cloud SCC) as examples.
Part 3: Cloud Forensic Analysis: Responding to an Incident in the Cloud
As an Incident Responder, this was the section I enjoyed the most. While the first two sections are foundational for understanding the architectures of networking and storage, part three provides detailed information on how to acquire evidence for cloud investigations. The section covers both log analysis techniques as well as recommendations for host forensics and memory analysis tools. The book covers the use of commercial forensic suites, like Magnet Axiom, as well as open-source tools like CyLR and HAWK. Besides covering investigations of the three Cloud Service Providers (CSPs), there is also a section covering the cloud productivity services of Microsoft M365 and Google Workspace, as well as a brief section on Kubernetes.
Summary
Whether you’re a gray-haired examiner like me, or a neophyte in the world of digital forensics, chances are high that if you’re not running investigations in the cloud yet – you will be soon enough. Preparation is the first step in the Incident Response lifecycle. To properly prepare for incidents you need to know both what sources will be most informative to your investigations, as well as the methodology to capture and process that evidence efficiently.
Cloud Forensics Demystified is a comprehensive guide that covers cloud fundamentals, forensic readiness, and incident response. It provides valuable insights into cloud investigation techniques, log analysis, and evidence acquisition for major cloud providers and productivity services. The book is valuable for both experienced and novice digital forensics professionals to prepare for cloud investigations.