In digital forensics, we often take a toolbox approach — success hinges on having the right tool for the job. Some tools offer broad functionality, while others are deeply specialized. Distributions like KALI and REMnux do a fantastic job bundling a wide range of forensic and security tools, but keeping track of what’s actually installed can be a challenge.
If you’re using a graphical interface, browsing through available packages is fairly intuitive. But when you’re living in the terminal — as many analysts do — that discoverability disappears. There’s no built-in index of command-line tools or how to invoke them.
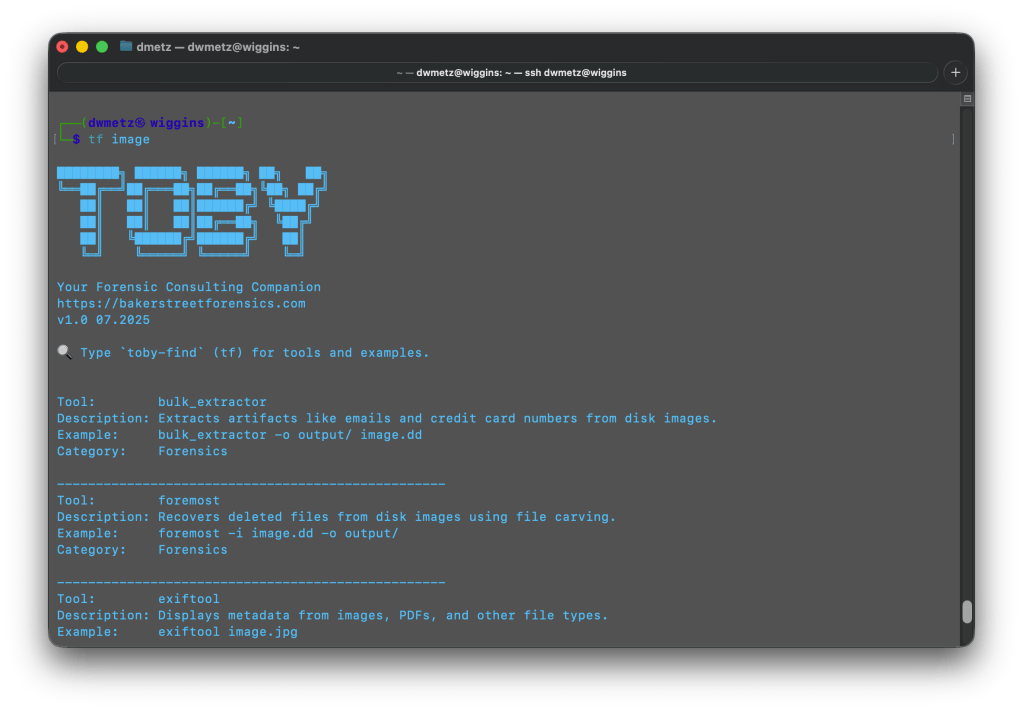
The first version of Toby-Find was born out of necessity. I teach a Network Forensics course at the university, using a custom VM loaded with tools like Zeek, Tshark, Suricata, and more. I wanted students to have an easy, searchable way to see what CLI tools were available and how to run them — without needing to memorize commands or dig through man pages.
Later, when I built Toby (a forensic-focused Raspberry Pi rig running a customized KALI install), I updated Toby-Find to include the complete CLI toolset geared toward forensics and malware analysis from the KALI ecosystem.
And because I can’t leave well enough alone, I decided to build a REMnux-compatible version too.
⸻
Once installed, you can launch Toby-Find (via tf, toby-find, or tf-help) from any terminal and instantly search for tools, descriptions, examples, and more.
Toby-Find on REMnux
Toby-Find on Kali
⸻
📦 Installation
1. Clone the repository:
git clone https://github.com/dwmetz/Toby.git
2. Make the install script executable:
cd Toby
chmod +x install.sh
3. Run the installer:
./install.sh
4. Follow the prompt to choose your environment (KALI or REMnux) 5. Open a new terminal or run:
source ~/.bashrc # or ~/.zshrc depending on shell
🚀 Usage
tf [keyword]
Examples:
tf yara
tf volatility
tf hash
To view the full list:
tf-help
Whether you’re working from a custom VM, a rugged Pi, or a hardened REMnux box, Toby-Find gives you a fast, terminal-friendly way to surface the tools at your disposal — without breaking focus. It’s lightweight, portable, and easy to extend for your own lab or classroom.
You can grab the full installer from GitHub, and contributions are always welcome. If you find it helpful — or build on it — I’d love to hear about it.
With the release of MalChela v3.0, I’m introducing features that shift the focus from tool-by-tool execution to a more structured investigative workflow. While the core philosophy of lightweight, file-first analysis remains unchanged, this version introduces smarter ways to manage investigations, track findings, and automate common analysis patterns, all with minimal fuss.
In this post, I’ll walk through the new Case Management system, the replacement of MismatchMiner with FileMiner, and the ability to identify and launch suggested tools — even in batch — based on file characteristics. These changes aim to reduce friction in multi-tool workflows and help analysts move faster without losing visibility or control.
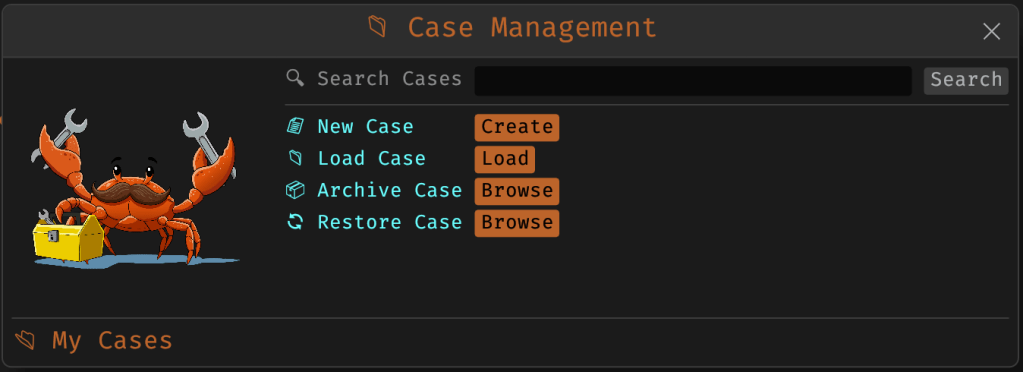
Cases: A Lightweight Way to Stay Organized
Until now, MalChela has operated in an ephemeral mode. You selected a tool, pointed it at a file or folder, and reviewed the output. Any saved results would be grouped by tool, but without much context.
Cases change that. In v3.0, you can start a new case from a file or folder — and everything from that point forward is grouped under that case. Tool outputs are saved to a dedicated case folder, file hashes are tracked, and metadata is preserved for review or reanalysis.
Case Management
You don’t need to create a case for every run — MalChela still supports standalone tool execution. But when you’re working with a malware sample set, an incident directory, or a disk image extract, cases give you the ability to:
Save tool results in a consistent location
Track analysis history per file
Reopen previous sessions with full context
Add notes, tags, and categorization (e.g., “suspicious”, “clean”, “needs review”)
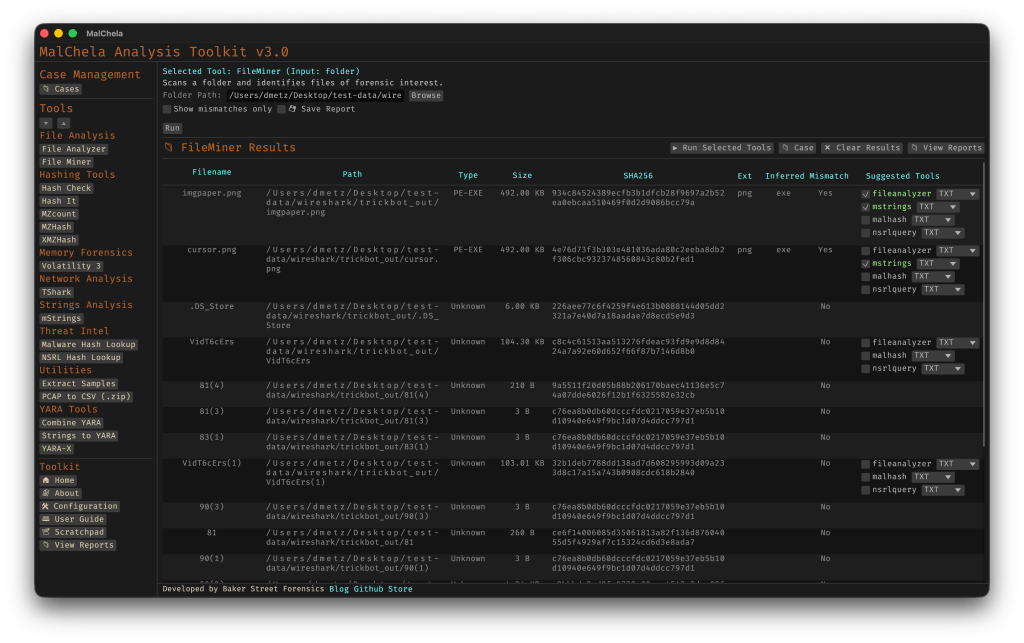
Hello FileMiner: Goodbye MismatchMiner
The MismatchMiner tool was originally designed to surface anomalies between file names and actual content — a common trick in malicious attachments or script dropper chains. It worked well, but its scope was narrow.
FileMiner replaces it, expanding the logic to support full file-type classification and metadata inspection across an entire folder. It still flags mismatches, but now it also:
Detects embedded file types using magic bytes
Groups files by class (e.g., images, documents, executables, archives)
Calculates hashes for correlation and NSRL comparison
Extracts size, extension, and other key metadata
Saves both a human-readable .txt summary and a structured .json report
The output is designed to be used both manually and programmatically — which brings us to one of v3.0’s most important additions: tool suggestions.
The new FileMiner app
Suggested Tools and Batch Execution
Once FileMiner runs, it doesn’t just stop at reporting. Based on each file’s type and characteristics, it can now suggest one or more appropriate tools from the MalChela suite. These suggestions are surfaced right in the GUI — or in the CLI if you’re running FileMiner interactively. From there, you can choose to launch the recommended tool(s) on a per-file basis or queue up several for batch execution.
This makes it much faster to pivot from triage to deeper inspection. No more switching tools manually or copying paths. You stay within the flow — and more importantly, you reduce the risk of skipping important analysis steps.
CLI and GUI Improvements Aligned
These features are available in both the CLI and GUI editions of MalChela. In the CLI, FileMiner presents an interactive table of results. You can pick a file, see its suggested tools, and choose which one to run. When you’re done, you can return to the table and continue with the next file.
The GUI extends this even further, allowing you to:
View and scroll through full case history
Run tools with live output streaming
Reopen previous FileMiner runs from saved reports
Run all suggested tools on all files with one click (if desired)
These features let you treat MalChela more like a toolbox with memory, not just a launcher.
CLI Enhancements:
The command-line interface has also received a quiet but meaningful upgrade. Tool menus are now organized with clear numeric indexes and shortcodes, making it faster to navigate and launch tools without needing to retype full names. This small change goes a long way during repetitive tasks or when working in a time-constrained triage setting.
FileMiner supports an interactive loop: after running a tool on a selected file, you’re returned to the main results table — no need to restart the scan or re-navigate the menu. This allows you to run additional tools on different files within the same dataset, making FileMiner feel more like a lightweight control center for follow-up actions. It’s a subtle shift, but one that significantly reduces friction in batch-style or exploratory workflows.
Closing Thoughts
MalChela 3.0 reflects a steady evolution — not a revolution. It’s built on real-world feedback and a desire to make forensic and malware analysis a little less scattered. Whether you’re a one-person IR team or just trying to stay organized during a reverse engineering exercise, the new case features and smarter triage capabilities should save you time.
If you’ve been using MalChela already, I think this update will feel like a natural (and welcome) extension. And if you haven’t tried it yet, there’s never been a better time to start.
MalChela’s 2.2 update is packed with practical and platform-friendly improvements. It includes native support for REMnux, better tool settings, and deeper integrations with analysis tools like YARA-X, Tshark, Volatility3, and the newly improved fileanalyzer module.
🦀 REMnux Edition: Built-In Support, Zero Tweaks
When the GUI loads a REMnux-specific tools.yaml profile, it enters REMnux mode.
Screenshot of yaml configuration applying REMnux mode
Native binaries and Python scripts like capa, oledump.py, olevba, and FLOSS are loaded into the MalChela tools menu, allowing you to mix and match operations with the embedded MalChela utilities and the full REMnux tool stack. No manual configuration needed—just launch and go. MalChela currently supports the following REMnux programs right out of the box:
Tool Name
Description
binwalk
Firmware analysis and extraction tool
capa
Identifies capabilities in executable files
radare2
Advanced reverse engineering framework
Volatility 3
Memory forensics framework for RAM analysis
exiftool
Extracts metadata from images, documents, and more
If you only need a subset of tools you can easily save and restore that a custom profile.
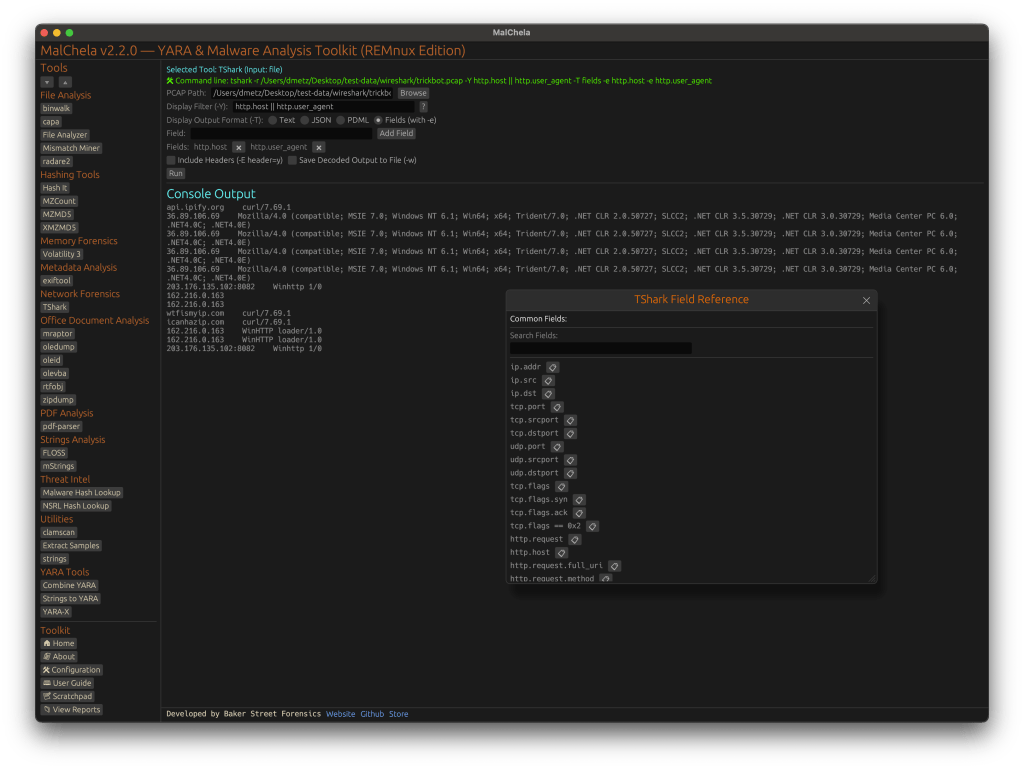
TShark Panel with Built-In Reference
Tshark and the integrated field reference
A new TShark integration exposes features including:
A filter builder panel
Commonly used fields reference
Tooltip hints for each example (e.g., `ip.addr == 192.168.1.1` shows “Any traffic to or from 192.168.1.1”)
One-click copy support
This helps analysts build and understand filters quickly—even if TShark isn’t something they use every day. Using the syntax builder in MalChela you can use the exact commands directly in Tshark or Wireshark.
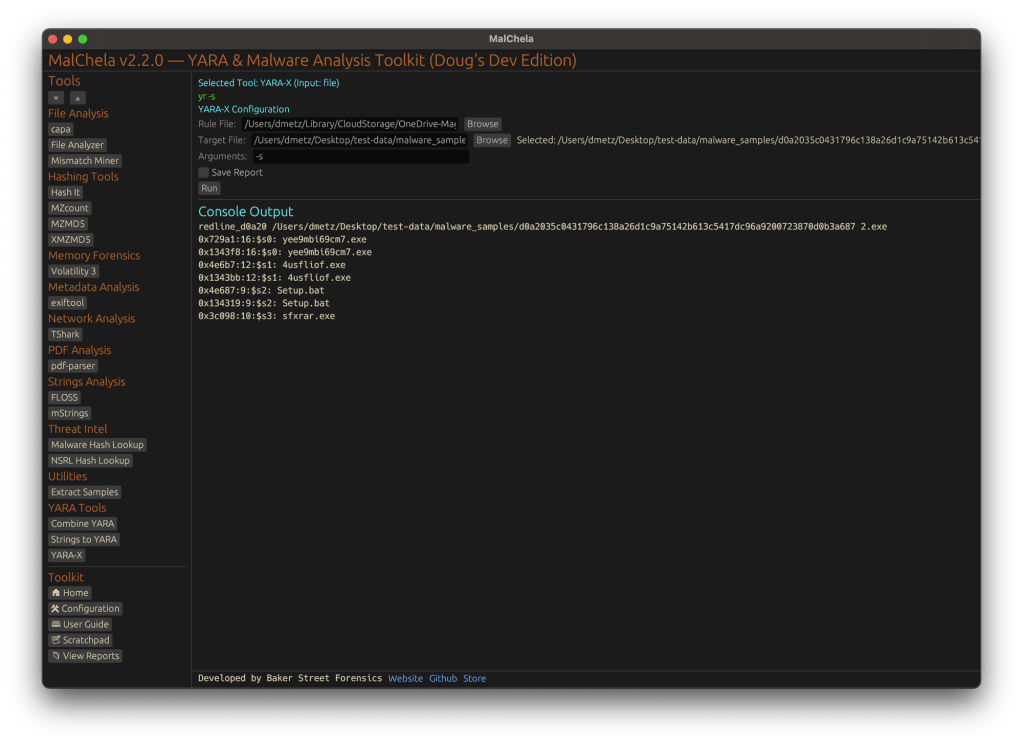
YARA-X Support (Install Guide Included)
YARA-X module in MalChela
Support for YARA-X (via the `yr` binary) is now built in. YARA-X is not bundled with REMnux by default, but install instructions are included in the User Guide for both macOS and Linux users.
Once installed, MalChela allows for rule-based scanning from the GUI,and with YARA-X, it’s faster than ever.
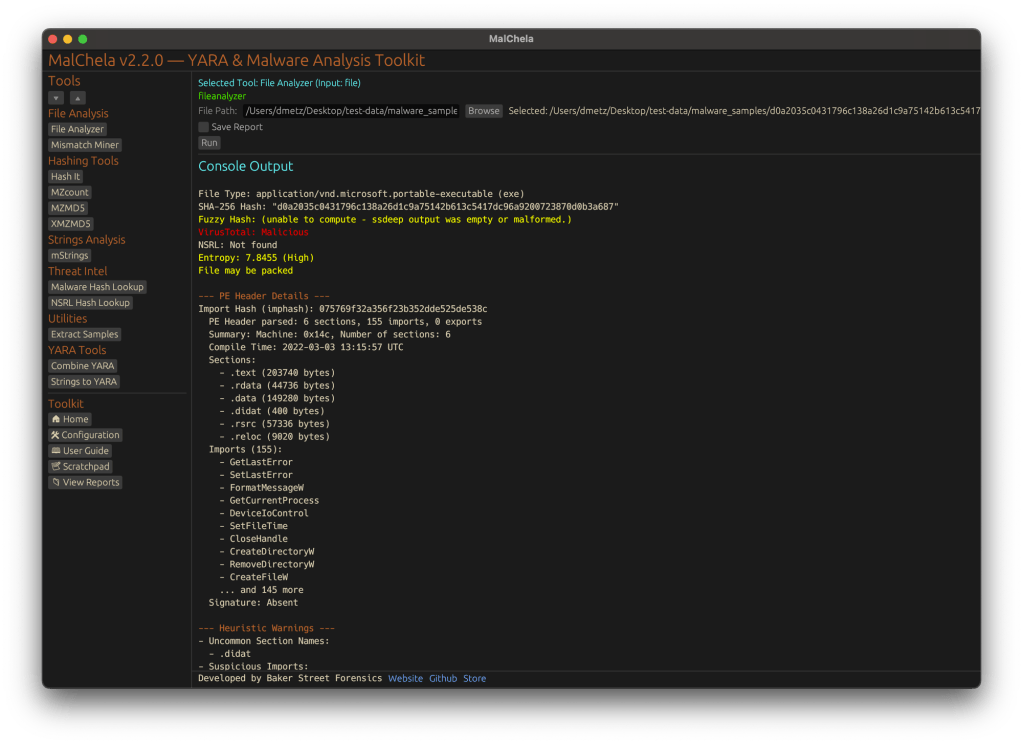
fileanalyzer: Fuzzy Hashing, PE Metadata, and More
Updated FileAnalyzer Module
MalChela’s fileanalyzer tool has also been updated to include:
Fuzzy hashing support via `ssdeep`
BLAKE3 hashing for fast, secure fingerprints
Expanded PE analysis, including:
Import and Export Table parsing (list of imported and exported functions)
Compilation Timestamp (for detection of suspicious or forged build times)
Section Characteristics (flags like IMAGE_SCN_MEM_EXECUTE, IMAGE_SCN_CNT_CODE, etc., for detecting anomalous sections)
These improvements provide deeper insight into executable structure, helping analysts detect anomalies such as packers, suspicious timestamps, or unexpected imports/exports. Useful for everything from sample triage to correlation, fileanalyzer now digs deeper—without slowing down.
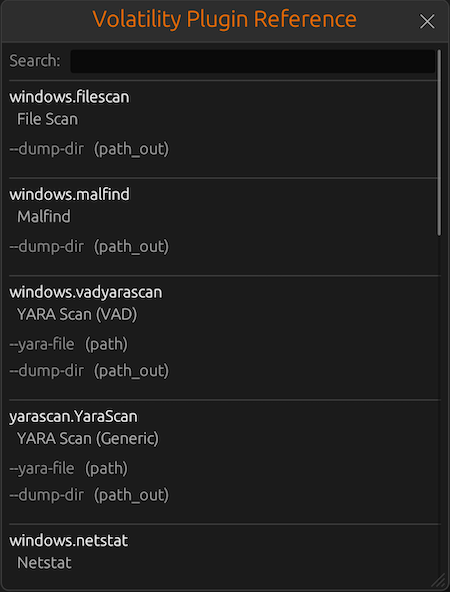
Memory Forensics Gets a Boost: Volatility 3 Now Supported
With the 2.2 release, MalChela introduces support for Volatility 3, the modern Python-based memory forensics framework. Whether you’re running MalChela in REMnux or on a customized macOS or Linux setup, you can now access the full power of Volatility directly from the MalChela GUI.
Volatility 3 in MalChela
There’s an intuitive plugin selector that dynamically adjusts available arguments based on your chosen plugin,. You can search, sort, and browse available plugins, and even toggle output options like –dump-dir with ease.
Like Tshark, there is an added plugin reference panel with searchable descriptions and argument overviews — a real time-saver when navigating Volatility’s deep and often complex toolset.
Volatility Plugin Reference
Smarter Tool Configuration via YAML
The tool configuration system continues to evolve:
Tools now declare their input type (file, folder, or hash)
The GUI dynamically adjusts the interface to match
Alternate profiles (like REMnux setups) can be managed simply by swapping `tools.yaml` files via the GUI
Easily backup or restore your custom setups
Restore the default toolset to get back to basics
This structure helps keep things clean—whether you’re testing, teaching, or deploying in a lab environment.
Embedded Documentation Access
The GUI now includes a link to the full MalChela User Guide in PDF. You can also access the documentation online.
From tool usage and CLI flags to configuration tips and install steps, it’s all just a click away—especially useful in offline environments or when onboarding new analysts. I’ll be honest, this is likely the most comprehensive user guide I’ve ever written.
Whether you’re reviewing binaries, building hash sets, or exploring network captures—MalChela 2.2 is designed bring together the tools you need, and make it easier to interoperate between them.
The new REMnux mode makes it even easier to get up and running with dozens of third party integrations.
Have an idea for a feature or application you’d like to see supported — reach out to me.
CyberPipe v5.1 is out with a few targeted improvements to make live response a bit smoother.
What’s New:
Collection profiles can now be passed directly as arguments using -CollectionProfile. No need to modify the script or hardcode anything — just run with the profile you need.
Improved support for saving to network shares, ideal for remote collections triggered by EDR.
Better error handling and logging, including clearer messages when tools are missing or when BitLocker key recovery fails.
The default profile still covers the most common triage needs:
✔️ Memory dump (RAM)
✔️ Pagefile
✔️ Volatile data (network config, hives, running procs)
✔️ System artifacts
But now, you can swap that out on the fly:
Usage Examples:
.\CyberPipe.ps1 ## default profile, capture RAM, Pagefile, Volatile and System Files

.\CyberPipe.ps1 -CollectionProfile RAMOnly ## just the RAM

.\CyberPipe.ps1 -CollectionProfile RAMSystem ## just the RAM and System Files (triage lite)

.\CyberPipe.ps1 -CollectionProfile RAMPage ## RAM & Pagefile

.\CyberPipe.ps1 -CollectionProfile Volatile ## Just Volatile data
Useful for tailoring collections based on available time, scope, or system stability — especially during incident response where conditions change quickly.
CyberPipe still captures memory with DumpIt or RAM Capture, grabs volatile system data, checks for encryption, and recovers the BitLocker key when possible. But now it’s just a bit easier to tailor to the job at hand — whether you’re responding interactively or invoking it remotely via EDR integration.
As always, no dependencies beyond what’s in the Tools folder, and no assumptions about the system you’re collecting from.