

I don’t like to brag, he said, but you should see the size of my malware library.
For a recent project, I wanted to produce a hash set for all the malware files in my repository. Included in the library are malware samples for Windows and other platforms. Within the library there are also a lot of pdf’s with write ups corresponding to different samples. Lastly there are zip files that the malware samples haven’t been extracted from yet.
I didn’t want hashes for any of the pdf documents or zip files. I wanted one hash set for the malware specific to Windows, and a second set for all the other samples.
Using YARA and Python, and some (a lot of) AI coaching, I wound up with three scripts. Two of them are used to create the hash sets, and a third that does counting and indexing on the source directory for different file headers.
Windows Malware Hashing
The majority of Windows malware has an MZ header. The first Python script uses YARA to recursively search a directory. For any files with an MZ header, it will write the MD5 hash to a file.


MZMD5.py
import os
import yara
import hashlib
import sys

def compile_yara_rules():
    """
    Compile YARA rules for detecting MZ headers.

    Returns:
        yara.Rules: Compiled YARA rules.
    """
    rules = """
rule mz_header {
    meta:
        description = "Matches files with MZ header (Windows Executables)"
    strings:
        $mz = {4D 5A}  // MZ header in hex
    condition:
        $mz at 0  // Match if MZ header is at the start of the file
}
"""
    return yara.compile(source=rules)

def calculate_md5(file_path):
    """
    Calculate the MD5 hash of a file.

    Args:
        file_path (str): Path to the file.

    Returns:
        str: MD5 hash in hexadecimal format.
    """
    md5_hash = hashlib.md5()
    try:
        with open(file_path, "rb") as f:
            for byte_block in iter(lambda: f.read(4096), b""):
                md5_hash.update(byte_block)
        return md5_hash.hexdigest()
    except Exception as e:
        return None

def scan_and_hash_files(directory, rules, output_file):
    """
    Scan files in a directory using YARA rules, calculate MD5 hashes for matches,
    and write results to an output file.

    Args:
        directory (str): Path to the directory to scan.
        rules (yara.Rules): Compiled YARA rules.
        output_file (str): Path to the output file where results will be saved.

    Returns:
        int: Total number of hashes written to the output file.
    """
    hash_count = 0
    with open(output_file, "w") as out_file:
        # Walk through the directory and its subdirectories
        for root, _, files in os.walk(directory):
            for file in files:
                file_path = os.path.join(root, file)

                try:
                    # Match YARA rules against the file
                    matches = rules.match(file_path)
                    if any(match.rule == "mz_header" for match in matches):
                        # Calculate MD5 hash if the file matches the MZ header rule
                        md5_hash = calculate_md5(file_path)
                        if md5_hash:
                            out_file.write(f"{md5_hash}\n")
                            # Print hash value and flush output immediately
                            print(md5_hash, flush=True)
                            hash_count += 1
                except Exception as e:
                    pass  # Suppress error messages

    return hash_count

if __name__ == "__main__":
    # Prompt user for directory to scan
    directory_to_scan = input("Enter the directory you want to scan: ").strip()

    # Verify that the directory exists
    if not os.path.isdir(directory_to_scan):
        print("Error: The specified directory does not exist.")
        exit(1)

    # Set output file path to MZMD5.txt in the current working directory
    output_file_path = "MZMD5.txt"

    # Check if the output file already exists
    if os.path.exists(output_file_path):
        overwrite = input(f"The file '{output_file_path}' already exists. Overwrite? (y/n): ").strip().lower()
        if overwrite != 'y':
            print("Operation canceled.")
            exit(0)

    # Compile YARA rules
    yara_rules = compile_yara_rules()

    # Scan directory, calculate MD5 hashes, and write results to an output file
    total_hashes = scan_and_hash_files(directory_to_scan, yara_rules, output_file_path)

    # Report total number of hashes written and location of the output file
    print(f"\nScan completed.")
    print(f"Total number of hashes written: {total_hashes}")
    print(f"Output file location: {os.path.abspath(output_file_path)}")
Non-Windows Malware Hashing
The second script is a little more complicated. Again we will use YARA to determine the filetype, however in this case we want to exclude anything with an MZ header, as well as exclude any zip files or pdfs. Based on the contents of the library, this should produce a hash set for all the other binaries in the library that aren’t targeted to Windows.


XMZMD5.py
import os
import yara
import hashlib

def compile_yara_rules():
    """
    Compile YARA rules for MZ, PDF, and ZIP headers.

    Returns:
        yara.Rules: Compiled YARA rules.
    """
    rules = """
rule mz_header {
    meta:
        description = "Matches files with MZ header (Windows Executables)"
    strings:
        $mz = {4D 5A}  // MZ header in hex
    condition:
        $mz at 0  // Match if MZ header is at the start of the file
}

rule pdf_header {
    meta:
        description = "Matches files with PDF header"
    strings:
        $pdf = {25 50 44 46}  // PDF header in hex (%PDF)
    condition:
        $pdf at 0  // Match if PDF header is at the start of the file
}

rule zip_header {
    meta:
        description = "Matches files with ZIP header"
    strings:
        $zip = {50 4B 03 04}  // ZIP header in hex
    condition:
        $zip at 0  // Match if ZIP header is at the start of the file
}
"""
    return yara.compile(source=rules)

def calculate_md5(file_path):
    """
    Calculate the MD5 hash of a file.

    Args:
        file_path (str): Path to the file.

    Returns:
        str: MD5 hash of the file, or None if an error occurs.
    """
    hasher = hashlib.md5()
    try:
        with open(file_path, 'rb') as f:
            for chunk in iter(lambda: f.read(4096), b""):
                hasher.update(chunk)
        return hasher.hexdigest()
    except Exception as e:
        print(f"[ERROR] Unable to calculate MD5 for {file_path}: {e}")
        return None

def scan_directory(directory, rules, output_file):
    """
    Scan a directory for files that do not match YARA rules and calculate their MD5 hashes.

    Args:
        directory (str): Path to the directory to scan.
        rules (yara.Rules): Compiled YARA rules.
        output_file (str): File to save MD5 hashes of unmatched files.
    """
    hash_count = 0  # Counter for total number of hashes written

    try:
        with open(output_file, 'w') as out:
            for root, _, files in os.walk(directory):
                for file in files:
                    file_path = os.path.join(root, file)
                    try:
                        # Check if the file matches any YARA rule
                        matches = rules.match(file_path)
                        if not matches:  # Only process files that do not match any rule
                            md5_hash = calculate_md5(file_path)
                            if md5_hash:
                                print(md5_hash)  # Print hash to console
                                out.write(md5_hash + '\n')  # Write only hash to output file
                                hash_count += 1
                    except yara.Error as ye:
                        print(f"[WARNING] YARA error scanning {file_path}: {ye}")
                    except Exception as e:
                        print(f"[ERROR] Unexpected error scanning {file_path}: {e}")

        # Report total number of hashes written and location of the output file
        print(f"\nScan completed.")
        print(f"Total number of hashes written: {hash_count}")
        print(f"Output file location: {os.path.abspath(output_file)}")

    except Exception as e:
        print(f"[ERROR] Failed to write to output file {output_file}: {e}")

if __name__ == "__main__":
    # Prompt user for directory to scan
    directory_to_scan = input("Enter directory to scan: ").strip()

    # Compile YARA rules
    try:
        yara_rules = compile_yara_rules()
    except Exception as e:
        print(f"[ERROR] Failed to compile YARA rules: {e}")
        exit(1)

    # Output filename for unmatched files' MD5 hashes
    output_filename = "XMZMD5.txt"

    # Check if the output file already exists and prompt user for action
    if os.path.exists(output_filename):
        overwrite_prompt = input(f"[WARNING] The file '{output_filename}' already exists. Do you want to overwrite it? (yes/no): ").strip().lower()

        if overwrite_prompt not in ['yes', 'y']:
            print("[INFO] Operation canceled by user.")
            exit(0)

    # Scan the directory
    if os.path.isdir(directory_to_scan):
        scan_directory(directory_to_scan, yara_rules, output_filename)
    else:
        print(f"[ERROR] The provided path is not a valid directory: {directory_to_scan}")
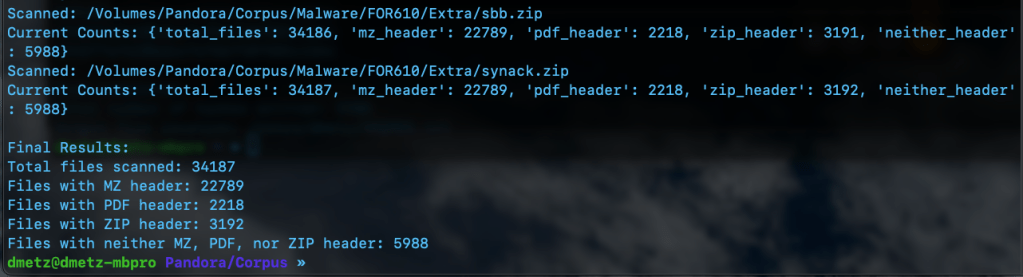
The third script is for counting and validation. I wanted to know the total number of files, and how many had the MZ header, were zip or pdf files, or none of the above. Based on the counts, the hash lists should contain a matching number of entries, the MZ’s for Windows malware samples and the “Neither Header Files” for the remaining binaries. Note: to run this script you will need to have the Python module “tabulate” installed. (pip install tabulate). There are 2 output options available, Detailed and Table View.


MZCount.py
import os
import yara
import time


def compile_yara_rules():
    """
    Compile YARA rules for MZ, PDF, and ZIP headers.

    Returns:
        yara.Rules: Compiled YARA rules.
    """
    rules = """
rule mz_header {
    meta:
        description = "Matches files with MZ header (Windows Executables)"
    strings:
        $mz = {4D 5A}  // MZ header in hex
    condition:
        $mz at 0  // Match if MZ header is at the start of the file
}

rule pdf_header {
    meta:
        description = "Matches files with PDF header"
    strings:
        $pdf = {25 50 44 46}  // PDF header in hex (%PDF)
    condition:
        $pdf at 0  // Match if PDF header is at the start of the file
}

rule zip_header {
    meta:
        description = "Matches files with ZIP header"
    strings:
        $zip = {50 4B 03 04}  // ZIP header in hex
    condition:
        $zip at 0  // Match if ZIP header is at the start of the file
}
"""
    try:
        return yara.compile(source=rules)
    except yara.SyntaxError as e:
        print(f"Error compiling YARA rules: {e}")
        raise


def display_table(counts):
    """
    Display the counts in a simple table format.

    Args:
        counts (dict): Dictionary containing counts for each file type.
    """
    # Clear console before displaying new table
    os.system('cls' if os.name == 'nt' else 'clear')  # Clears terminal for Windows ('cls') or Linux/Mac ('clear')

    # Print updated table
    print("\n+----------------------+---------+")
    print("| File Type           | Count   |")
    print("+----------------------+---------+")
    print(f"| Total Files         | {counts['total_files']:<7} |")
    print(f"| MZ Header Files     | {counts['mz_header']:<7} |")
    print(f"| PDF Header Files    | {counts['pdf_header']:<7} |")
    print(f"| ZIP Header Files    | {counts['zip_header']:<7} |")
    print(f"| Neither Header Files| {counts['neither_header']:<7} |")
    print("+----------------------+---------+")


def scan_and_count_files(directory, rules, use_table_display):
    """
    Scan files in a directory using YARA rules and count matches by header type.

    Args:
        directory (str): Path to the directory to scan.
        rules (yara.Rules): Compiled YARA rules.
        use_table_display (bool): Whether to use table display for live updates.

    Returns:
        dict: A dictionary with counts for total files, MZ headers, PDF headers, ZIP headers, and neither headers.
    """
    counts = {
        "total_files": 0,
        "mz_header": 0,
        "pdf_header": 0,
        "zip_header": 0,
        "neither_header": 0
    }

    # Walk through the directory and its subdirectories
    for root, _, files in os.walk(directory):
        for file in files:
            counts["total_files"] += 1
            file_path = os.path.join(root, file)

            try:
                # Open file in binary mode for YARA matching
                with open(file_path, "rb") as f:
                    data = f.read()

                # Match YARA rules against file content
                matches = rules.match(data=data)

                # Process matches
                if matches:
                    matched_rules = {match.rule for match in matches}
                    if "mz_header" in matched_rules:
                        counts["mz_header"] += 1
                    if "pdf_header" in matched_rules:
                        counts["pdf_header"] += 1
                    if "zip_header" in matched_rules:
                        counts["zip_header"] += 1
                else:
                    counts["neither_header"] += 1

            except Exception as e:
                print(f"Error scanning {file_path}: {e}")
                # Decrement total_files if an error occurs
                counts["total_files"] -= 1

            # Display updated output after processing each file
            if use_table_display:
                display_table(counts)
            else:
                print(f"Scanned: {file_path}")
                print(f"Current Counts: {counts}")

            time.sleep(0.1)  # Optional: Add a small delay for smoother updates

    return counts


if __name__ == "__main__":
    # Prompt user for directory to scan
    directory_to_scan = input("Enter directory to scan: ").strip()

    # Check if the directory exists
    if not os.path.isdir(directory_to_scan):
        print(f"Error: The directory '{directory_to_scan}' does not exist. Please enter a valid directory.")
        exit(1)

    # Prompt user for display format preference
    display_choice = input("Choose output format - (1) Detailed, (2) Table Display: ").strip()

    # Determine whether to use table display or original output format
    use_table_display = display_choice == "2"

    # Compile YARA rules
    yara_rules = compile_yara_rules()

    # Scan directory and count matches
    results = scan_and_count_files(directory_to_scan, yara_rules, use_table_display)

    # Final results display after completion
    print("\nFinal Results:")

    if use_table_display:
        display_table(results)

        # Handle case where no results were found
        if results["total_files"] == 0:
            print("No files were scanned. Please check your directory.")

    else:
        print(f"Total files scanned: {results['total_files']}")
        print(f"Files with MZ header: {results['mz_header']}")
        print(f"Files with PDF header: {results['pdf_header']}")
        print(f"Files with ZIP header: {results['zip_header']}")
        print(f"Files with neither MZ, PDF, nor ZIP header: {results['neither_header']}")
Double Checking the Hash Files
Finally we can use RegEx to count the number of MD5 hashes for each file. The RegEx looks for strings of 32 hexadecimal digits. (A-F and 0-9.)
grep -oE '\b[a-fA-F0-9]{32}\b' [filename].txt | wc -l
The number of hashes in the MZMD5.txt hash list matches the number of MZ files identified by YARA. Additionally, the number of non-MZ binaries in the hash list, XMZMD5.txt, matches the number of files when we exclude the Windows binaries and the pdf and zip files.
There you have it, the fruits of my labors combining a few of my favorite things (cue John Coltrane), YARA, Malware, Python, and using AI as tool to develop my coding skills. If you’d like to download the scripts for your own usage, they can be found at https://github.com/dwmetz/Toolbox/ (Miscellaneous PowerShell and Python scripts related to YARA and Malware Analysis.)


